Turn on suggestions
Auto-suggest helps you quickly narrow down your search results by suggesting possible matches as you type.
Showing results for
- Good Sam Community
- Everything RV
- RV Tips & Tricks
- Travel Trailer Hitch Set-up Procedure
Options
- Subscribe to RSS Feed
- Mark Topic as New
- Mark Topic as Read
- Float this Topic for Current User
- Bookmark
- Subscribe
- Mute
- Printer Friendly Page
Travel Trailer Hitch Set-up Procedure
Options
- Mark as New
- Bookmark
- Subscribe
- Mute
- Subscribe to RSS Feed
- Permalink
- Report Inappropriate Content
Jun-06-2006 11:06 AM
The following is a compilation of two posts by Les Adams, former moderator of the Travel Trailer forum, author of many RVing articles, and long time RV'er and friend. It is the document that I have been sending to many members to help them set up their weight distributing hitch. I have decided to post it here and make it a sticky at the top of the Towing forum so all who want can read it or print it. Hope it helps some of you out.
Note: Not all trucks will squat or settle evenly when the WD bars are put under tension. See this post for pictures of reason why. There is a long thread on the reason for this, especially concerning GM vehicles. See thread here. In fact, some of the tow vehicle manufacturers and hitch makers now recommend only returning the front measurement to slightly above unloaded height and not lower. They also recommend that the rear not be above unloaded height.
The above will get you in the ball park but the best way to determine how much weight is being transferred is to actually weigh your rig on a scale. Scales can be found at grain elevators, moving companies, truck stops and many other places. You can locate a scale near you here.
One other note, not all WD bars should be parallel to the ground. Many trunnion style bars need to be pointing down a bit rather than level. The round style bars function best when they are level or parallel with the ground or trailer A frame.
Another resource that you might want to check out before you start towing is this one, NHTSA Towing Guide, and this one by member DavidG, Davids' RV Tips.
In addition, there are three videos that can help you out - courtesy of E-Trailer.com.
Dual Cam HP Sway Control installation video
Newer Dual Cam HP Sway Control installation video
Weight Distribution hitch and friction sway control installation video
Barney
TT Hitch Set-Up Procedure
By Les Adams (revised by Ron Gratz and BarneyS with permission)
(as posted on RV.Net Open Forum)
This has been discussed a few times before on the forum but I'll repeat it again for you... It appears to be a very popular topic...
Basically what your trying to do is to keep the trailer as level as possible when the w/d bars are snapped up and the TT tongue weight is distributed so the front of the Tow Vehicle is close to its unhitched height....
With the TT and truck on a level surface and unhitched, measure the wheel well openings of the truck to ground level... Record these measurements for future reference during the adjustment procedure...
Level the trailer with the tongue jack... Measure from the extreme front and back of the trailer frame to ground until the measurement is the same... Then measure from the ground to the inside top of the ball coupler of the trailer...
At this point some will set the hitch head ball height about 1/2 to 1" higher than this measurement as a starting point... Some start with the ball height 1/2 to 1" lower (including myself)... At this preliminary stage it doesn't make much difference which way you go, up or below as you'll more than likely readjust it again before your through with the procedure...
(Note: On older vehicles, the procedure was to have the WD system lower the whole vehicle evenly, front and back (equal squat) but newer recommendations have changed that procedure. The following steps are aligned with the newest recommendations from the various hitch and vehicle manufacturers.)
Hook up the trailer, but do not snap up the w/d bars... Measure the front wheel well again... Subtract the first front height from the second front height... This is the amount of front end "RISE". Now, snap up the w/d bars...
Measure the truck wheel wells again...Basically what you're trying to do is keep the trailer as level as possible when the w/d bars are snapped up and the TT tongue weight is distributed so the front of the TV is close to its unhitched height....
Ford specs for 2011 and newer trucks say the w/d should be adjusted to eliminate about 50% of the front end RISE... IOW, if the front rises 1.5" initially, the RISE should be reduced to around 3/4"...
Ford specs for SUVs say the w/d should be adjusted to return the front bumper to within 1/2" of the unhitched height...
Equal-i-zer specs, beginning in 2010, say the w/d should be adjusted to eliminate at least 50% of the rise...
GMC specifies that 100% of the rise should be eliminated...
Curt Mfg says, "A weight distributing system is properly set up and coupled when the tow vehicle has settled with the front wheel opening at the original uncoupled dimension measured and slightly lower in the rear. ~ This will assure the front wheel load remains unchanged. This results in good handling and the desired load on the rear axle."...
Reese 2009 specs say the final front end height must be less than or equal to the unhitched height...
Eaz-lift, reported to have invented the w/d hitch in 1952, says, "Remeasure front and back of towing vehicle and have both settle the same amount or up to an inch lower in back by adjusting chain on spring bars."
From The Toyota manual..
"If using a weight distribution hitch when towing, return the front axle to the same weight as before the trailer connection.
If front axle weight cannot be measured directly, measure the front fender height above the front axle before connection. Adjust weight distribution hitch torque until front fender is returned to the same height as before connection.
Do not reduce front fender height below original measurement."
All of the above, except the 2011+ Ford trucks, seem to indicate it is okay for the front end to be returned to the unhitched height...
If your w.d bar adjustment is sufficient, the front of the truck should have settled downward approximately to the same distance as it was at originally. Do not worry about the rear as it will take care of itself if the front is correct. If the front is still high, increase tension on the w.d bars... You may have to tilt the hitch head down to gain additional tension from the w/d bars... If the front of the truck is lower (unlikely!!) relax the tension of the w/d bars... Too much weight on the front axle will cause premature wear of components and likely make handling a bit unstable...
Once the weight distribution measurements are where they should be, adjust the hitch head ball height so that the trailer is as close to level as possible... If perfectly level can't be obtained, opt for a bit nose down attitude... This will increase rear end clearance when going up ramps and such and will shift the TT center of gravity forward for a bit more hitch weight...
At the end of this procedure you should have 5 or 6 chain links between the snap up plates and the bars... This distance varies somewhat from hitch manufacturer to hitch manufacturer, but you want enough distance between the bars and snap-up plates so that there is no binding of the w/d bars... The round style w/d bars should be level with the frame when in tension. If using the trunnion style bars, they should slant downward to the rear...
After adjusting ball height, do a final wheel well measurement... If it's the same or close to it, your ready to roll...
This procedure is for a standard weight distributing hitch... It will vary somewhat with some of the anti sway hitches like the Reese Dual Cam and the Equal-i-zer and others...
Best Regards,
Les
Three leveling rules:
1) Use your spring bars to return the front of the truck to approximately the same height as it was originally.
2) Use the height of the hitch head on the shank to level your trailer.
3) Use the tilt of your hitch head to level your tightened spring bars.
2nd Post by Les Adams
(Similar to above but slightly different approach)
Park the TT and truck on level ground... Level the TT (using the tongue jack) by measuring the frame front and back with reference to ground level... Measure from ground level to inside top of trailer ball coupler... Record this measurement...
Set unloaded ball height on truck hitch head about 1/2' to 1" lower than this measurement... The exact amount will depend on the stiffness of your truck suspension...
Measure all four truck wheel wells with trailer unhooked... Record this measurement...
Hook up trailer and snap up w/d bars so TT appears to be level... Measure truck wheel well distance again... If front of truck is same height as, or slightly higher than, the unhitched height, you're done (not likely on the first try!!)...
If front of truck is not at or close to the unhitched height, adjust w/d bars as necessary...
If the front is too high, you may have to increase w/d head tilt and/or decrease tensioned chain link count to achieve more w/d bar tension...
If the front is too low, you may have to decrease w/d head tilt and/or increase tensioned chain link count to achieve less w/d bar tension...
The amount of tension required will depend on TT tongue weight and on TV and TT dimensions...
Round style W/D bars should be parallel with trailer frame when these adjustments are complete... If W/D bars are not level with TT frame using a given number of chain links (5 minimum) or the trunnion bars are not slanted downward slightly, tilt w/d bars up or down with adjustment screw, washers, etc., (whatever method is employed on your hitch) and readjust as required, dropping or picking up chain links as needed for necessary tension while maintaining a level condition to the TT frame...
Check the truck's front end height again after these adjustments...
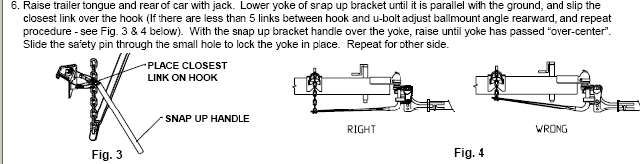
Most hitch manufacturers want to see at least 5 chain links between the snap up plates and w/d bars (under tension)... This is to avoid binding of the w/d bars in turns and when backing...
Once you have achieved the proper truck front end height, check TT for levelness again... If TT is not level, adjust ball height on hitch head as necessary to level TT... If you can't achieve perfectly level, opt for a bit nose down... This will increase TT rear end clearance on sloping driveways and add a bit more hitch weight as the TT center of gravity shifts forward a bit with the nose down...
All these adjustments will interact with one another to some degree so a few readjustments will most likely be required...
When you are done, the w/d bars should be level (except trunnion w/d bars), the TT should be level and the front of the truck should be close to or slightly above the unhitched height...
It's pretty tough to get everything EXACTLY perfect, but get the TT as close to level as you can and the front of the truck as close to the unhitched height as you can... My truck is almost equal squat, maybe a 1/4" lower in the back... Avoid the front end of the truck being lower than the unhitched height... This indicates too much weight is being transferred to the front axle and could cause handling problems and excessive front tire wear...
My TT is level within 1/4" front to rear, being a bit nose down... My w/d bars have an upward set to them, but the Pullrite hitch adjustment is a bit different than others as it's w/d bars do not flex like a normal w/d hitch... So that part is pretty normal for my Pullrite hitch...
The procedure sounds difficult but really is not... It can be a bit tedious trying to achieve a perfect condition, but is not difficult... You should be pretty near perfect after a few readjustments and you'll probably find your TT tows and handles much better...
I have seldom seen a hitch adjustment from a dealership that couldn't be improved on with a bit of fine adjustment...
Best Regards,
Les
The following has been added on 6/7/06 to add specific information on the Dual Cam setup in conjunction with the WD hitch.
Barney
Posted by JBarca on 6/06/06
Let me see if I can help on this "5 links" question. This topic comes up a lot and the instructions are confusing when the HP DC is added. Sorry this post is long and windy, but it has pics and some good data in it if you are trying to set one of these up.
I found this out as I first had just the HP trunnion style WD hitch with a sway bar, then later added a HP DC. Following the instructions exactly did not ideally yield the right end results. Every TT tongue is setup up different and the instructions do not cover every TT tongue. After 2 lengthy letters to Reese Tech service that went all the way to Reese engineering for clarification along with several phone calls, I have found out what the end result they want to achieve. I praise the Reese hitch, however their instructions need some updating.
Edit: 2-13-11 Corrected Reese Links
Reese prints at least 2 sets of directions as Huntingdog pointed out for WD hitches. The first set is for just the HP trunnion style hitch. Reese Trunnion Bar WD setup and the Reese Round Bar WD setup . You get these sets of instructions when you buy just the WD hitch. No DC yet.
Here is the confusing part. The reasons for "5 links" minimums is not clear at all when it comes to the HP DC. It has great merit on just the WD hitch portion.
See here on the Trunnion style HP WD instructions it talks on the "5 links" that are bolted to the END of the spring bar.

And see here on the Round HP WD instructions it talks on the "5 links" again that are bolted to the END of the spring bar.
On the WD hitch with NO Dual cam they need the 5 links minimum in most cases to make sure the spring bar does not bind up in the snap up bracket or crash the frame with the spring bar during turns. If the chain has too few links a crash occurs. This has nothing to do with the DC. YET anyway. Actually on some very large ~ 8" frame trailers, you may need more than 5 links minimum to not crash the frame. And on some narrow frames, like 3", 4 links may be OK.
Reese's sister company, DrawTite, has a better explanation in their instructions on why the "5 links' min. See here from their older instructions.
They also send out the same WD hitch instructions when you buy the complete Straightline hitch package, which is the WD hitch and the HP Dual cam kit. But they add the separate HP DC instructions NOTE: In early 2010 Reese upgraded the design of the HP Dual Cam system. As such there are 2 instruction sets, pending which vintage you have. Here is the prior 2010 upgrades Prior 2010 HP DC and here is the 2010 and forward instructions 2010 upgraded HP DC
OK so now we know WHY they are stating the "5 links" on a normal WD hitch. So now we start adding the HP DC.
Just like Huntingdog said the HP DC instructions talks about setting up the WD per the WD hitch instructions.
See excerpt here.
OK we just followed the WD setup instructions. We had "5 links" minimum when the chains where bolted to the rear of the spring bar. The DC instructions said "SET UP THE WD". This means tilt the hitch head angle and apply load to the spring bars by the snap up chains and do not use less than 5 links. You keep tilting the head as needed to apply more or less WD. And you can tweak a chain link as well, just not less than 5. Now we have the WD on the truck all set. Front end is where it is suppose to be at. Right??? This is exactly what the instructions tell us to do. And what I did when I first had the WD hitch only. No DC.
Now we continue on in the instructions and add the HP DC. Remember your hitch head is already tilted to transfer WD properly. The snap up links you are using under load bolted to the ends of thee spring bars was now at least set to 5 as that was the minimum before. Say you picked 5 to set up the WD. It's OK and the ball tilt works with this spring bar loading.
Now along comes the DC kit to add on. The spring bars and hitch head angle where already set up from earlier. When you unbolt the chains from the ends of the spring bars and bolt them to the keeper plates, if you where setup on 5 links on just the WD kit, you will end up being about 3 to 4 links under load now for the same vertical distance and spring bar loading. The keeper plate uses about 2 1/2 ish chain links of space.
There is no where in the HP DC instructions that it talks about the minimum links under load when you bolt on the DC keeper plates. It is just not in there. And with the DC attached the spring bar will never swing under the frame and crash as the DC only allows the bar to slide forward and backward over the cam. See here:
And here is 4 links. You do not hit the frame as the DC makes a guide to hold the bar, but there are other issues with 4 links. More below
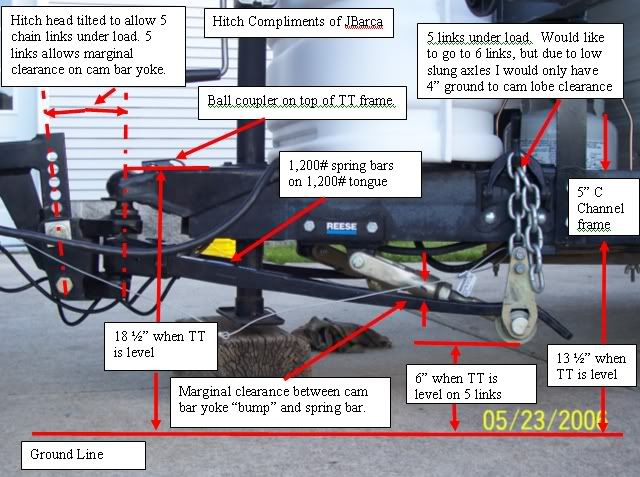
HOWEVER what they do not tell you is that on the HP DC you actually do want at least 5 links under load to gain the correct clearance between the spring bar and cam yoke. This is a falling out in the instructions. Ideally you want 6 or 7 links, even 8 if you can run that way pending your TT tongue layout and have enough ground clearance.
If you do not have adequate clearance between the cam yoke and the spring bar, in a compound angle turn you can create a bind up that may break the cam bar off. The spring bar acts as a lever against the pivot point of the cam bar yoke. If you want to read more up on this, see this post. DC Problems Post Other forum members helped do a lot of research on why some folks where breaking the cam bar. Not realizing the proper relationship setup was one of the main causes.
Huntingdog, you had the right requirement of 5 links min, but you were listing the wrong reason.
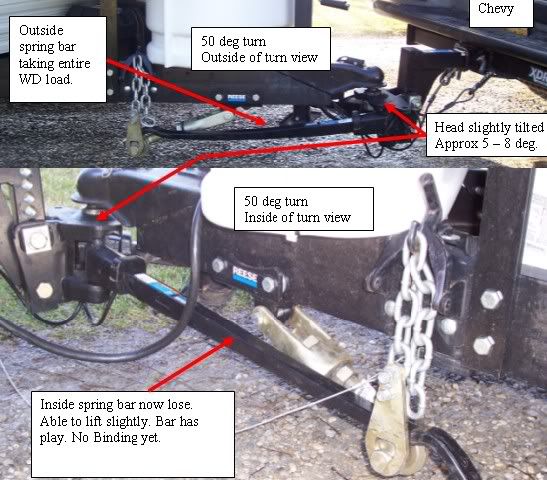
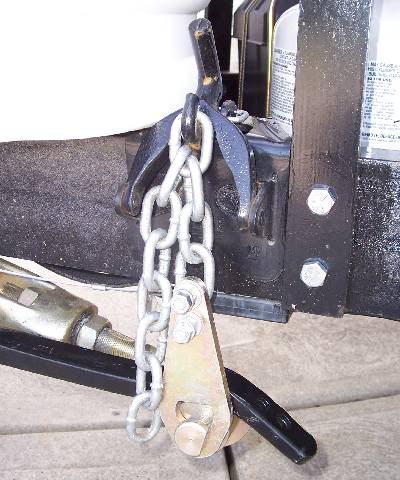
This is easier to show with pictures. First see my hitch setup. I am running on the 5 links. I really would like to run on 6 but I have low slung axles and that would only give me 4 inches ground clearance. Not good. I also have my TT ball coupler on top of the frame. This combo makes it complex to adjust out of the problem, but doable. In my case I had to shim out the frame bracket to gain more daylight between the spring bar and cam yoke bump. My setup is not perfect, but I can turn 74 degrees on level ground and not bind unless I get in a real bad compound angle turn. 74 degrees in my case is almost a jack knife.
My hitch showing the relationships.
And here is a top shot showing the clearance I shimmed to create between spring bar and came yoke.
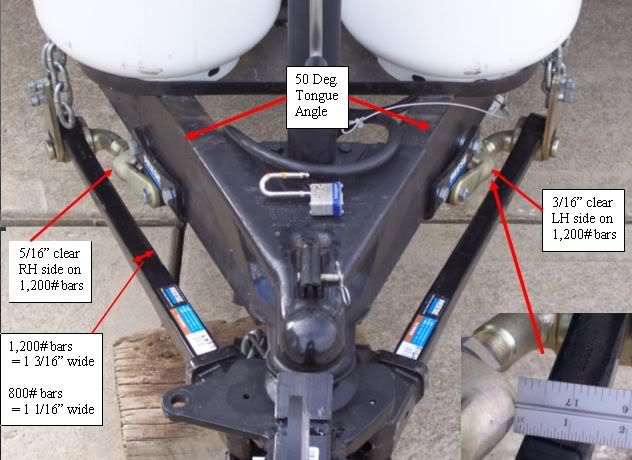
On my rig I do not have a slide and my TT is low to the ground. So I had to get put of the binding issues using alternate means not mentioned in the instructions.
Here is TURK2500's hitch setup. He has a slide, has good ground clearance and he has worked and adjusted his DC setup to run on 7 links. His ball coupler is also on the bottom of the TT frame making it almost ideal. There is lots of clearance between the spring bar and cam yoke.

Basically, if you are setting up a WD hitch with DC right out of the box, setup 6 ideally 7 links under load to start with if you can with the chains bolted to the chain keeper plate. Look for the cam bar yoke clearance pointed out above. Then tilt the hitch head to get the right WD transfer on your TV. Once you are set you should not have to tweak chains from this setting unless a fair amount of tongue weight is added or removed from the TV or TT. Always setup up the hitch loaded ready to go camping. When you move the hitch head up and down the hitch shank to level out the TT, you may have to tweak the cams settings and the hitch head tilt one last time. Depending on tongue weight, spring bars rating and how much you are moving the head up and down the shank, this moving interacts with WD a small amount and you have to re-tweak once all set and leveled out.
Hopefully this will help some fellow campers not learn some of this the hard way like we did.
Happy camping.
John
Posted by Turk2500 on 6/07/06
All,
As John noted in his post, Reese has a little work to do with their Installation Instructions. It has also been confirmed with Reese that in their HP Dual Cam Installation Instructions, item #2 below, there has been a carry-over text error from an earlier Reese document. Please note:
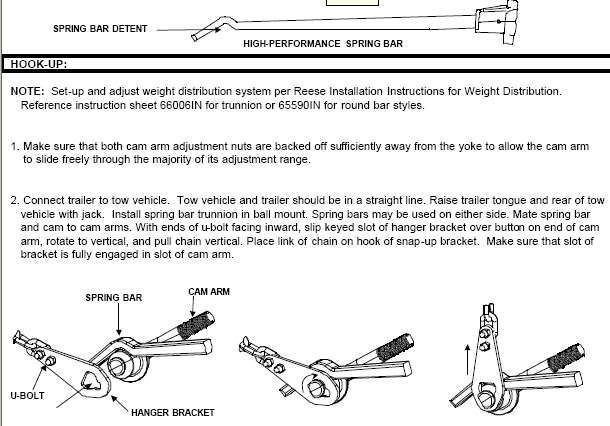
Reads: "With ends of U-bolt facing inward,".
Should Read: "With ends of U-bolt facing outward,".
The Reese assembly/connection diagrams above are correct, showing the threaded ends of the U-bolt facing outward when utilizing the "FLAT" hanger bracket.
SPECIAL NOTE: If you have the latest version of the HP Dual Cam utilizing a hanger bracket with a slight "BEND" in it, in this case the U-bolt threads should be facing inward as shown below:

I would like to also add that having just returned from a 6,800 mile cross country trip, the Reese HP Dual Cam system preformed great. A considerable improvement over my prior friction control sway unit.
Turk2500 🙂
Note: Not all trucks will squat or settle evenly when the WD bars are put under tension. See this post for pictures of reason why. There is a long thread on the reason for this, especially concerning GM vehicles. See thread here. In fact, some of the tow vehicle manufacturers and hitch makers now recommend only returning the front measurement to slightly above unloaded height and not lower. They also recommend that the rear not be above unloaded height.
The above will get you in the ball park but the best way to determine how much weight is being transferred is to actually weigh your rig on a scale. Scales can be found at grain elevators, moving companies, truck stops and many other places. You can locate a scale near you here.
One other note, not all WD bars should be parallel to the ground. Many trunnion style bars need to be pointing down a bit rather than level. The round style bars function best when they are level or parallel with the ground or trailer A frame.
Another resource that you might want to check out before you start towing is this one, NHTSA Towing Guide, and this one by member DavidG, Davids' RV Tips.
In addition, there are three videos that can help you out - courtesy of E-Trailer.com.
Dual Cam HP Sway Control installation video
Newer Dual Cam HP Sway Control installation video
Weight Distribution hitch and friction sway control installation video
Barney
TT Hitch Set-Up Procedure
By Les Adams (revised by Ron Gratz and BarneyS with permission)
(as posted on RV.Net Open Forum)
This has been discussed a few times before on the forum but I'll repeat it again for you... It appears to be a very popular topic...
Basically what your trying to do is to keep the trailer as level as possible when the w/d bars are snapped up and the TT tongue weight is distributed so the front of the Tow Vehicle is close to its unhitched height....
With the TT and truck on a level surface and unhitched, measure the wheel well openings of the truck to ground level... Record these measurements for future reference during the adjustment procedure...
Level the trailer with the tongue jack... Measure from the extreme front and back of the trailer frame to ground until the measurement is the same... Then measure from the ground to the inside top of the ball coupler of the trailer...
At this point some will set the hitch head ball height about 1/2 to 1" higher than this measurement as a starting point... Some start with the ball height 1/2 to 1" lower (including myself)... At this preliminary stage it doesn't make much difference which way you go, up or below as you'll more than likely readjust it again before your through with the procedure...
(Note: On older vehicles, the procedure was to have the WD system lower the whole vehicle evenly, front and back (equal squat) but newer recommendations have changed that procedure. The following steps are aligned with the newest recommendations from the various hitch and vehicle manufacturers.)
Hook up the trailer, but do not snap up the w/d bars... Measure the front wheel well again... Subtract the first front height from the second front height... This is the amount of front end "RISE". Now, snap up the w/d bars...
Measure the truck wheel wells again...Basically what you're trying to do is keep the trailer as level as possible when the w/d bars are snapped up and the TT tongue weight is distributed so the front of the TV is close to its unhitched height....
Ford specs for 2011 and newer trucks say the w/d should be adjusted to eliminate about 50% of the front end RISE... IOW, if the front rises 1.5" initially, the RISE should be reduced to around 3/4"...
Ford specs for SUVs say the w/d should be adjusted to return the front bumper to within 1/2" of the unhitched height...
Equal-i-zer specs, beginning in 2010, say the w/d should be adjusted to eliminate at least 50% of the rise...
GMC specifies that 100% of the rise should be eliminated...
Curt Mfg says, "A weight distributing system is properly set up and coupled when the tow vehicle has settled with the front wheel opening at the original uncoupled dimension measured and slightly lower in the rear. ~ This will assure the front wheel load remains unchanged. This results in good handling and the desired load on the rear axle."...
Reese 2009 specs say the final front end height must be less than or equal to the unhitched height...
Eaz-lift, reported to have invented the w/d hitch in 1952, says, "Remeasure front and back of towing vehicle and have both settle the same amount or up to an inch lower in back by adjusting chain on spring bars."
From The Toyota manual..
"If using a weight distribution hitch when towing, return the front axle to the same weight as before the trailer connection.
If front axle weight cannot be measured directly, measure the front fender height above the front axle before connection. Adjust weight distribution hitch torque until front fender is returned to the same height as before connection.
Do not reduce front fender height below original measurement."
All of the above, except the 2011+ Ford trucks, seem to indicate it is okay for the front end to be returned to the unhitched height...
If your w.d bar adjustment is sufficient, the front of the truck should have settled downward approximately to the same distance as it was at originally. Do not worry about the rear as it will take care of itself if the front is correct. If the front is still high, increase tension on the w.d bars... You may have to tilt the hitch head down to gain additional tension from the w/d bars... If the front of the truck is lower (unlikely!!) relax the tension of the w/d bars... Too much weight on the front axle will cause premature wear of components and likely make handling a bit unstable...
Once the weight distribution measurements are where they should be, adjust the hitch head ball height so that the trailer is as close to level as possible... If perfectly level can't be obtained, opt for a bit nose down attitude... This will increase rear end clearance when going up ramps and such and will shift the TT center of gravity forward for a bit more hitch weight...
At the end of this procedure you should have 5 or 6 chain links between the snap up plates and the bars... This distance varies somewhat from hitch manufacturer to hitch manufacturer, but you want enough distance between the bars and snap-up plates so that there is no binding of the w/d bars... The round style w/d bars should be level with the frame when in tension. If using the trunnion style bars, they should slant downward to the rear...
After adjusting ball height, do a final wheel well measurement... If it's the same or close to it, your ready to roll...
This procedure is for a standard weight distributing hitch... It will vary somewhat with some of the anti sway hitches like the Reese Dual Cam and the Equal-i-zer and others...
Best Regards,
Les
Three leveling rules:
1) Use your spring bars to return the front of the truck to approximately the same height as it was originally.
2) Use the height of the hitch head on the shank to level your trailer.
3) Use the tilt of your hitch head to level your tightened spring bars.
2nd Post by Les Adams
(Similar to above but slightly different approach)
Park the TT and truck on level ground... Level the TT (using the tongue jack) by measuring the frame front and back with reference to ground level... Measure from ground level to inside top of trailer ball coupler... Record this measurement...
Set unloaded ball height on truck hitch head about 1/2' to 1" lower than this measurement... The exact amount will depend on the stiffness of your truck suspension...
Measure all four truck wheel wells with trailer unhooked... Record this measurement...
Hook up trailer and snap up w/d bars so TT appears to be level... Measure truck wheel well distance again... If front of truck is same height as, or slightly higher than, the unhitched height, you're done (not likely on the first try!!)...
If front of truck is not at or close to the unhitched height, adjust w/d bars as necessary...
If the front is too high, you may have to increase w/d head tilt and/or decrease tensioned chain link count to achieve more w/d bar tension...
If the front is too low, you may have to decrease w/d head tilt and/or increase tensioned chain link count to achieve less w/d bar tension...
The amount of tension required will depend on TT tongue weight and on TV and TT dimensions...
Round style W/D bars should be parallel with trailer frame when these adjustments are complete... If W/D bars are not level with TT frame using a given number of chain links (5 minimum) or the trunnion bars are not slanted downward slightly, tilt w/d bars up or down with adjustment screw, washers, etc., (whatever method is employed on your hitch) and readjust as required, dropping or picking up chain links as needed for necessary tension while maintaining a level condition to the TT frame...
Check the truck's front end height again after these adjustments...
Most hitch manufacturers want to see at least 5 chain links between the snap up plates and w/d bars (under tension)... This is to avoid binding of the w/d bars in turns and when backing...
Once you have achieved the proper truck front end height, check TT for levelness again... If TT is not level, adjust ball height on hitch head as necessary to level TT... If you can't achieve perfectly level, opt for a bit nose down... This will increase TT rear end clearance on sloping driveways and add a bit more hitch weight as the TT center of gravity shifts forward a bit with the nose down...
All these adjustments will interact with one another to some degree so a few readjustments will most likely be required...
When you are done, the w/d bars should be level (except trunnion w/d bars), the TT should be level and the front of the truck should be close to or slightly above the unhitched height...
It's pretty tough to get everything EXACTLY perfect, but get the TT as close to level as you can and the front of the truck as close to the unhitched height as you can... My truck is almost equal squat, maybe a 1/4" lower in the back... Avoid the front end of the truck being lower than the unhitched height... This indicates too much weight is being transferred to the front axle and could cause handling problems and excessive front tire wear...
My TT is level within 1/4" front to rear, being a bit nose down... My w/d bars have an upward set to them, but the Pullrite hitch adjustment is a bit different than others as it's w/d bars do not flex like a normal w/d hitch... So that part is pretty normal for my Pullrite hitch...
The procedure sounds difficult but really is not... It can be a bit tedious trying to achieve a perfect condition, but is not difficult... You should be pretty near perfect after a few readjustments and you'll probably find your TT tows and handles much better...
I have seldom seen a hitch adjustment from a dealership that couldn't be improved on with a bit of fine adjustment...
Best Regards,
Les
The following has been added on 6/7/06 to add specific information on the Dual Cam setup in conjunction with the WD hitch.
Barney
Posted by JBarca on 6/06/06
Let me see if I can help on this "5 links" question. This topic comes up a lot and the instructions are confusing when the HP DC is added. Sorry this post is long and windy, but it has pics and some good data in it if you are trying to set one of these up.
I found this out as I first had just the HP trunnion style WD hitch with a sway bar, then later added a HP DC. Following the instructions exactly did not ideally yield the right end results. Every TT tongue is setup up different and the instructions do not cover every TT tongue. After 2 lengthy letters to Reese Tech service that went all the way to Reese engineering for clarification along with several phone calls, I have found out what the end result they want to achieve. I praise the Reese hitch, however their instructions need some updating.
Edit: 2-13-11 Corrected Reese Links
Reese prints at least 2 sets of directions as Huntingdog pointed out for WD hitches. The first set is for just the HP trunnion style hitch. Reese Trunnion Bar WD setup and the Reese Round Bar WD setup . You get these sets of instructions when you buy just the WD hitch. No DC yet.
Here is the confusing part. The reasons for "5 links" minimums is not clear at all when it comes to the HP DC. It has great merit on just the WD hitch portion.
See here on the Trunnion style HP WD instructions it talks on the "5 links" that are bolted to the END of the spring bar.
And see here on the Round HP WD instructions it talks on the "5 links" again that are bolted to the END of the spring bar.
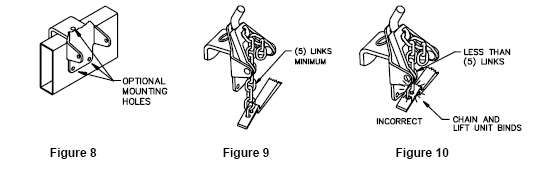
On the WD hitch with NO Dual cam they need the 5 links minimum in most cases to make sure the spring bar does not bind up in the snap up bracket or crash the frame with the spring bar during turns. If the chain has too few links a crash occurs. This has nothing to do with the DC. YET anyway. Actually on some very large ~ 8" frame trailers, you may need more than 5 links minimum to not crash the frame. And on some narrow frames, like 3", 4 links may be OK.
Reese's sister company, DrawTite, has a better explanation in their instructions on why the "5 links' min. See here from their older instructions.
They also send out the same WD hitch instructions when you buy the complete Straightline hitch package, which is the WD hitch and the HP Dual cam kit. But they add the separate HP DC instructions NOTE: In early 2010 Reese upgraded the design of the HP Dual Cam system. As such there are 2 instruction sets, pending which vintage you have. Here is the prior 2010 upgrades Prior 2010 HP DC and here is the 2010 and forward instructions 2010 upgraded HP DC
OK so now we know WHY they are stating the "5 links" on a normal WD hitch. So now we start adding the HP DC.
Just like Huntingdog said the HP DC instructions talks about setting up the WD per the WD hitch instructions.
See excerpt here.
OK we just followed the WD setup instructions. We had "5 links" minimum when the chains where bolted to the rear of the spring bar. The DC instructions said "SET UP THE WD". This means tilt the hitch head angle and apply load to the spring bars by the snap up chains and do not use less than 5 links. You keep tilting the head as needed to apply more or less WD. And you can tweak a chain link as well, just not less than 5. Now we have the WD on the truck all set. Front end is where it is suppose to be at. Right??? This is exactly what the instructions tell us to do. And what I did when I first had the WD hitch only. No DC.
Now we continue on in the instructions and add the HP DC. Remember your hitch head is already tilted to transfer WD properly. The snap up links you are using under load bolted to the ends of thee spring bars was now at least set to 5 as that was the minimum before. Say you picked 5 to set up the WD. It's OK and the ball tilt works with this spring bar loading.
Now along comes the DC kit to add on. The spring bars and hitch head angle where already set up from earlier. When you unbolt the chains from the ends of the spring bars and bolt them to the keeper plates, if you where setup on 5 links on just the WD kit, you will end up being about 3 to 4 links under load now for the same vertical distance and spring bar loading. The keeper plate uses about 2 1/2 ish chain links of space.
There is no where in the HP DC instructions that it talks about the minimum links under load when you bolt on the DC keeper plates. It is just not in there. And with the DC attached the spring bar will never swing under the frame and crash as the DC only allows the bar to slide forward and backward over the cam. See here:
And here is 4 links. You do not hit the frame as the DC makes a guide to hold the bar, but there are other issues with 4 links. More below
HOWEVER what they do not tell you is that on the HP DC you actually do want at least 5 links under load to gain the correct clearance between the spring bar and cam yoke. This is a falling out in the instructions. Ideally you want 6 or 7 links, even 8 if you can run that way pending your TT tongue layout and have enough ground clearance.
If you do not have adequate clearance between the cam yoke and the spring bar, in a compound angle turn you can create a bind up that may break the cam bar off. The spring bar acts as a lever against the pivot point of the cam bar yoke. If you want to read more up on this, see this post. DC Problems Post Other forum members helped do a lot of research on why some folks where breaking the cam bar. Not realizing the proper relationship setup was one of the main causes.
Huntingdog, you had the right requirement of 5 links min, but you were listing the wrong reason.
This is easier to show with pictures. First see my hitch setup. I am running on the 5 links. I really would like to run on 6 but I have low slung axles and that would only give me 4 inches ground clearance. Not good. I also have my TT ball coupler on top of the frame. This combo makes it complex to adjust out of the problem, but doable. In my case I had to shim out the frame bracket to gain more daylight between the spring bar and cam yoke bump. My setup is not perfect, but I can turn 74 degrees on level ground and not bind unless I get in a real bad compound angle turn. 74 degrees in my case is almost a jack knife.
My hitch showing the relationships.
And here is a top shot showing the clearance I shimmed to create between spring bar and came yoke.
On my rig I do not have a slide and my TT is low to the ground. So I had to get put of the binding issues using alternate means not mentioned in the instructions.
Here is TURK2500's hitch setup. He has a slide, has good ground clearance and he has worked and adjusted his DC setup to run on 7 links. His ball coupler is also on the bottom of the TT frame making it almost ideal. There is lots of clearance between the spring bar and cam yoke.
Basically, if you are setting up a WD hitch with DC right out of the box, setup 6 ideally 7 links under load to start with if you can with the chains bolted to the chain keeper plate. Look for the cam bar yoke clearance pointed out above. Then tilt the hitch head to get the right WD transfer on your TV. Once you are set you should not have to tweak chains from this setting unless a fair amount of tongue weight is added or removed from the TV or TT. Always setup up the hitch loaded ready to go camping. When you move the hitch head up and down the hitch shank to level out the TT, you may have to tweak the cams settings and the hitch head tilt one last time. Depending on tongue weight, spring bars rating and how much you are moving the head up and down the shank, this moving interacts with WD a small amount and you have to re-tweak once all set and leveled out.
Hopefully this will help some fellow campers not learn some of this the hard way like we did.
Happy camping.
John
Posted by Turk2500 on 6/07/06
All,
As John noted in his post, Reese has a little work to do with their Installation Instructions. It has also been confirmed with Reese that in their HP Dual Cam Installation Instructions, item #2 below, there has been a carry-over text error from an earlier Reese document. Please note:
Reads: "With ends of U-bolt facing inward,".
Should Read: "With ends of U-bolt facing outward,".
The Reese assembly/connection diagrams above are correct, showing the threaded ends of the U-bolt facing outward when utilizing the "FLAT" hanger bracket.
SPECIAL NOTE: If you have the latest version of the HP Dual Cam utilizing a hanger bracket with a slight "BEND" in it, in this case the U-bolt threads should be facing inward as shown below:
I would like to also add that having just returned from a 6,800 mile cross country trip, the Reese HP Dual Cam system preformed great. A considerable improvement over my prior friction control sway unit.
Turk2500 🙂
2004 Sunnybrook Titan 30FKS TT
Hensley "Arrow" 1400# hitch (Sold)
Not towing now.
Former tow vehicles were 2016 Ram 2500 CTD, 2002 Ford F250, 7.3 PSD, 1997 Ram 2500 5.9 gas engine
Hensley "Arrow" 1400# hitch (Sold)
Not towing now.
Former tow vehicles were 2016 Ram 2500 CTD, 2002 Ford F250, 7.3 PSD, 1997 Ram 2500 5.9 gas engine
0 REPLIES 0


