Turn on suggestions
Auto-suggest helps you quickly narrow down your search results by suggesting possible matches as you type.
Showing results for
- Good Sam Community
- Groups
- Motorhome Group
- Forum
- Fiberglass Repair Help
Options
- Subscribe to RSS Feed
- Mark Topic as New
- Mark Topic as Read
- Float this Topic for Current User
- Bookmark
- Subscribe
- Mute
- Printer Friendly Page
Fiberglass Repair Help
Options
- Mark as New
- Bookmark
- Subscribe
- Mute
- Subscribe to RSS Feed
- Permalink
- Report Inappropriate Content
Oct-30-2017 04:40 PM
Getting ready to replace the front clearance lights with new LED ones when I noticed some fiberglass issues on the front of the cabover cap. Several long cracks and some weird surface markings under the black paint.

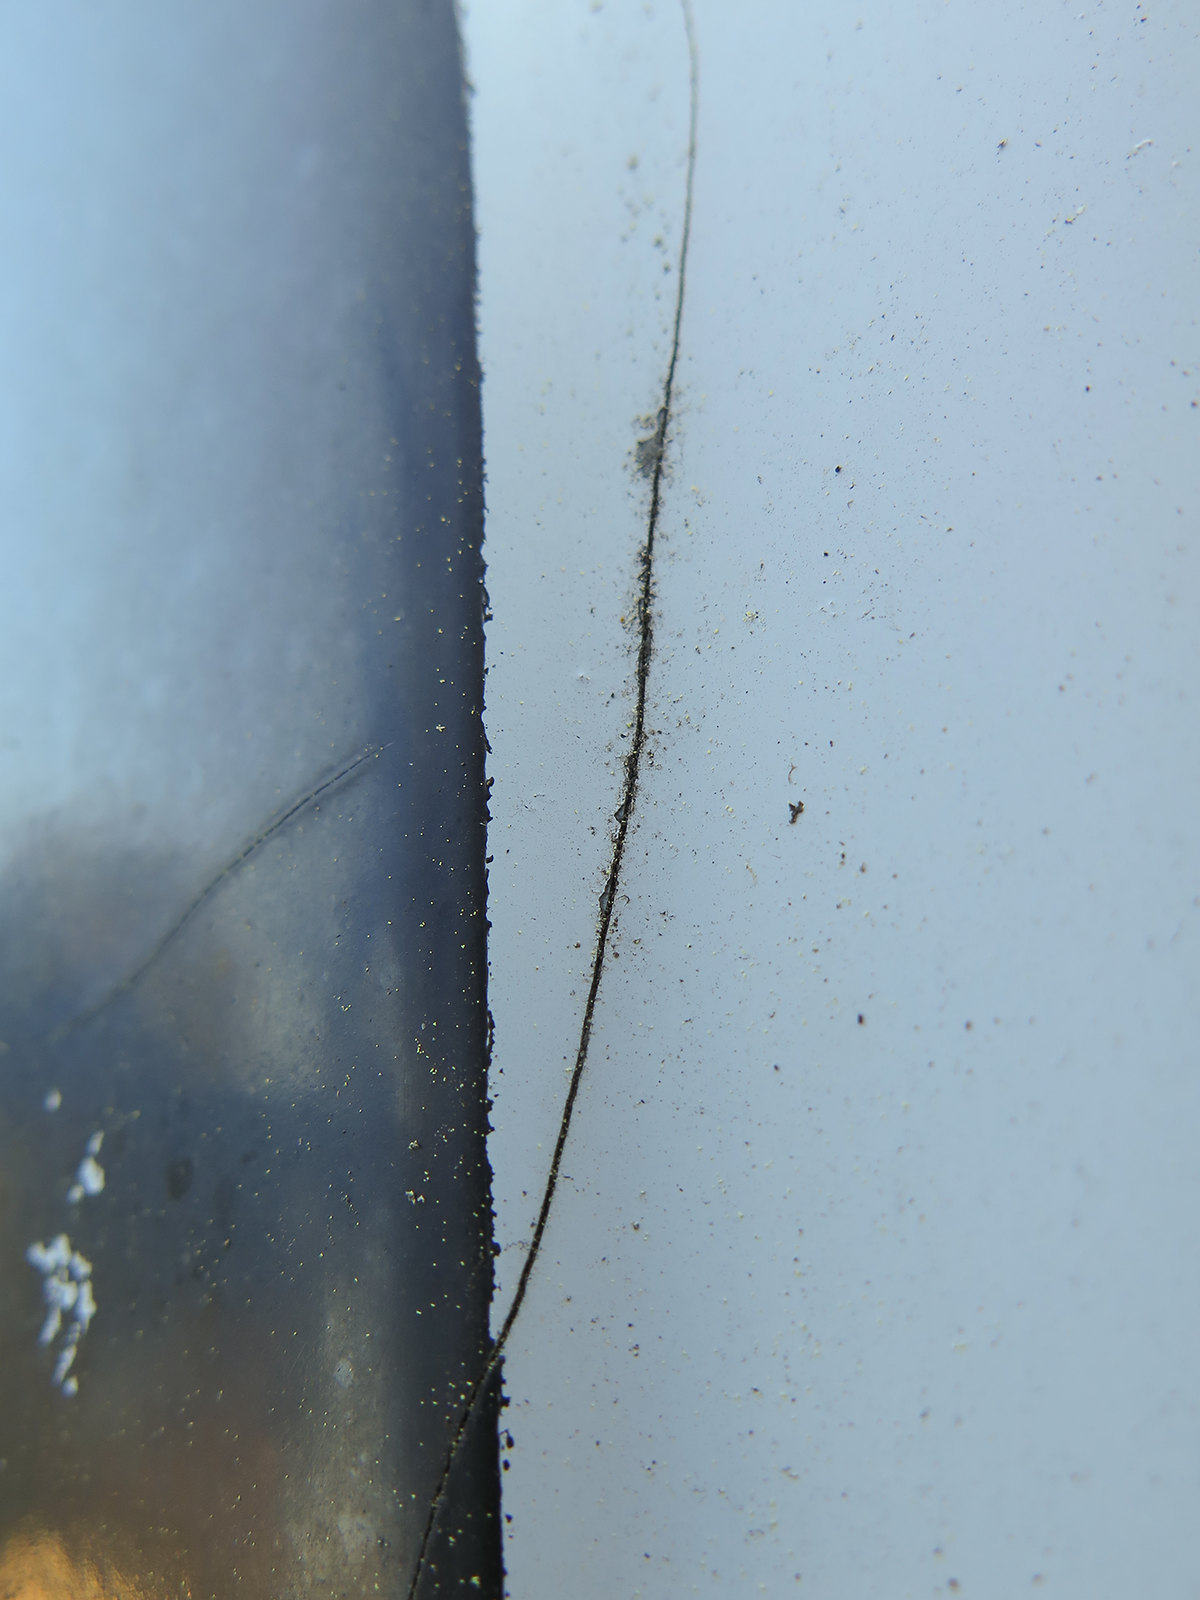
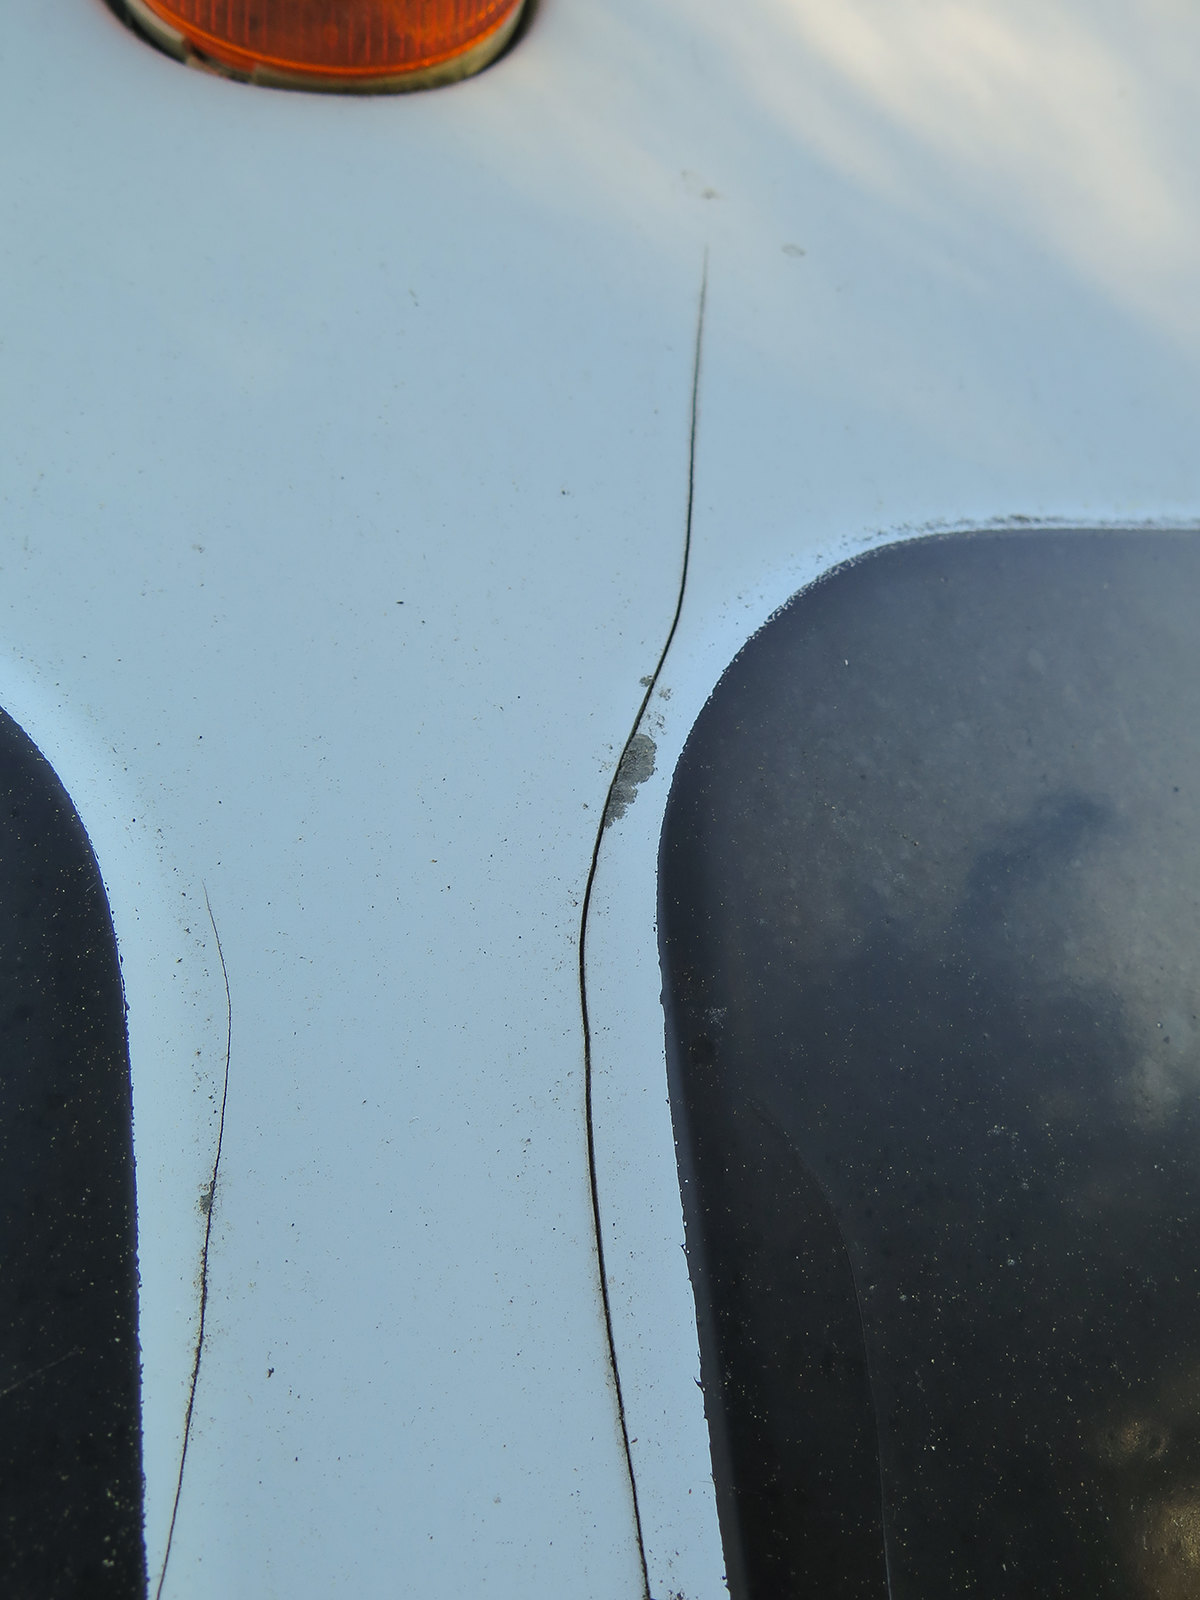

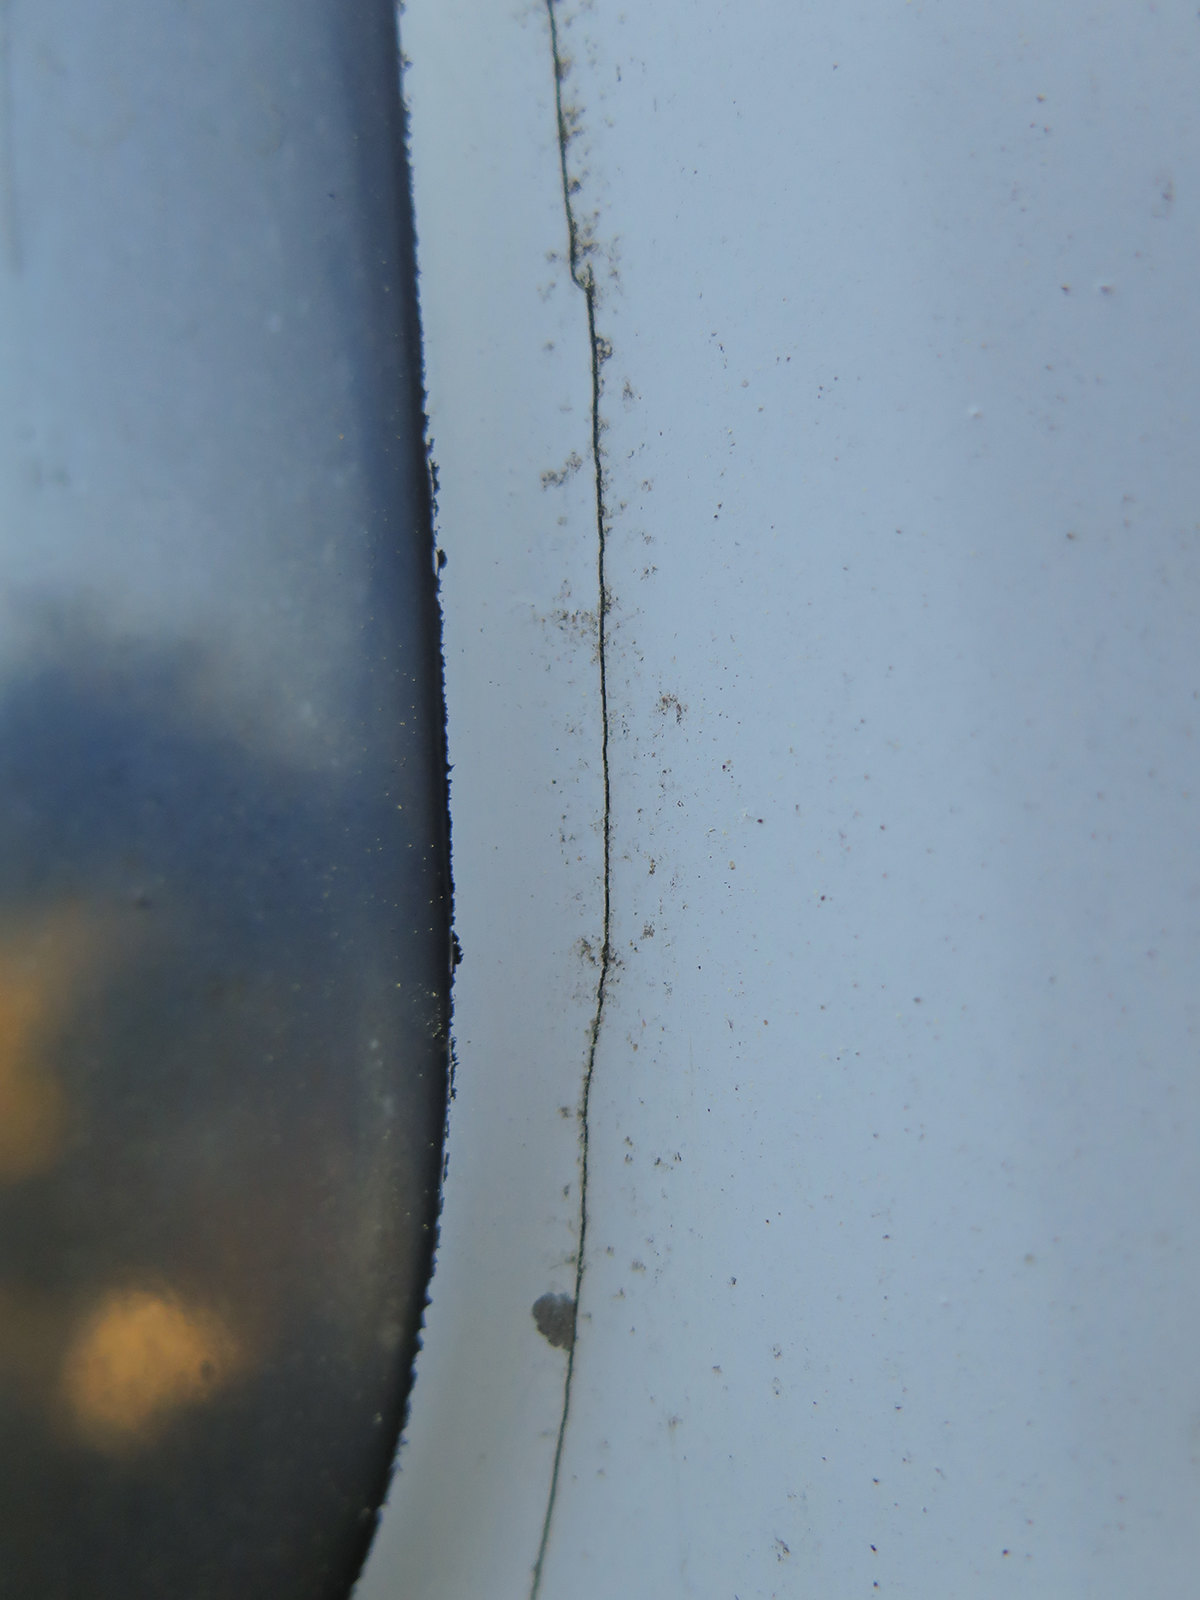
I'm a bit alarmed at this, and not sure how the best way of fixing it would be. If I was at work, I'd call NDI and have them run an ultrasound on it to verify how big the cracks are, then send it to fiberglass repair to fix. This isn't an option though. I was thinking take a dremel and route out the cracks, then fill the chanels with resin. Probably wouldn't look too good, but at least I wouldn't have any leaks. Any one seen this and had it repaired? How did they do it?
In case you didn't know, lazy daze decided that front windows were too much of leak path and deleted the option. Problem was the front looked like a bread truck, so they painted fake windows on the front with fake curtains on the inside. The side windows still are real.
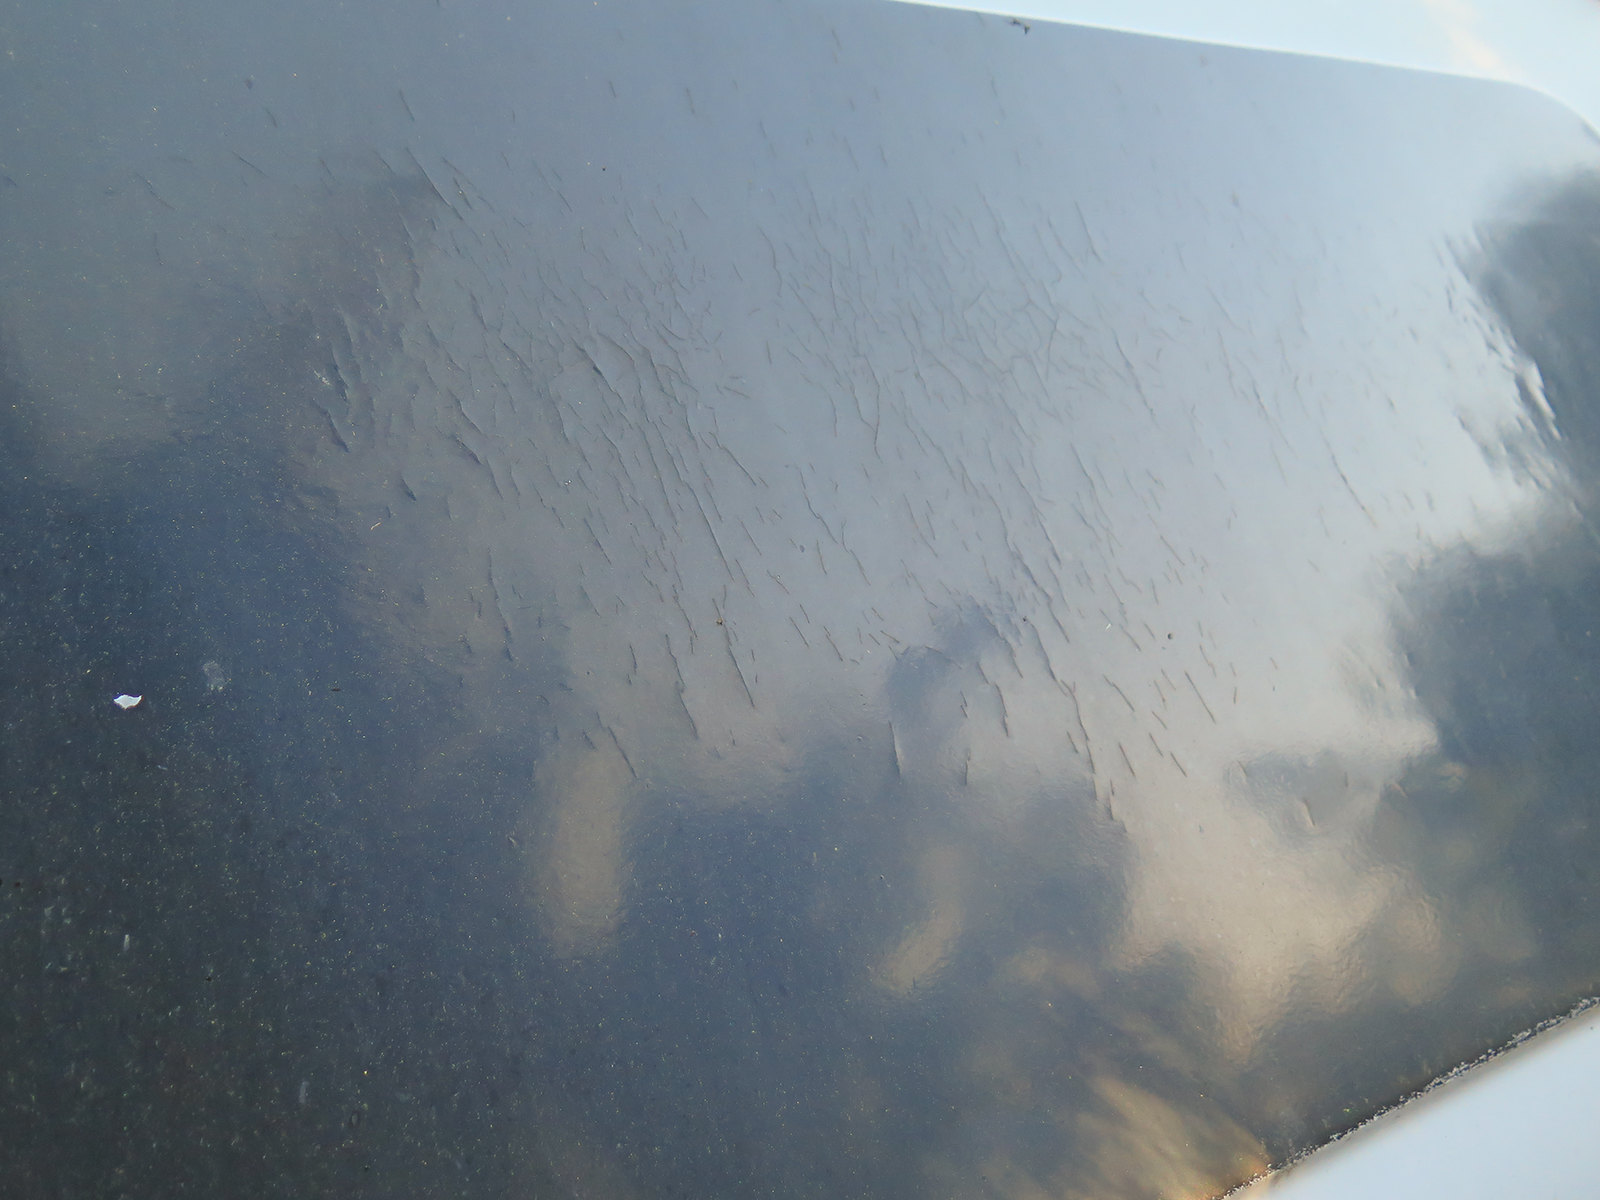
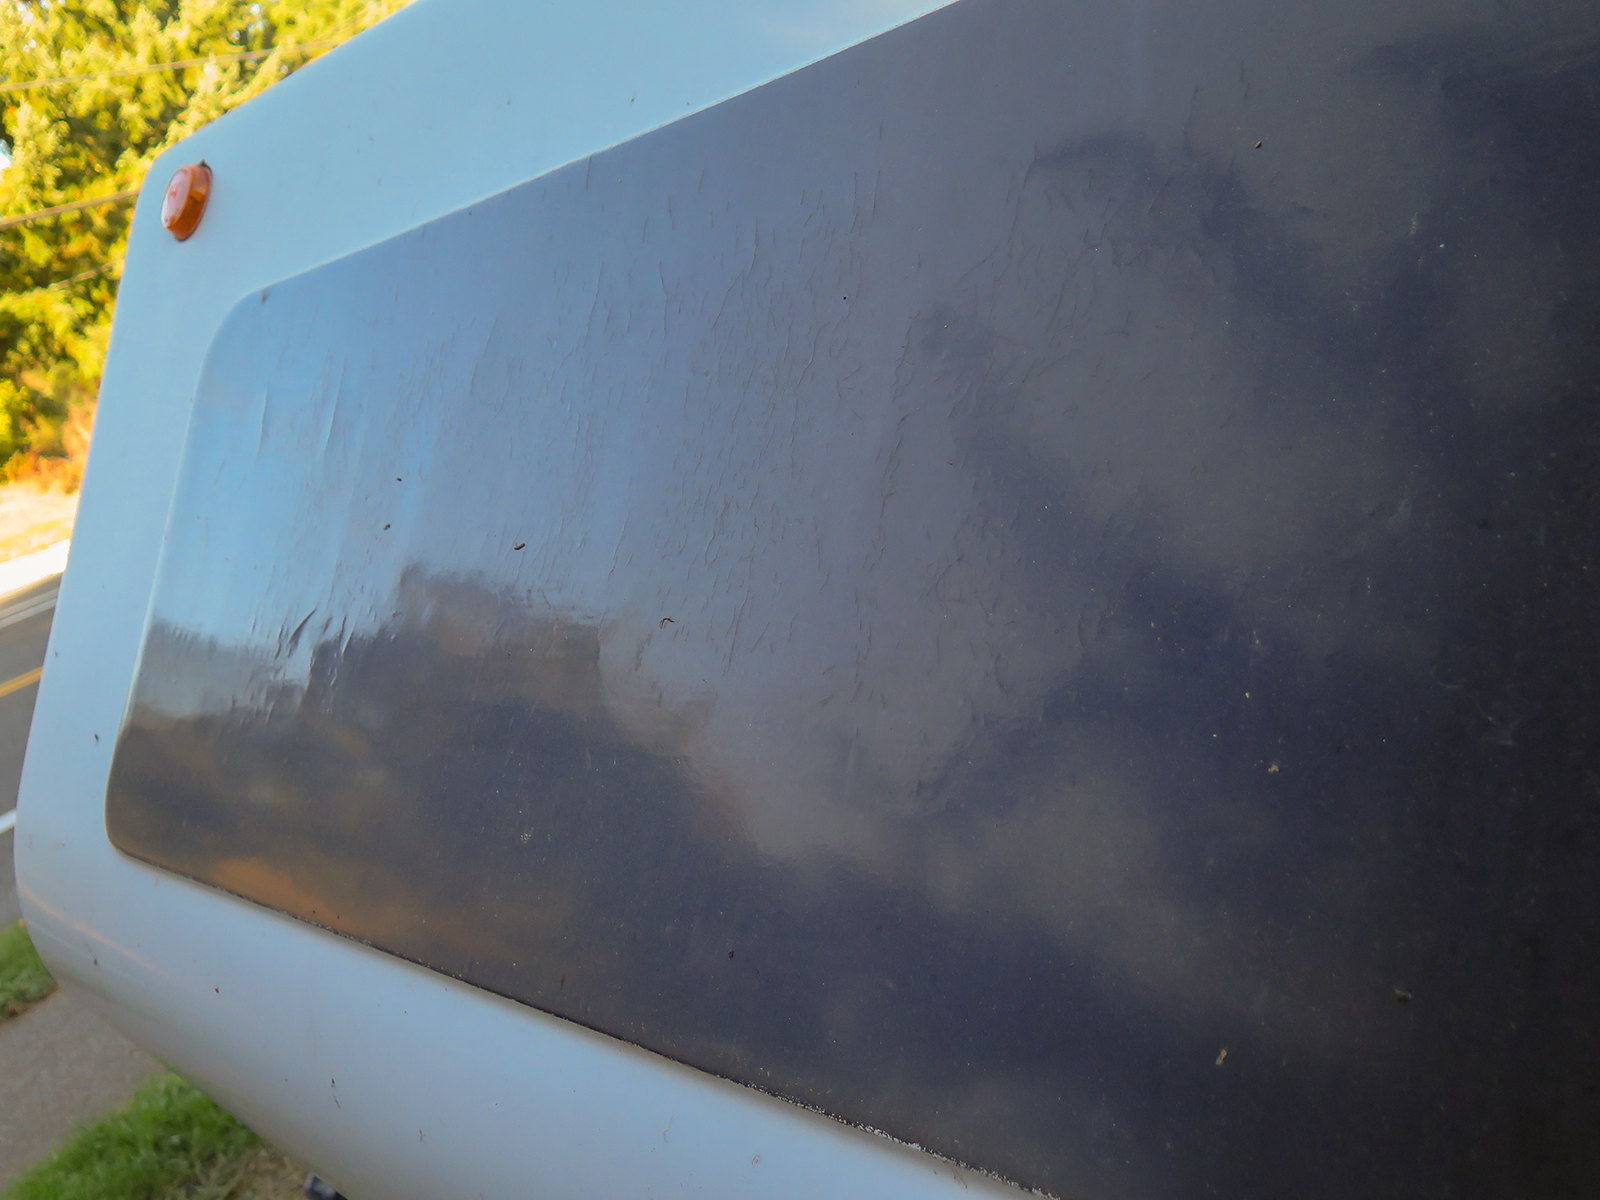
I'm hoping this is just some type of paint delamination and not an issue with the fiberglass.
I leave on my cross country road trip in a little over 2 weeks so I don't have a whole lot of time.
I'm a bit alarmed at this, and not sure how the best way of fixing it would be. If I was at work, I'd call NDI and have them run an ultrasound on it to verify how big the cracks are, then send it to fiberglass repair to fix. This isn't an option though. I was thinking take a dremel and route out the cracks, then fill the chanels with resin. Probably wouldn't look too good, but at least I wouldn't have any leaks. Any one seen this and had it repaired? How did they do it?
In case you didn't know, lazy daze decided that front windows were too much of leak path and deleted the option. Problem was the front looked like a bread truck, so they painted fake windows on the front with fake curtains on the inside. The side windows still are real.
I'm hoping this is just some type of paint delamination and not an issue with the fiberglass.
I leave on my cross country road trip in a little over 2 weeks so I don't have a whole lot of time.
1998 Class C Lazy Daze 26 1/2 island bed
banks intake/exhaust
wifi/4g/siriusXM/DTV/DirecTV/CB
2xGeorbital electric bike conversions
banks intake/exhaust
wifi/4g/siriusXM/DTV/DirecTV/CB
2xGeorbital electric bike conversions
Labels:
- Labels:
-
Class C
24 REPLIES 24
Options
- Mark as New
- Bookmark
- Subscribe
- Mute
- Subscribe to RSS Feed
- Permalink
- Report Inappropriate Content
May-26-2020 02:14 PM
Fiberglass cars are a bit rare, but fiberglass boats are not. There's a lot of good fiberglass repair information to be had from boat repair books, boat forums, and even boating stores.
Along the same line, the fiberglass repair kits sold in auto stores tend to be...bad. To put it mildly. Go to a boating store, and you find much more and of higher quality.
Along the same line, the fiberglass repair kits sold in auto stores tend to be...bad. To put it mildly. Go to a boating store, and you find much more and of higher quality.
Options
- Mark as New
- Bookmark
- Subscribe
- Mute
- Subscribe to RSS Feed
- Permalink
- Report Inappropriate Content
Mar-24-2020 06:04 PM
I have owned commercial fiberglass boats for 30 plus years, this happens with all the flex, I would not worry to much about it. If it is the look you do not like take to a fiberglass boat repair for an opinion
Options
- Mark as New
- Bookmark
- Subscribe
- Mute
- Subscribe to RSS Feed
- Permalink
- Report Inappropriate Content
Mar-23-2020 03:16 AM
Grit dog wrote:
Uhh OP had this issue 3 years ago...
I think many of us, such as myself, have done this too. Its easy to overlook the date on older threads. We have to look for 'thread stress cracks'. 🙂
Options
- Mark as New
- Bookmark
- Subscribe
- Mute
- Subscribe to RSS Feed
- Permalink
- Report Inappropriate Content
Mar-22-2020 09:07 AM
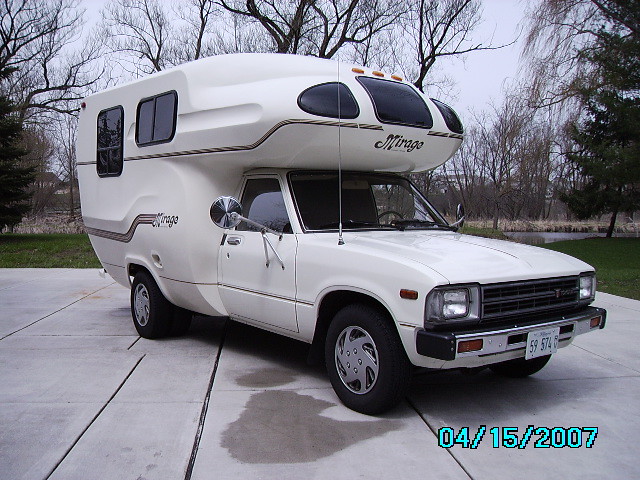
Yes, I also noticed this is a very old thread.
But to comment for the sake of others........
We bought this motor home pictured below, brand new in 1983 and sold it in 2007. Over the years, it developed cracks exactly like the OP shared, some formed right away. While under warranty the first year, I called the manufacture who said the cracks were only cosmetic. They were willing to fix them for me but said they would likely return, so I did nothing. I was glad I did nothing. The rig was fine (with more cracks) even the day we sold it 24 years later. The patchwork would have been ugly compared to leaving it alone.
So my advise is to do nothing.
Options
- Mark as New
- Bookmark
- Subscribe
- Mute
- Subscribe to RSS Feed
- Permalink
- Report Inappropriate Content
Mar-21-2020 08:39 PM
Uhh OP had this issue 3 years ago...
2016 Ram 2500, MotorOps.ca EFIlive tuned, 5” turbo back, 6" lift on 37s
2017 Heartland Torque T29 - Sold.
Couple of Arctic Fox TCs - Sold
2017 Heartland Torque T29 - Sold.
Couple of Arctic Fox TCs - Sold
Options
- Mark as New
- Bookmark
- Subscribe
- Mute
- Subscribe to RSS Feed
- Permalink
- Report Inappropriate Content
Mar-21-2020 09:29 AM
From the photos you posted it is hard to tell if the crack is in the gel coat or goes all the way through the laminate. If you are not getting water on the inside it is probably just cracking in the gel coat and not through the laminate itself. If you worked at Boeing in the NDI area you know that Boeing uses prepreg materials for their layups and the resin to cloth ratio is controlled very tightly in the prepegging process. With a wet layup that boats and RV manufactures use there is little control and is pretty much left up to the laminator how much gelcoat to apply. When gelcote is applied too thick which usually happens in tight radius areas shown in you photos, it has a tendency crack in the heat from the sun because of the different rates of thermal expansion between pure resin and the laminate underneath. Pure resin (gelcote) expands much more than the laminate. Looking at the black area the black paint absorbs the heat from the sun much more than the white areas which tends to reflect the suns heat. I imagine the cab sees a lot of movement especially on rough roads which adds to the problem to cause stress cracks in those radius areas. If you are not getting water on the inside I would not do any repairs until after your trip. When you return I would sand the surface cracks off the black areas and paint them white. For the long stress cracks(again if not through the laminate) I would sand that area down to remove the excess resin then go to a marine store and have them mix you a gelcoat to match your color (there are many different shades of white) and screed that over the sanded area just enough to cover the fibers, the thinner the better. I would not drill any holes through the laminate to stop the cracks from spreading the FG cross plys will resist crack propagation,you would only do that in metal and pure resin structures like thermoplastics. Hope this helps and try to enjoy your trip.
Options
- Mark as New
- Bookmark
- Subscribe
- Mute
- Subscribe to RSS Feed
- Permalink
- Report Inappropriate Content
Mar-20-2020 05:01 PM
I would agree with the guys above. If that rig has been sitting out in the rain with those cracks you may have some bigger issues inside. Here's how another of our members said a dealer fixed his roof crack. "Clean the area with a non petroleum solvent. Fill the crack with Fiberglass resin,then apply a fiberglass patch with Marine 5200 Vulcanizing adhesive" This was done on a roof however, so can't say how appropriate it would be for your overhead.
Retired Anesthetist. LTP. Pilot with mechanic/inspection ratings. Between rigs right now.. Wife and daughter. Four cats which we must obey.
Options
- Mark as New
- Bookmark
- Subscribe
- Mute
- Subscribe to RSS Feed
- Permalink
- Report Inappropriate Content
Nov-04-2017 11:41 PM
the sun is supposed to come out monday, I'll see if I can rig a platform up there and see what I can do. supposed to snow again tonight. I'm thinking something a bit flexible for a filler because is looks like there's a bit of stress in that area and brittle resin might crack or peal out again. Fife is a bit far for me right now, too me 2 1/2 hrs to get to tacoma dome last night. 38 miles. 2 more weeks until I leave.
1998 Class C Lazy Daze 26 1/2 island bed
banks intake/exhaust
wifi/4g/siriusXM/DTV/DirecTV/CB
2xGeorbital electric bike conversions
banks intake/exhaust
wifi/4g/siriusXM/DTV/DirecTV/CB
2xGeorbital electric bike conversions
Options
- Mark as New
- Bookmark
- Subscribe
- Mute
- Subscribe to RSS Feed
- Permalink
- Report Inappropriate Content
Nov-04-2017 03:53 PM
The real fix is to grind it out repair any damage, fill and refinish. A die grinder works well for this. If the damage goes deep enough, you need to get behind it and lay in some fiberglass. It is very doable if you've done any bodywork and are willing to learn a bit of fiberglass work if needed. I suspect you are going to find it is more cosmetic than anything. I don't think stop drilling it is going to do much for you as fiberglass cracks don't propagate in fiberglass like aluminum. The "paint" they use when molding fiberglass is called gelcoat. It is thick stuff that is sprayed into the mold befor the fiberglass goes in. The fiberglass, when laid into the mold sticks to the gelcoat as the exposed surface remains tacky after "drying". It almost looks like the gelcoat or gelcoat and a layer of thin fiberglass have separated. I used to work with fiberglass a lot so I've seen a bit. If you do and up having to do glass work in the interior of the RV I would recommend using something other that polyester resin (epoxy may be better). The smell of polyester resin inside an enclosed place like an RV will linger a long time and could cause marital strife. It is one of the more potent and permanent stinks I know of. If you feel you are in over your head I know of an RV repair place in Fife (Wescraft) that did an excellent job on an insurance repair of my fiberglass overhead from a rock strike.
2011 Itasca Navion 24J
2000 Chev Tracker Toad
2000 Chev Tracker Toad
Options
- Mark as New
- Bookmark
- Subscribe
- Mute
- Subscribe to RSS Feed
- Permalink
- Report Inappropriate Content
Nov-02-2017 03:18 PM
Sun needs to come out again, it's 45 degrees and raining. can't get any exterior work done.
How am I supposed to get any work done? It SNOWED last night.
How am I supposed to get any work done? It SNOWED last night.
1998 Class C Lazy Daze 26 1/2 island bed
banks intake/exhaust
wifi/4g/siriusXM/DTV/DirecTV/CB
2xGeorbital electric bike conversions
banks intake/exhaust
wifi/4g/siriusXM/DTV/DirecTV/CB
2xGeorbital electric bike conversions
Options
- Mark as New
- Bookmark
- Subscribe
- Mute
- Subscribe to RSS Feed
- Permalink
- Report Inappropriate Content
Nov-01-2017 09:09 PM
I'm an ex Air Force flight engineer and Boeing aircraft inspector. I'm familiar with the concept. Started pouring rain out again, so I didn't get a chance to work on it. I suppose I should check for delamination as well. wish I had an ultra sound machine to really check it.
1998 Class C Lazy Daze 26 1/2 island bed
banks intake/exhaust
wifi/4g/siriusXM/DTV/DirecTV/CB
2xGeorbital electric bike conversions
banks intake/exhaust
wifi/4g/siriusXM/DTV/DirecTV/CB
2xGeorbital electric bike conversions
Options
- Mark as New
- Bookmark
- Subscribe
- Mute
- Subscribe to RSS Feed
- Permalink
- Report Inappropriate Content
Nov-01-2017 08:15 PM
The cracks will continue IF you do not get the very end of the crack. This is a technique used in aviation to stop cracks. The bit will be decided by the size but if small a 1/16 should be fine. I found some on my class c and stop drilled them and they have not returned, same on the motorcycle accessories that had small cracks. Just have to be sure to get the very end.
Options
- Mark as New
- Bookmark
- Subscribe
- Mute
- Subscribe to RSS Feed
- Permalink
- Report Inappropriate Content
Nov-01-2017 11:53 AM
fourthclassC wrote:
Hi, another suggestion here. If they are really cracks, I think the 1/16" drill hole at the ends is good. If only gel coat cracks I suggest the same. MarineTex . I think this is the best stuff for this type of repair. Using a really clean edge rubber squeege to apply thin..
Hate to disagree, but I think they'll just open up again if he does this. That's the first thing I tried on mine, and they just opened up again.
-Speak
It's just Mrs. SpeakEasy and me now (empty-nesters). But we can choose from among 7 grandchildren to drag along with us!
2014 F-150 Super Crew Short Bed 3.5L Ecoboost
2014 Flagstaff Micro Lite 23LB
2014 F-150 Super Crew Short Bed 3.5L Ecoboost
2014 Flagstaff Micro Lite 23LB
Options
- Mark as New
- Bookmark
- Subscribe
- Mute
- Subscribe to RSS Feed
- Permalink
- Report Inappropriate Content
Nov-01-2017 11:25 AM
Hi, another suggestion here. If they are really cracks, I think the 1/16" drill hole at the ends is good. If only gel coat cracks I suggest the same. MarineTex . I think this is the best stuff for this type of repair. Using a really clean edge rubber squeege to apply thin..


