Turn on suggestions
Auto-suggest helps you quickly narrow down your search results by suggesting possible matches as you type.
Showing results for
- Good Sam Community
- Groups
- Travel Trailer Group
- Forum
- Water Leak, Repair Update Feb 12th
Options
- Subscribe to RSS Feed
- Mark Topic as New
- Mark Topic as Read
- Float this Topic for Current User
- Bookmark
- Subscribe
- Mute
- Printer Friendly Page
Water Leak, Repair Update Feb 12th
Options
- Mark as New
- Bookmark
- Subscribe
- Mute
- Subscribe to RSS Feed
- Permalink
- Report Inappropriate Content
Jan-16-2018 04:16 PM
Well, here we go again. Back in 2013 I found a leak that was deteriorating the slide out floor, so I undertook those repairs. I had a thread on here but couldn't find it again to give you a link, but thanks to JBarca and other forum members who helped me tackle that job and get it all back together.
Last spring I noticed a small soft spot just ahead of the slide on the main floor. Unfortunately we were knee-deep in home renovations, so I put a piece of plywood over the soft spot with the goal of fixing it this winter.
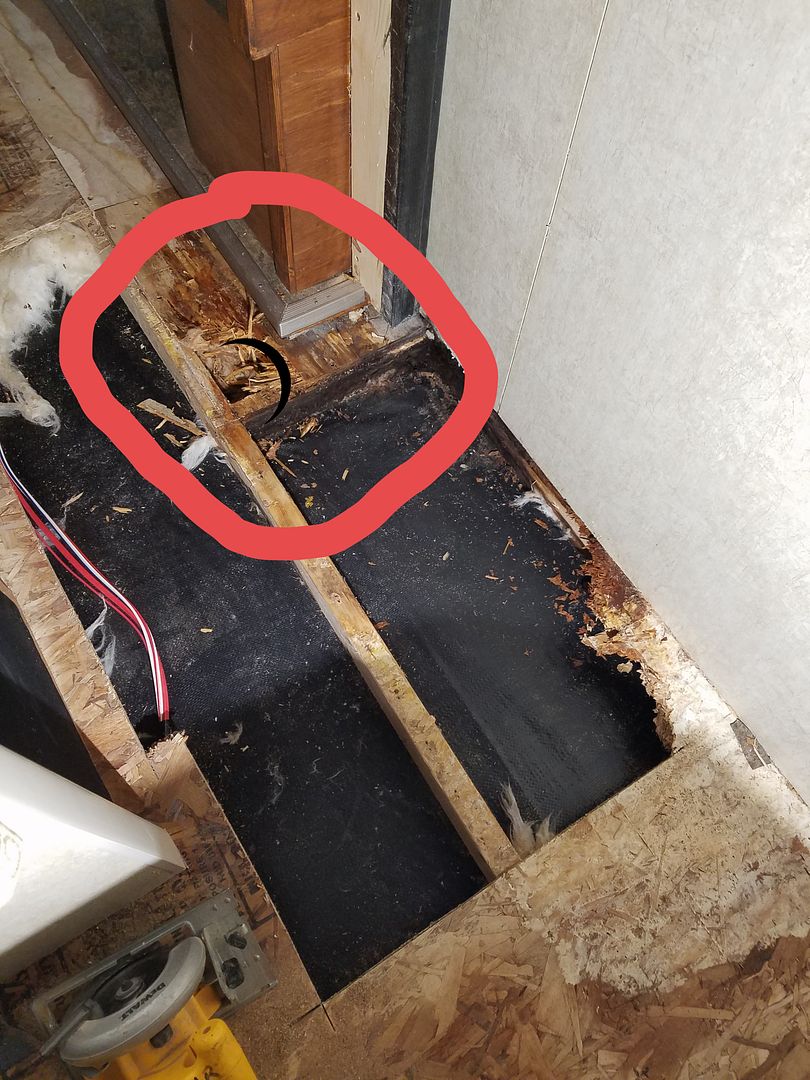
Well, it's amazing how fast things go to pot. Here's what I am dealing with now:
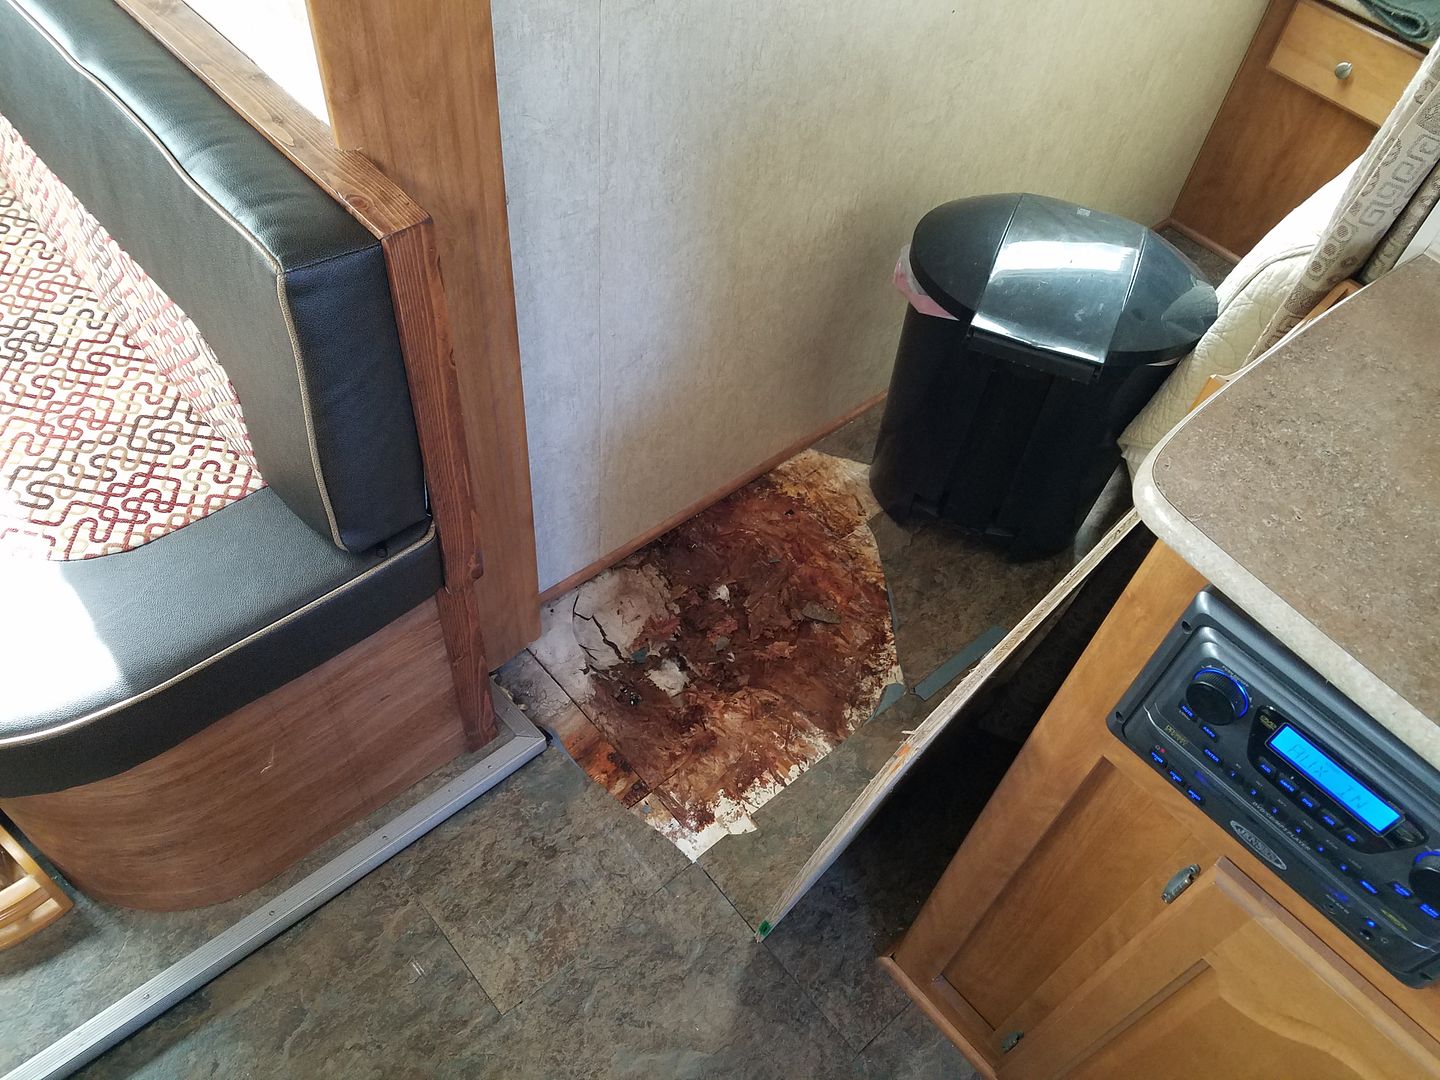
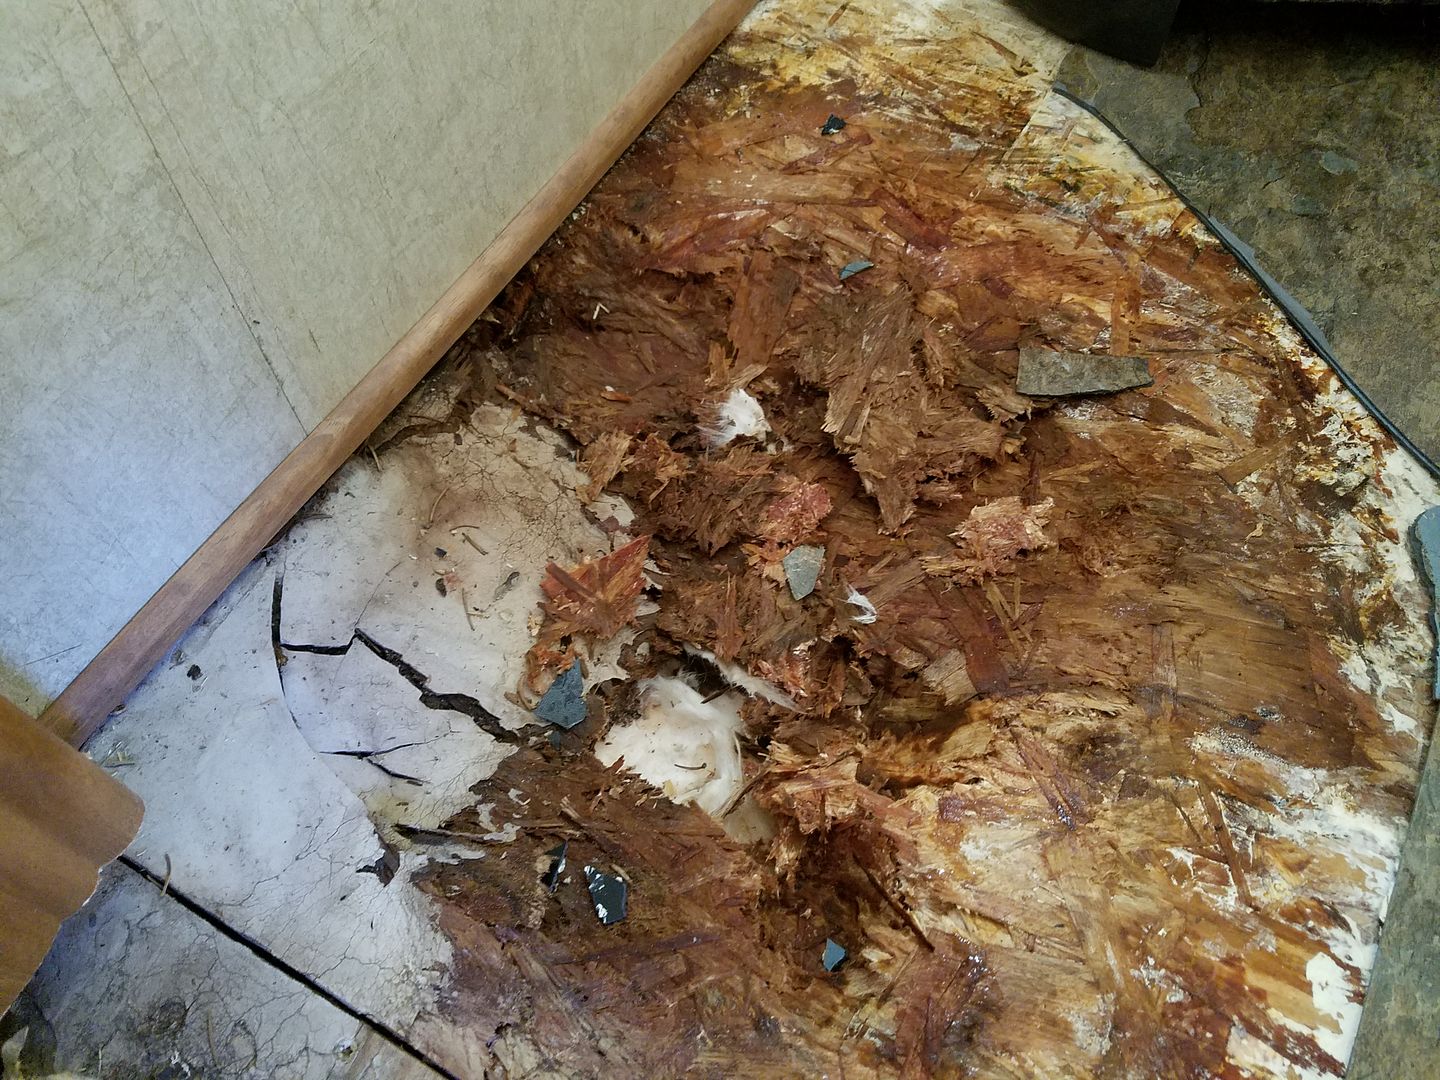
we had replaced the floor after the slide repair, but we used the cheap Allure vinyl so it needed to be done again anyway. So I started to dig in to the rot:
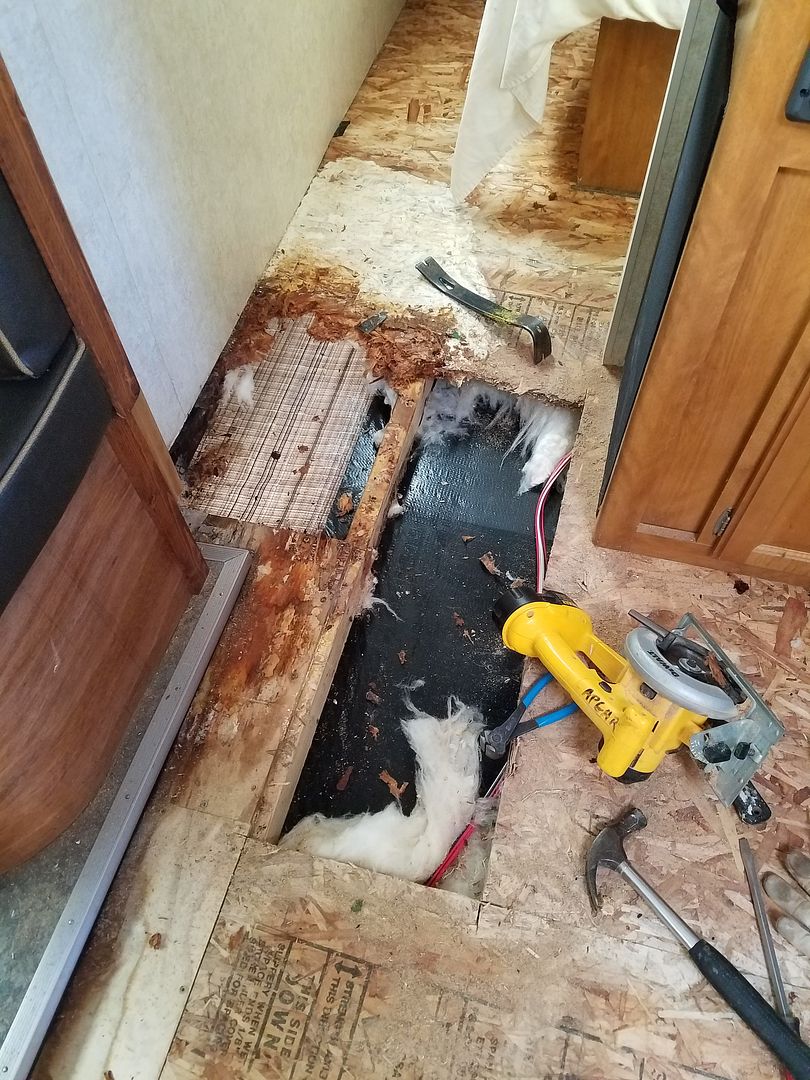
What's interesting is that this TT has the enclosed underbelly, so under the 3/4" OSB there is insulation and the Darco wrap. Whaerever the leak was coming from, I took on a lot of water since there was 1/2" of ice sitting on top of the Darco.
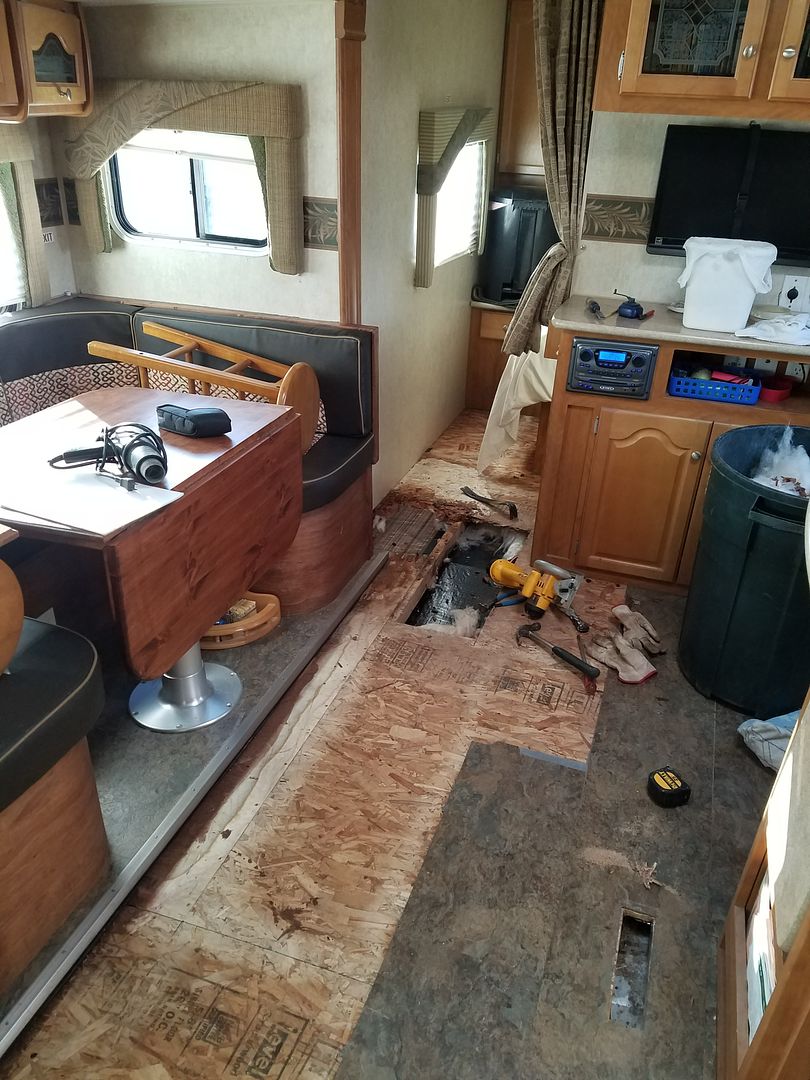
An idea of where we are in the trailer, facing front in this pic:
Here we are with the rot mostly dug out
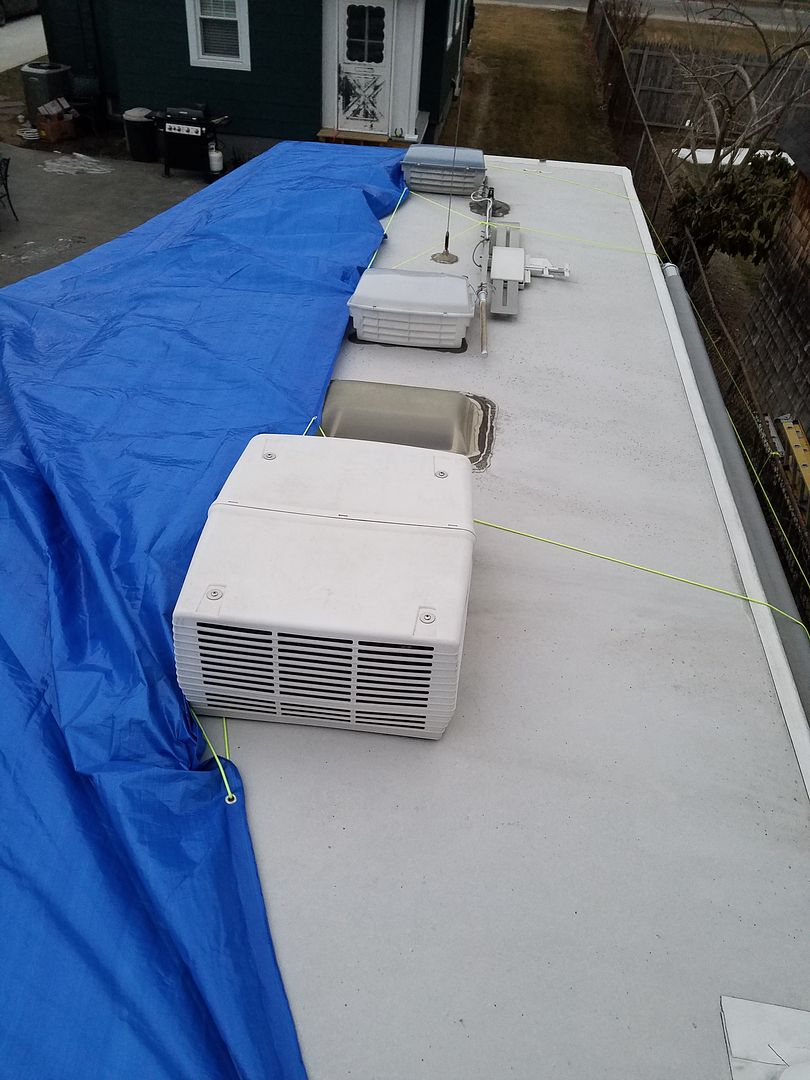
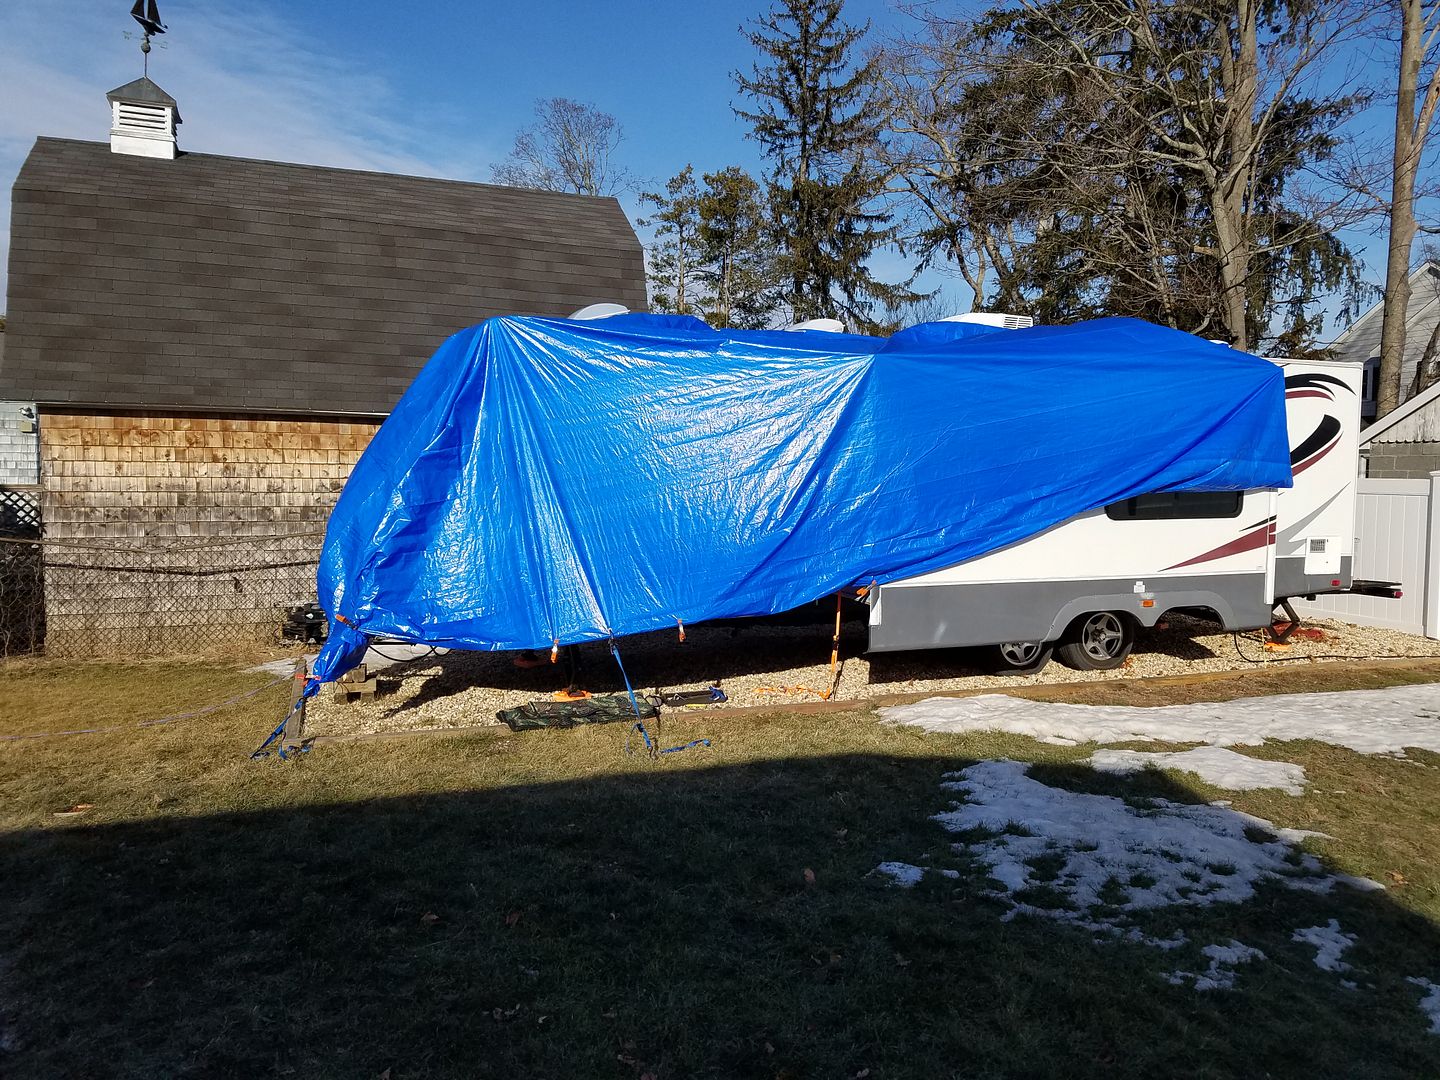
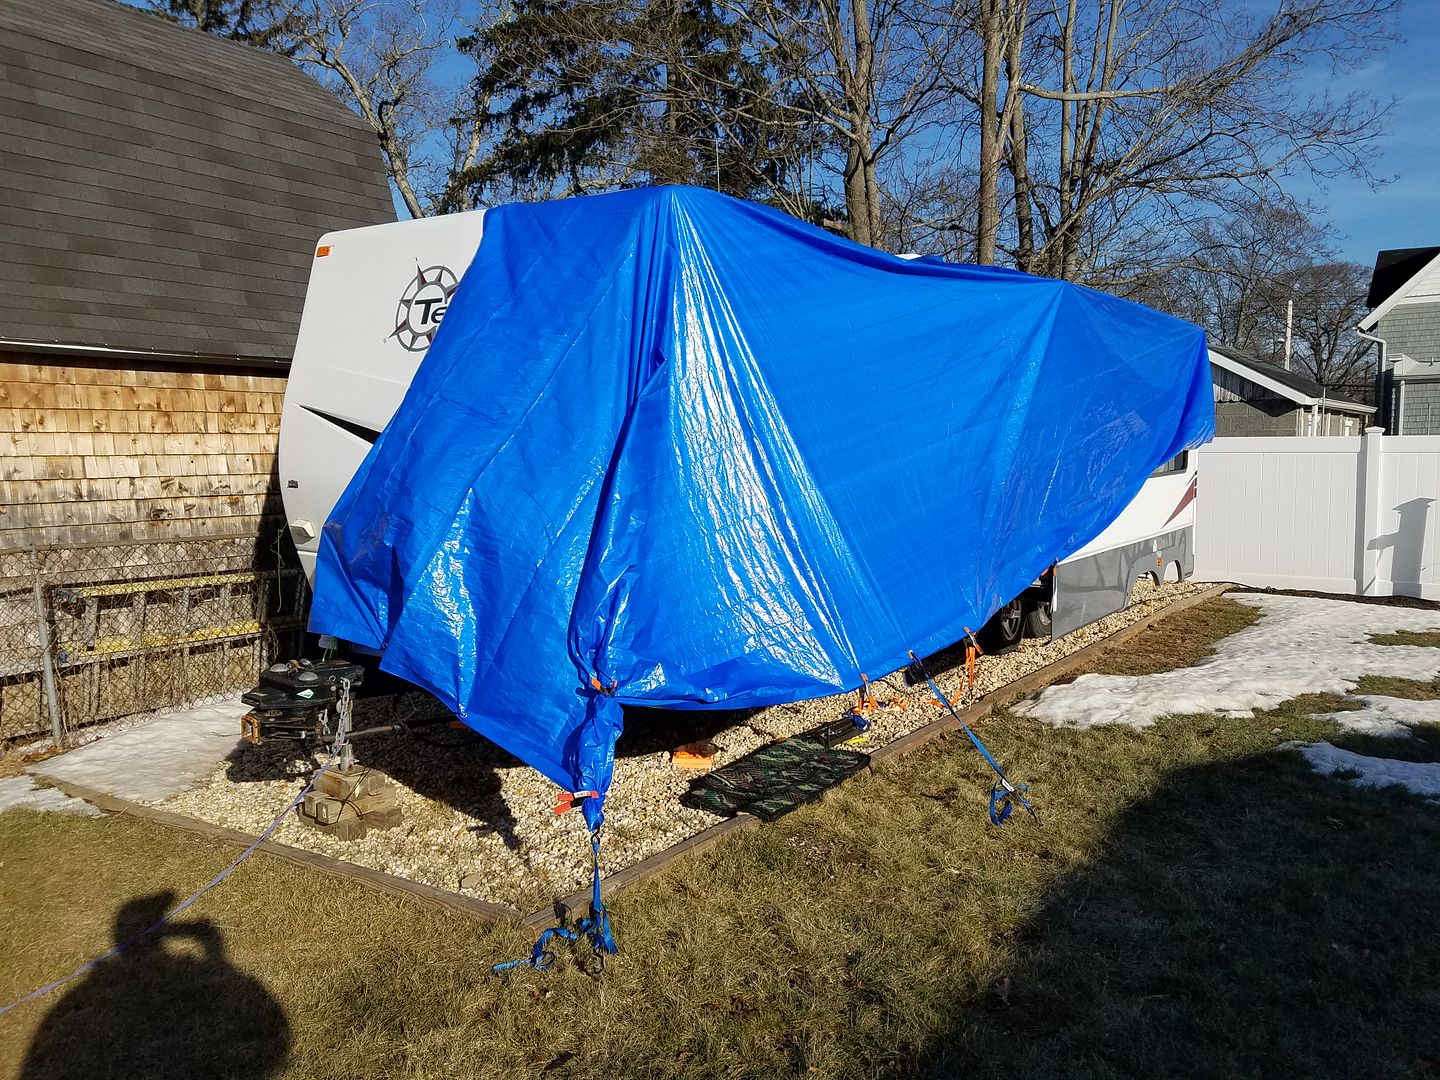
The tarping process begins:
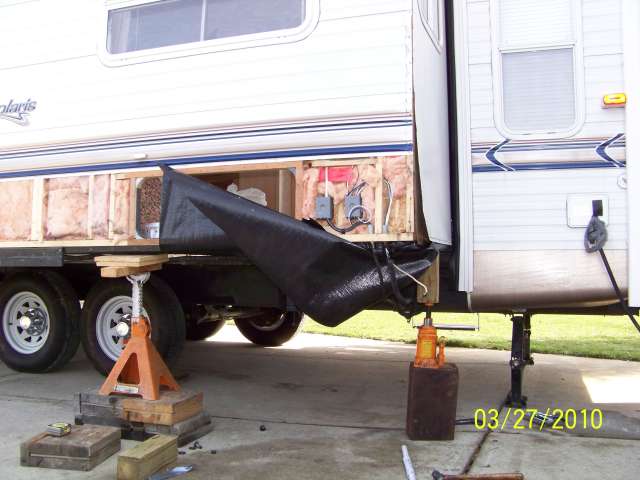
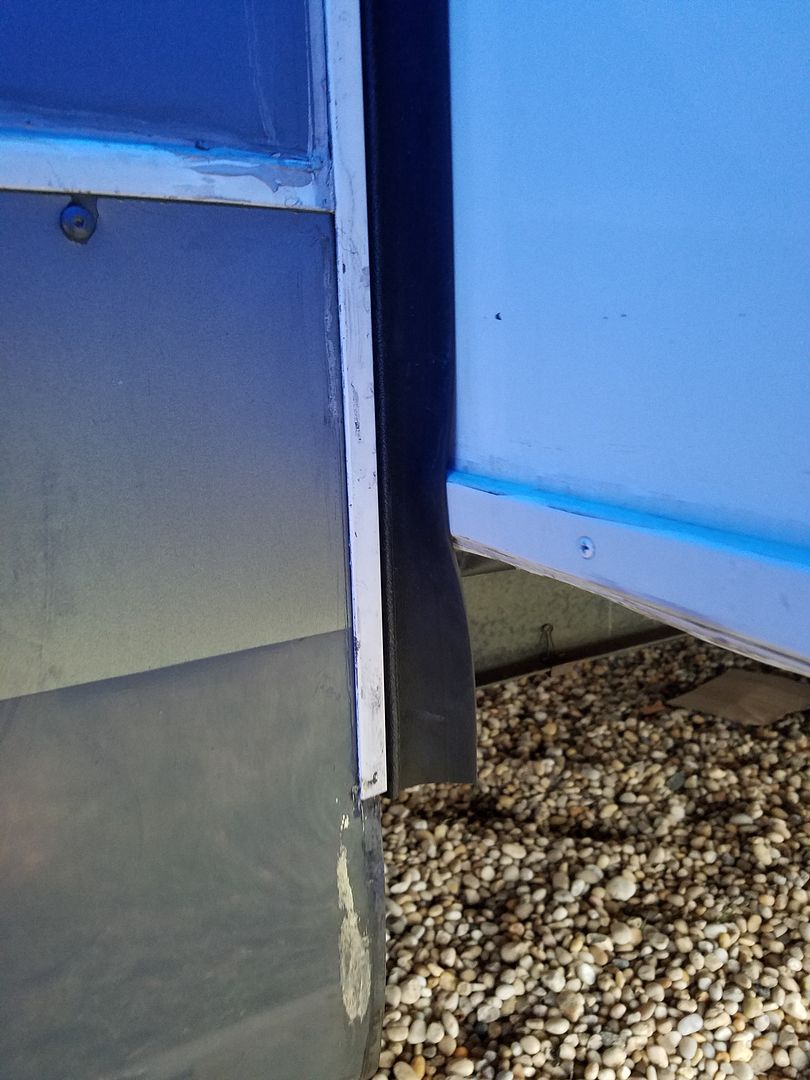
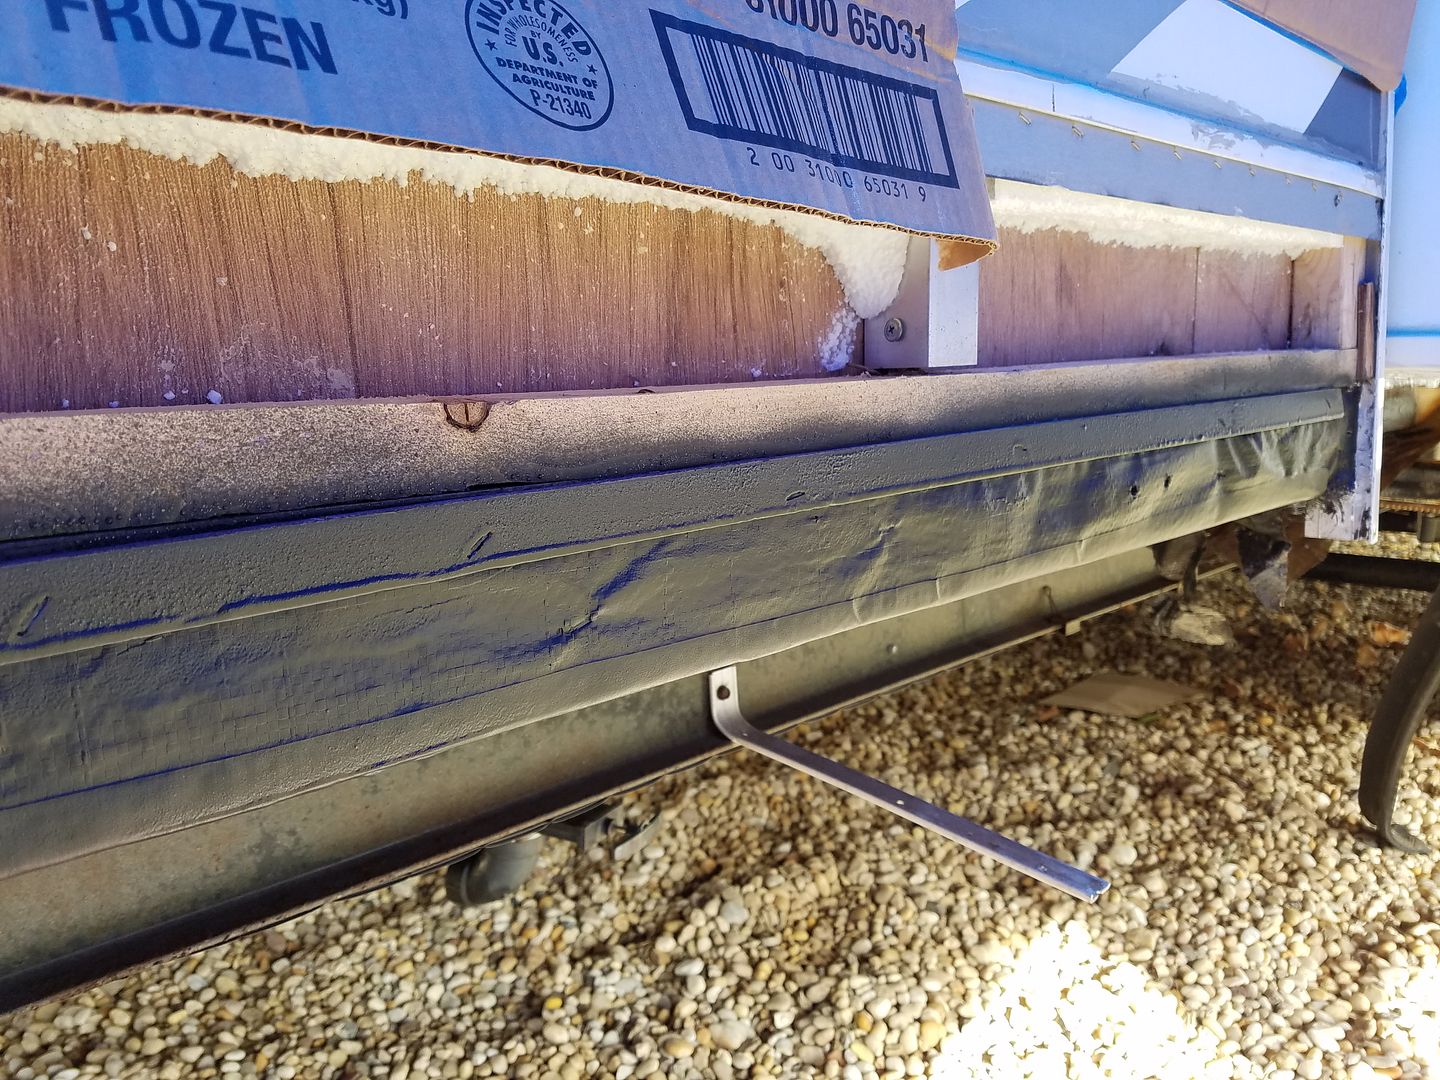
Now to get into it: The white section you see is fiberglas gel coat, it meets at a seam to the gray part which is a steel skirt:
You can see from the way it's put together that the steel inserts to a crimped molding that prevents any water incursion. You can also see the 2x3 floor joist framing that is wrapped in Darco wrap. The floor frame is wrapped in Darco, then the OSB floor is added, then covered in sheet vinyl, then walls screwed on to that.

So here is the money pic and where I need some help. If you recall from the inside pics, the OSB floor absorbed water right in front of the slide. Here is the pic from the outside with her skirt off, you can see the rot in the floor. However, I cut out a few inches of the styrofoam insulation and the wall in bone dry, so it's NOT coming from above.
The 2x3 framing is wet all along but no signs of water above.
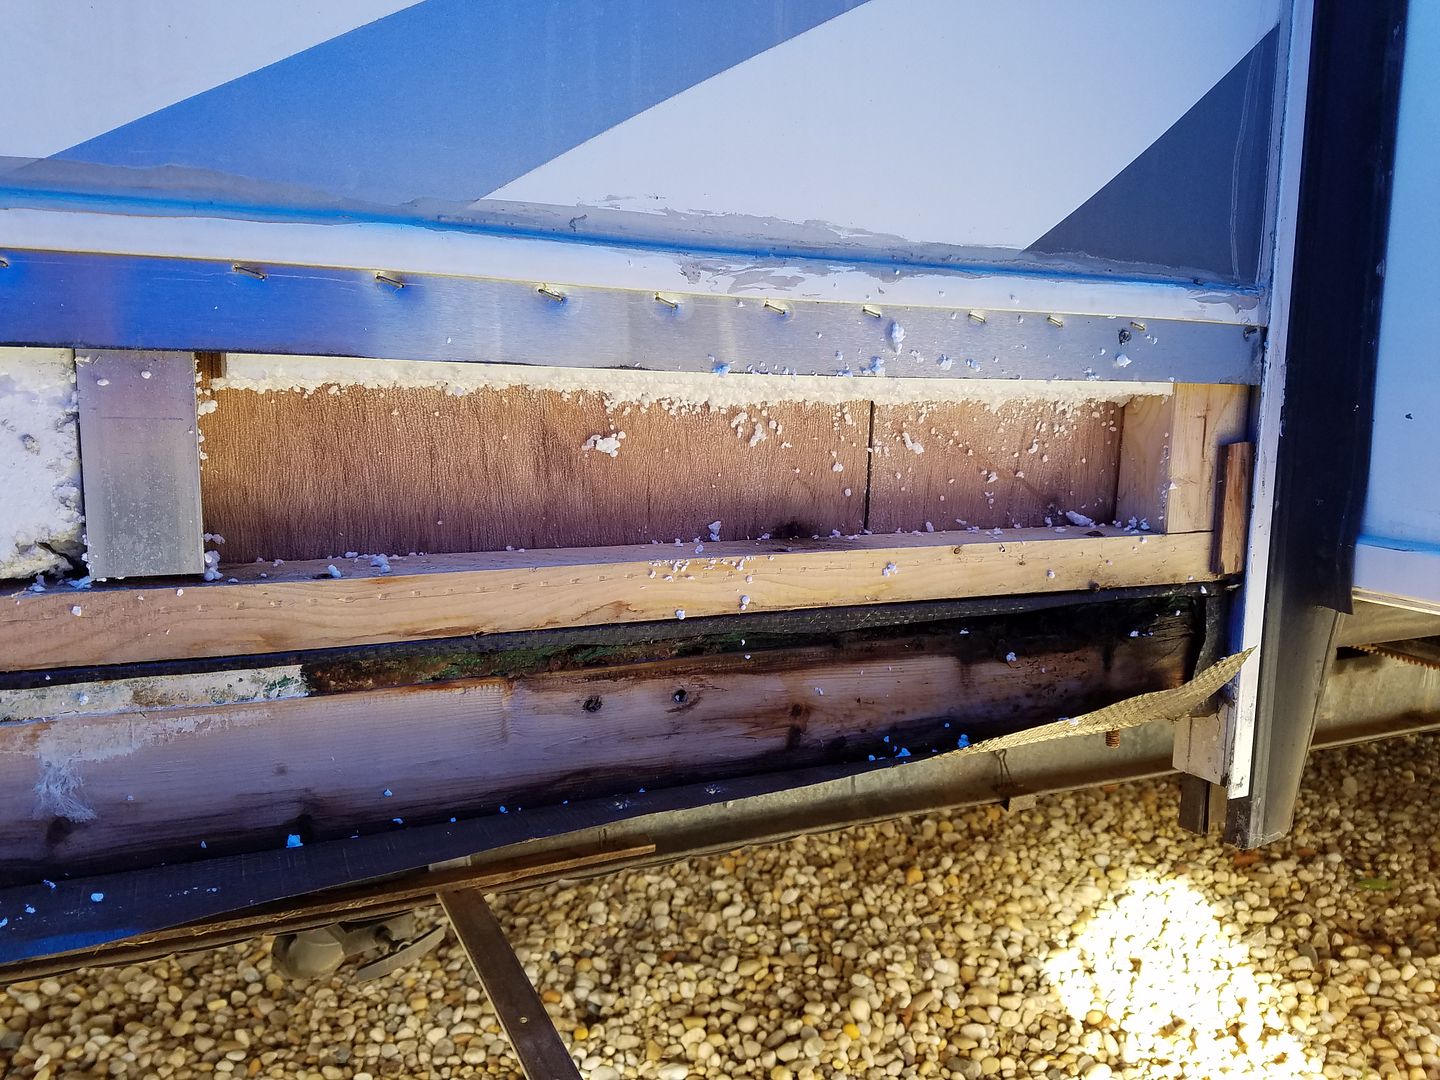
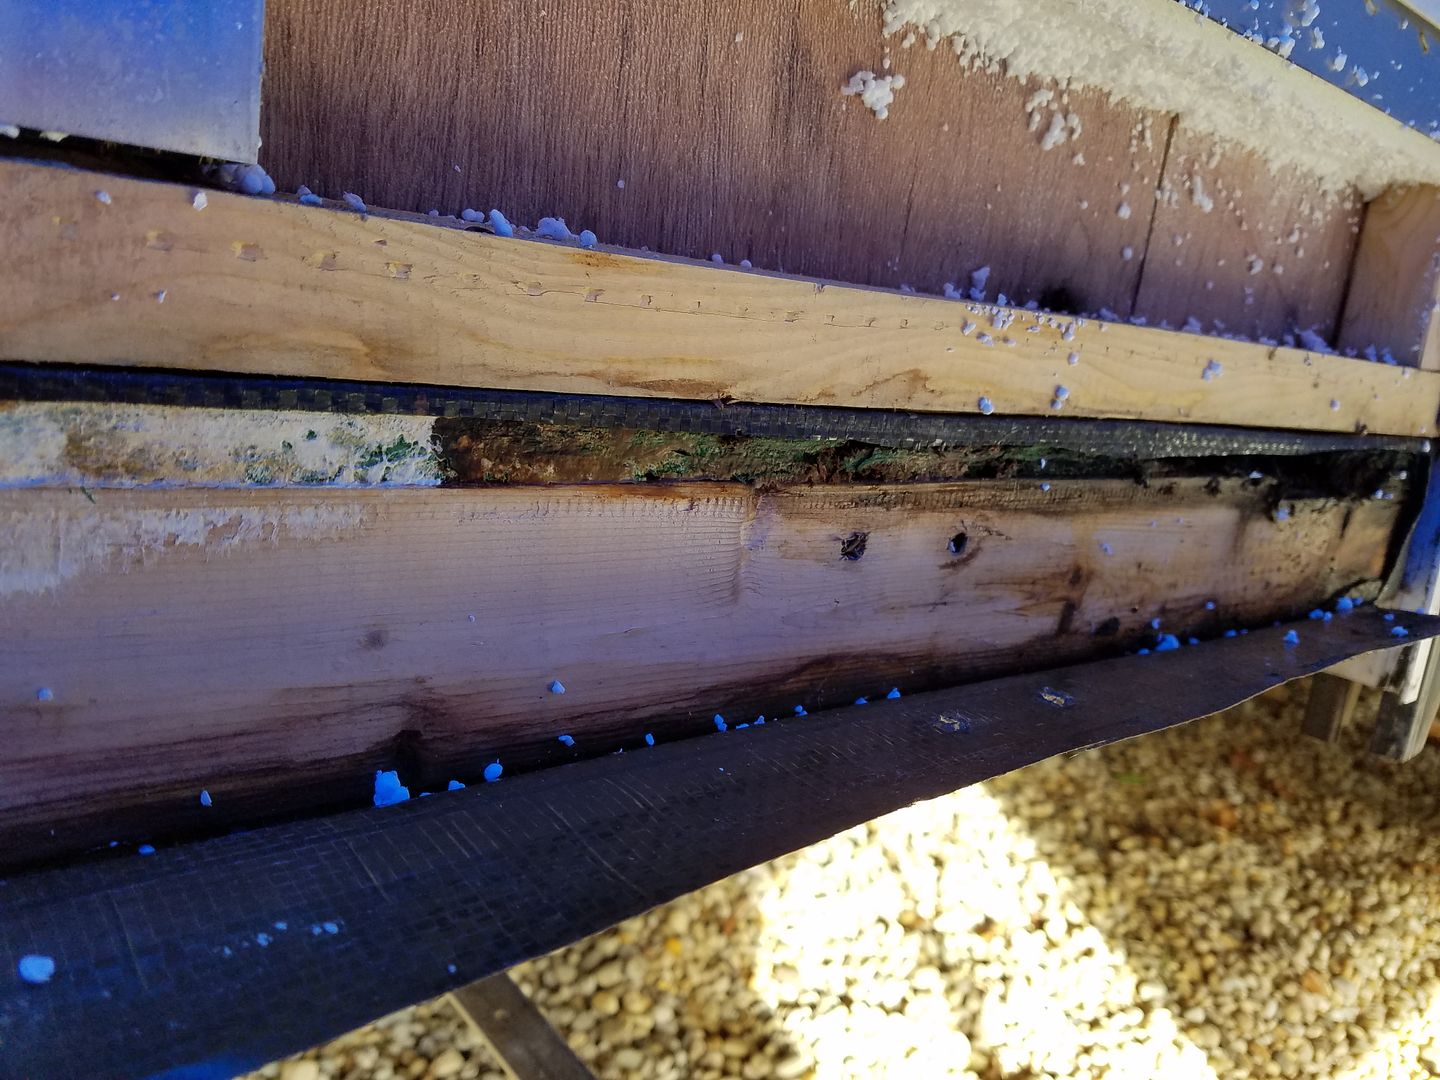
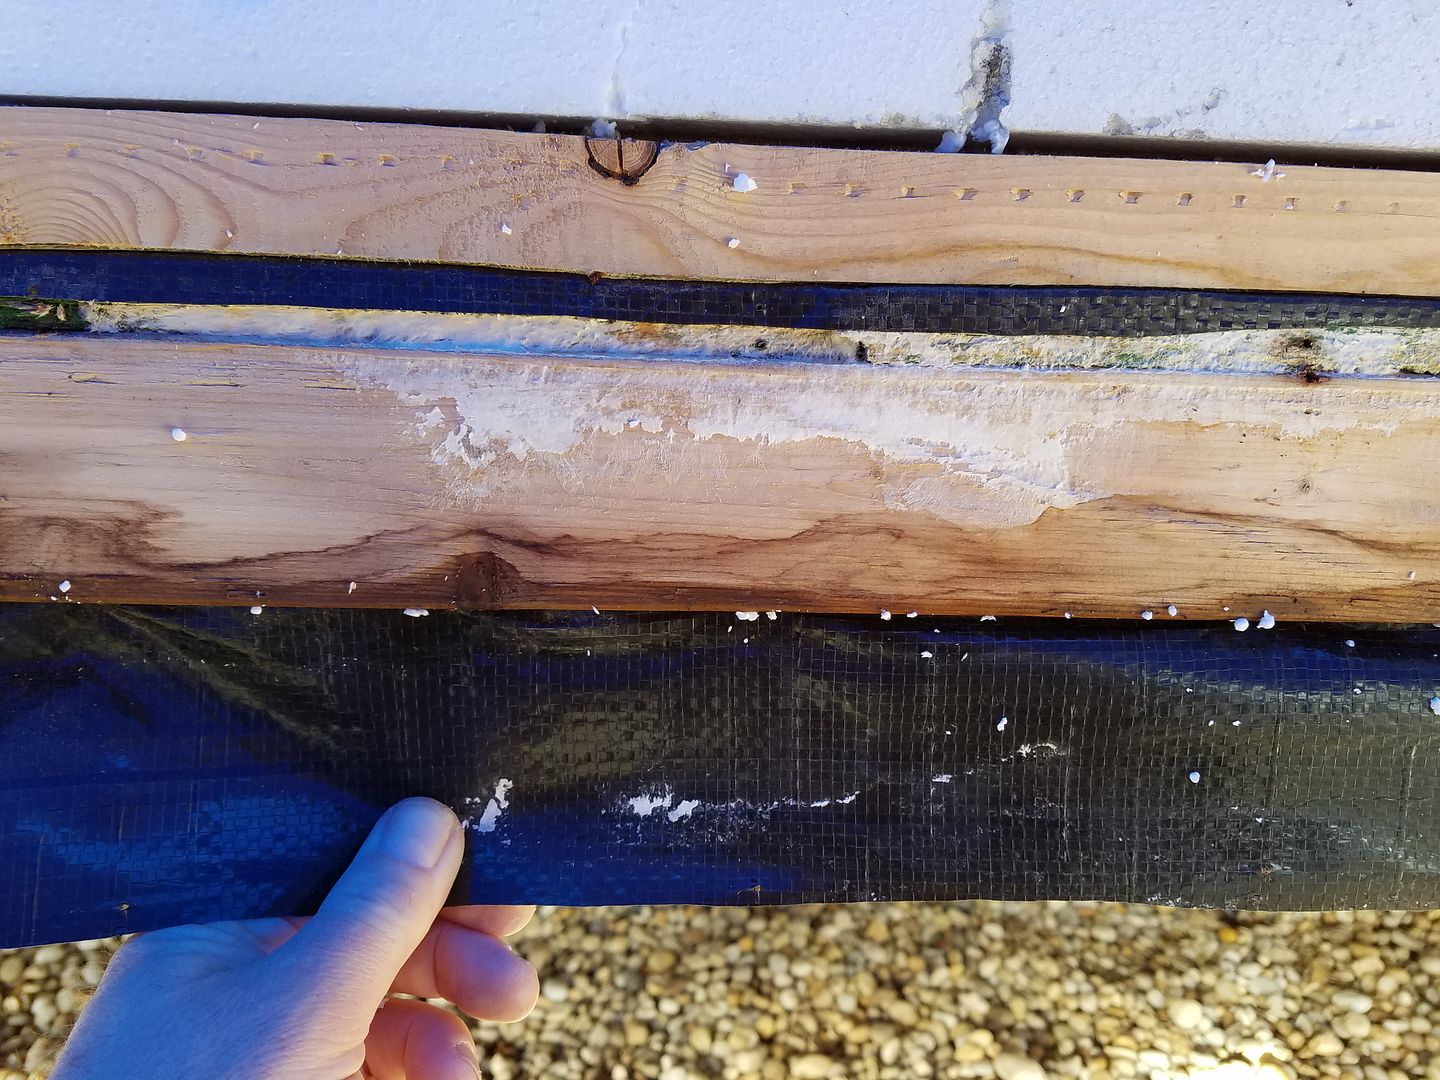
So for the guru's on the forum, where is the water coming in???
Doesn't look like the roof or any windows or appliances. How would I be getting enough water in this spot to cause damage?!?!?!
All ideas and thoughts welcome.
Last spring I noticed a small soft spot just ahead of the slide on the main floor. Unfortunately we were knee-deep in home renovations, so I put a piece of plywood over the soft spot with the goal of fixing it this winter.
Well, it's amazing how fast things go to pot. Here's what I am dealing with now:
we had replaced the floor after the slide repair, but we used the cheap Allure vinyl so it needed to be done again anyway. So I started to dig in to the rot:
What's interesting is that this TT has the enclosed underbelly, so under the 3/4" OSB there is insulation and the Darco wrap. Whaerever the leak was coming from, I took on a lot of water since there was 1/2" of ice sitting on top of the Darco.
An idea of where we are in the trailer, facing front in this pic:
Here we are with the rot mostly dug out
The tarping process begins:
Now to get into it: The white section you see is fiberglas gel coat, it meets at a seam to the gray part which is a steel skirt:
You can see from the way it's put together that the steel inserts to a crimped molding that prevents any water incursion. You can also see the 2x3 floor joist framing that is wrapped in Darco wrap. The floor frame is wrapped in Darco, then the OSB floor is added, then covered in sheet vinyl, then walls screwed on to that.
So here is the money pic and where I need some help. If you recall from the inside pics, the OSB floor absorbed water right in front of the slide. Here is the pic from the outside with her skirt off, you can see the rot in the floor. However, I cut out a few inches of the styrofoam insulation and the wall in bone dry, so it's NOT coming from above.
The 2x3 framing is wet all along but no signs of water above.
So for the guru's on the forum, where is the water coming in???
Doesn't look like the roof or any windows or appliances. How would I be getting enough water in this spot to cause damage?!?!?!
All ideas and thoughts welcome.
37 REPLIES 37
Options
- Mark as New
- Bookmark
- Subscribe
- Mute
- Subscribe to RSS Feed
- Permalink
- Report Inappropriate Content
Feb-13-2018 03:58 PM
Harbor Frieght is a good place to get tools like a stapler that won't get used much.
As to the repairs; Been There Done That. Twice!
Water gets in and is trapped while it turns the OSB to powder.
As to the repairs; Been There Done That. Twice!
Water gets in and is trapped while it turns the OSB to powder.
Build a life you don't need a vacation from.
2016 Silverado 3500HD DRW D/A 4x4
2018 Keystone Cougar 26RBS
2006 Weekend Warrior FK1900
2016 Silverado 3500HD DRW D/A 4x4
2018 Keystone Cougar 26RBS
2006 Weekend Warrior FK1900
Options
- Mark as New
- Bookmark
- Subscribe
- Mute
- Subscribe to RSS Feed
- Permalink
- Report Inappropriate Content
Feb-13-2018 01:58 PM
BurbMan wrote:
Our old Sunnybrook had a similar set up, they called it a "flush floor" slideout, so when it extended it dropped down and made a flat floor with the inside. When you retracted, it used a cam mechanism to raise the slide floor back up away from the main floor. This slide is straight in/out, was disappointed that the cheaped out on this feature.
Yes, that's it. I forgot you had the SunnyBrook. Yes, they used that same concept. It costs a little more to build them that way, but they work well.
Your flooring looks nice.
Your gaining... Keep up the good work.
John
2005 Ford F350 Super Duty, 4x4; 6.8L V10 with 4.10 RA, 21,000 GCWR, 11,000 GVWR, upgraded 2 1/2" Towbeast Receiver. Hitched with a 1,700# Reese HP WD, HP Dual Cam to a 2004 Sunline Solaris T310R travel trailer.
Options
- Mark as New
- Bookmark
- Subscribe
- Mute
- Subscribe to RSS Feed
- Permalink
- Report Inappropriate Content
Feb-13-2018 08:51 AM
Our old Sunnybrook had a similar set up, they called it a "flush floor" slideout, so when it extended it dropped down and made a flat floor with the inside. When you retracted, it used a cam mechanism to raise the slide floor back up away from the main floor. This slide is straight in/out, was disappointed that the cheaped out on this feature.
I have a couple of staplers too, one shoots T40 staples but those only come 9/16" long max. The other is a narrow crown stapler that will shoot 1" long staples but they are only 3/16 wide, mainly used for carpet work. Will have to look in HD for the one you have.
Good pics on the slide support, that's exactly how I jacked the front of the slide up when I replaced the rotten part of the main floor. Bottle jack and a 4x4, I can go up almost an inch to get the new blocks in there.
Your are right about the front/rear of the slide taking the load from the slide walls, and I thought it was interesting that the gap in the back was still there but the floor seemed to be sagging in the middle.
Forgot to post, this is the new flooring that's going in, vinyl click lock plank from Costco LINK.
Options
- Mark as New
- Bookmark
- Subscribe
- Mute
- Subscribe to RSS Feed
- Permalink
- Report Inappropriate Content
Feb-12-2018 03:34 PM
Hi Don,
Your HDPE will work for what you are doing with it. For future if you need something, UHMW will work well on that application too.
Your slide setup is a bit different than ours. Ours has a cam that lifts the slide up off the carpet on the way in. Yours looks like it slides straight in and out.
Regardless of type, the ends of the slide where the walls are takes the brunt of the load. The walls being more rigid is where the weight loads are. Ends walls and the long side wall. The center does carry some load but not like the ends.
The staple gun, When I did my slide back when, I bought an air stapler from Home Depot at the time to staple the siding back on. They may have different brands now. They change often.
Mine is not the 1/2" wide but they make them in different widths. Mine is 1/4". But it will shoot 1 1/2" long no problem. It's an air stapler and it will shoot staples through 0.70" aluminum no problem. I was amazed...
I run mine on an air regulator as with 80 psi from the compressor it will blow the staples in way to deep. You can set some of the force adjustment at the stapler for fine tuning, but for coarse adjustment you have to tone down the pressure. Just do a test piece and get to set right for what you are stapling.
If you need a little extra room to get you block in, you may be able to jack up that end of the slide 1/4 to 1/2" to allow you to put the HPDE block in easier. Let the slide out a ways to a point you can get closer to put the block in. That might be all the way out.
Get up on a ladder and look up top above the slide for how much room there is to lift before you touch slide ceiling to the side of the camper. There is generally some amount of room you can go up as the rubber seals take up the gap. Mine has a good 3/4 to 1" of room.
If you are going to lift it, put the jack at the end walls, again that is where the strength it.
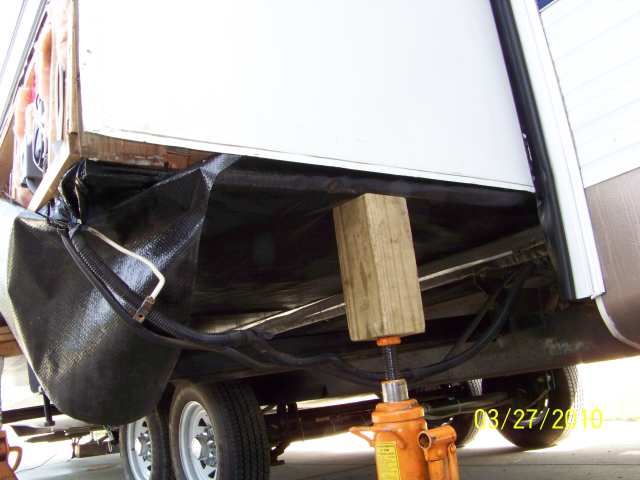
Jack stands to hold the slide after jacking
Hope this helps.
John
Your HDPE will work for what you are doing with it. For future if you need something, UHMW will work well on that application too.
Your slide setup is a bit different than ours. Ours has a cam that lifts the slide up off the carpet on the way in. Yours looks like it slides straight in and out.
Regardless of type, the ends of the slide where the walls are takes the brunt of the load. The walls being more rigid is where the weight loads are. Ends walls and the long side wall. The center does carry some load but not like the ends.
The staple gun, When I did my slide back when, I bought an air stapler from Home Depot at the time to staple the siding back on. They may have different brands now. They change often.
Mine is not the 1/2" wide but they make them in different widths. Mine is 1/4". But it will shoot 1 1/2" long no problem. It's an air stapler and it will shoot staples through 0.70" aluminum no problem. I was amazed...
I run mine on an air regulator as with 80 psi from the compressor it will blow the staples in way to deep. You can set some of the force adjustment at the stapler for fine tuning, but for coarse adjustment you have to tone down the pressure. Just do a test piece and get to set right for what you are stapling.
If you need a little extra room to get you block in, you may be able to jack up that end of the slide 1/4 to 1/2" to allow you to put the HPDE block in easier. Let the slide out a ways to a point you can get closer to put the block in. That might be all the way out.
Get up on a ladder and look up top above the slide for how much room there is to lift before you touch slide ceiling to the side of the camper. There is generally some amount of room you can go up as the rubber seals take up the gap. Mine has a good 3/4 to 1" of room.
If you are going to lift it, put the jack at the end walls, again that is where the strength it.
Jack stands to hold the slide after jacking
Hope this helps.
John
2005 Ford F350 Super Duty, 4x4; 6.8L V10 with 4.10 RA, 21,000 GCWR, 11,000 GVWR, upgraded 2 1/2" Towbeast Receiver. Hitched with a 1,700# Reese HP WD, HP Dual Cam to a 2004 Sunline Solaris T310R travel trailer.
Options
- Mark as New
- Bookmark
- Subscribe
- Mute
- Subscribe to RSS Feed
- Permalink
- Report Inappropriate Content
Feb-12-2018 07:42 AM
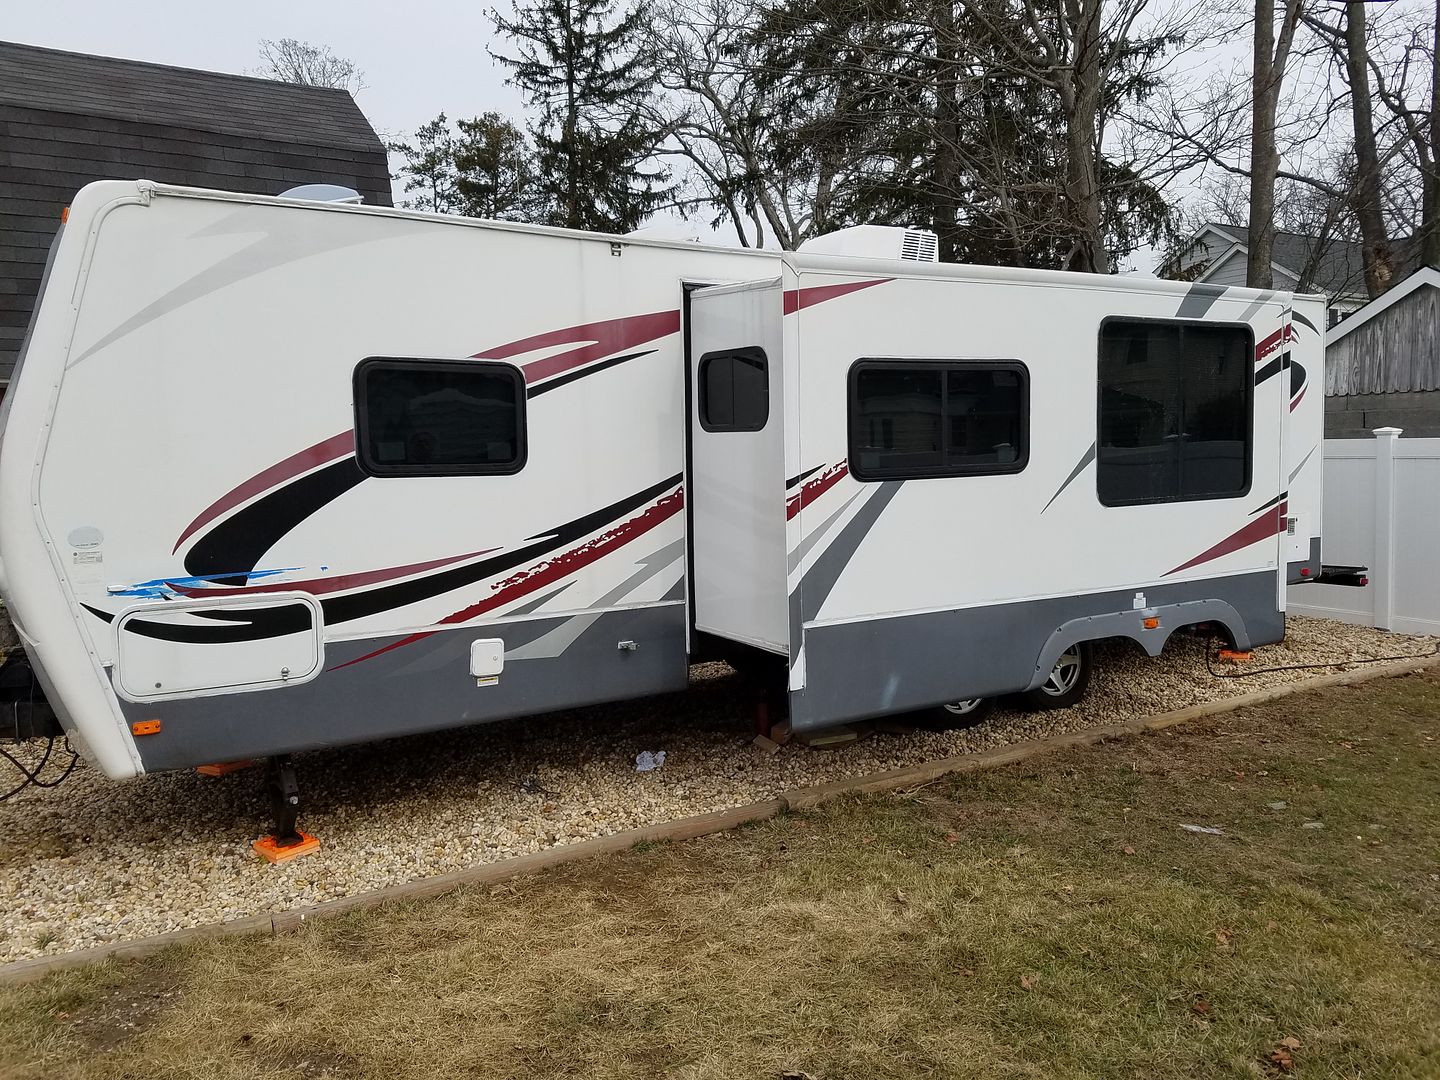
Well, more progress last week. Got the skirt back on, the baggage door in and everything re-caulked and (hopefully) water tight. Had some torrential rain here this weekend, so I rolled the slide in for that....no sense tempting fate LOL.
I was getting some water running under the tarp so I used blue painter's tape to put some cardboard over the baggage compartment when the door was off, so word of caution, don't get blue tape wet!!
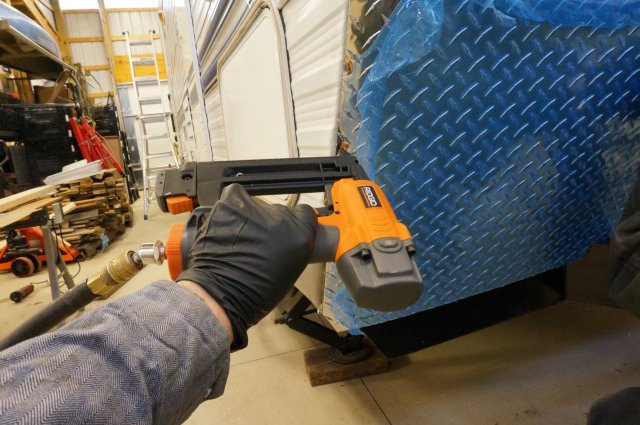
As an aside, I need to find out where I can buy one of these pneumatic guns that shoots these 1-1/2" x 1/2" staples...
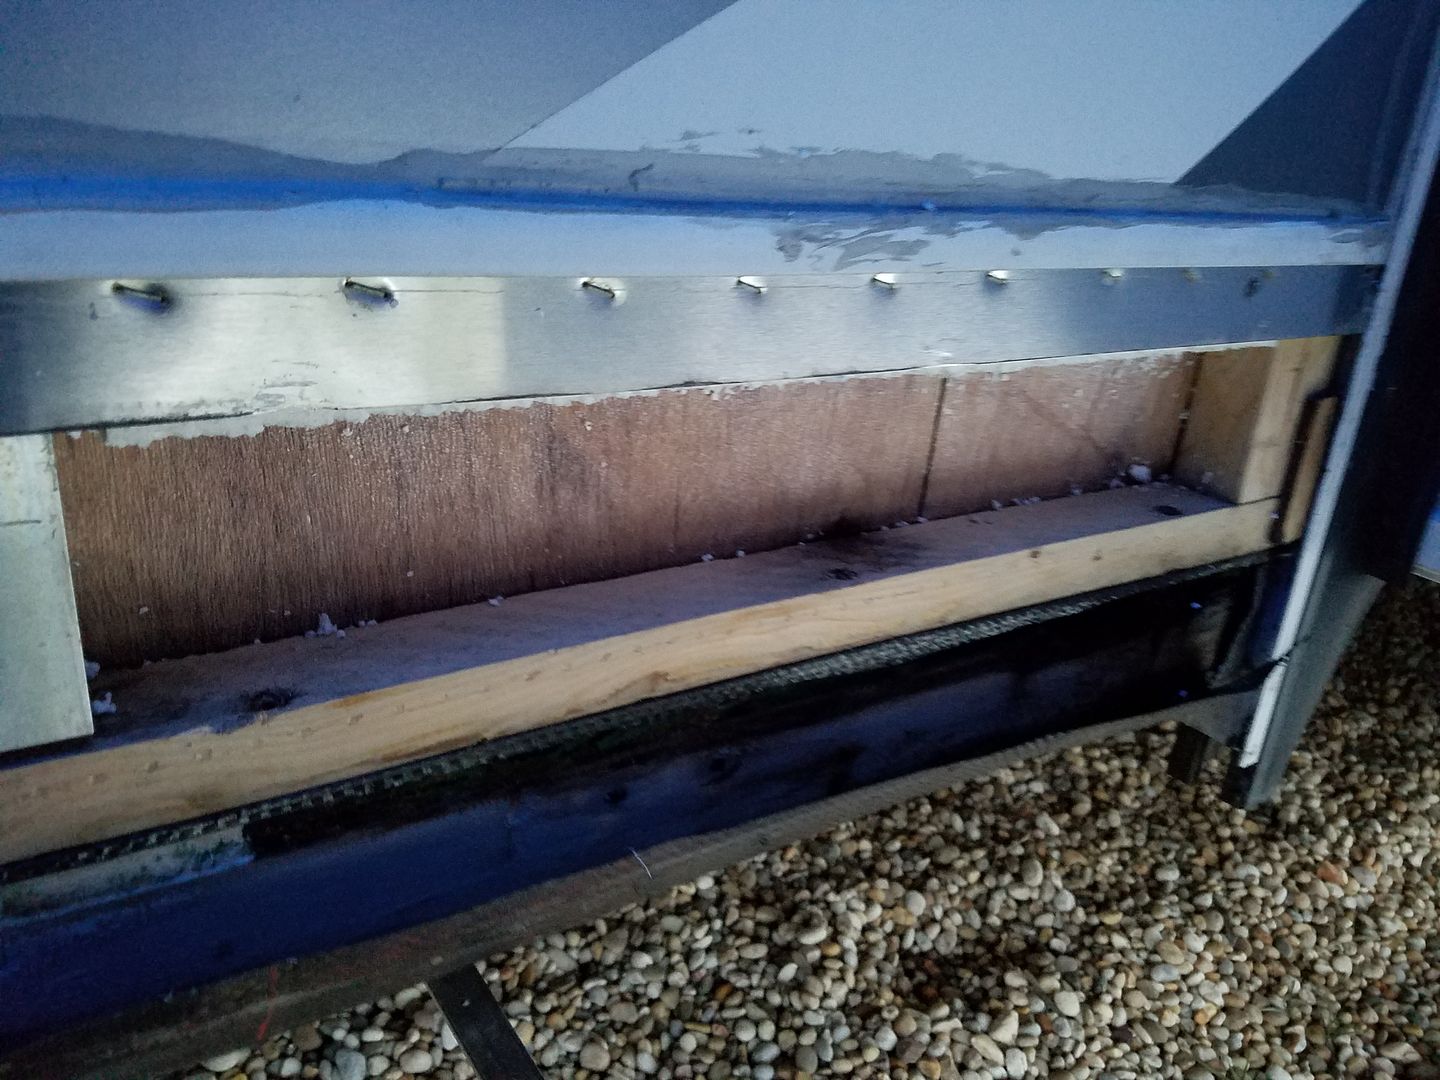
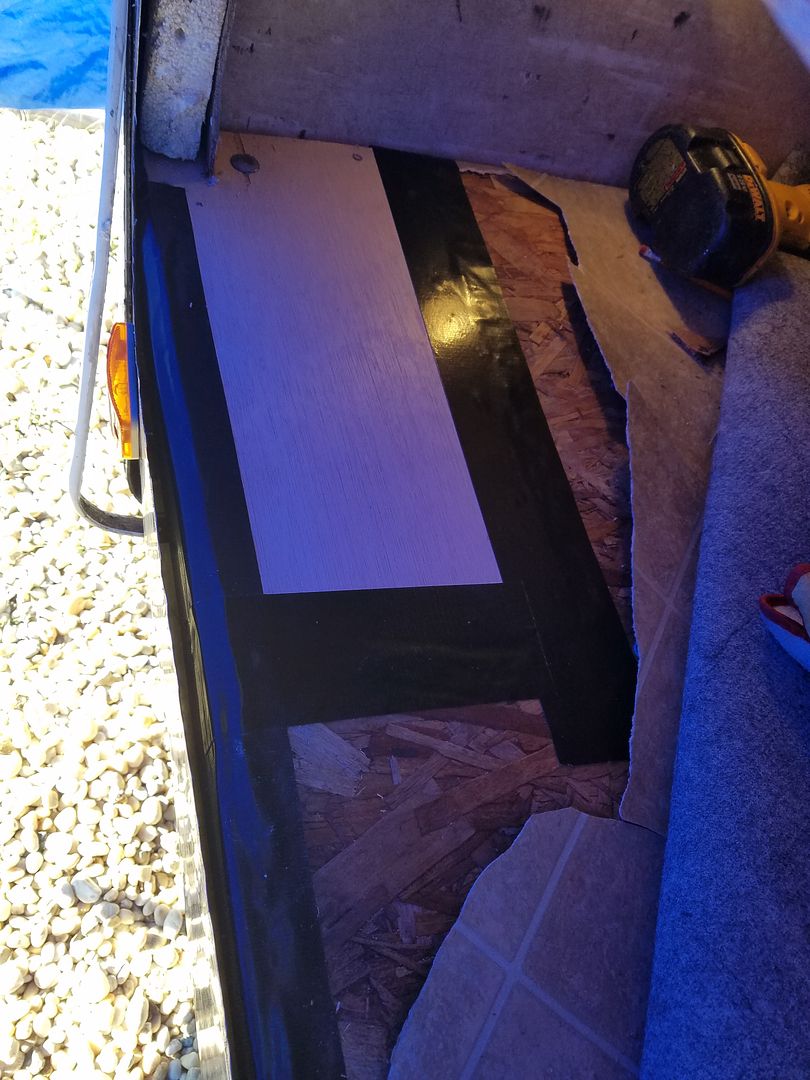
On to replacing the bottom sweeper seal for the slide. The bulb section on the bottom of the seal closes against the edge of the slide to keep the water out when traveling, but when the slide is open it's job is mainly to keep out the dirt, bugs, and drafts.
Taking the seal off reveals another issue...the slide floor is designed to ride on plastic blocks about 1" square. The blocks hold the slide floor off the main floor by about 5/16"and allow the slide to close with minimal friction and abrasion to the main floor. Last year we noticed that the main floor was getting quite scratched up in one section and here's why:
Here you can see one of the plastic blocks at the front of the slide. There are 5 or 6 of these blocks along the 13' length of the slide floor
Here's a close up of the next one headed toward the rear
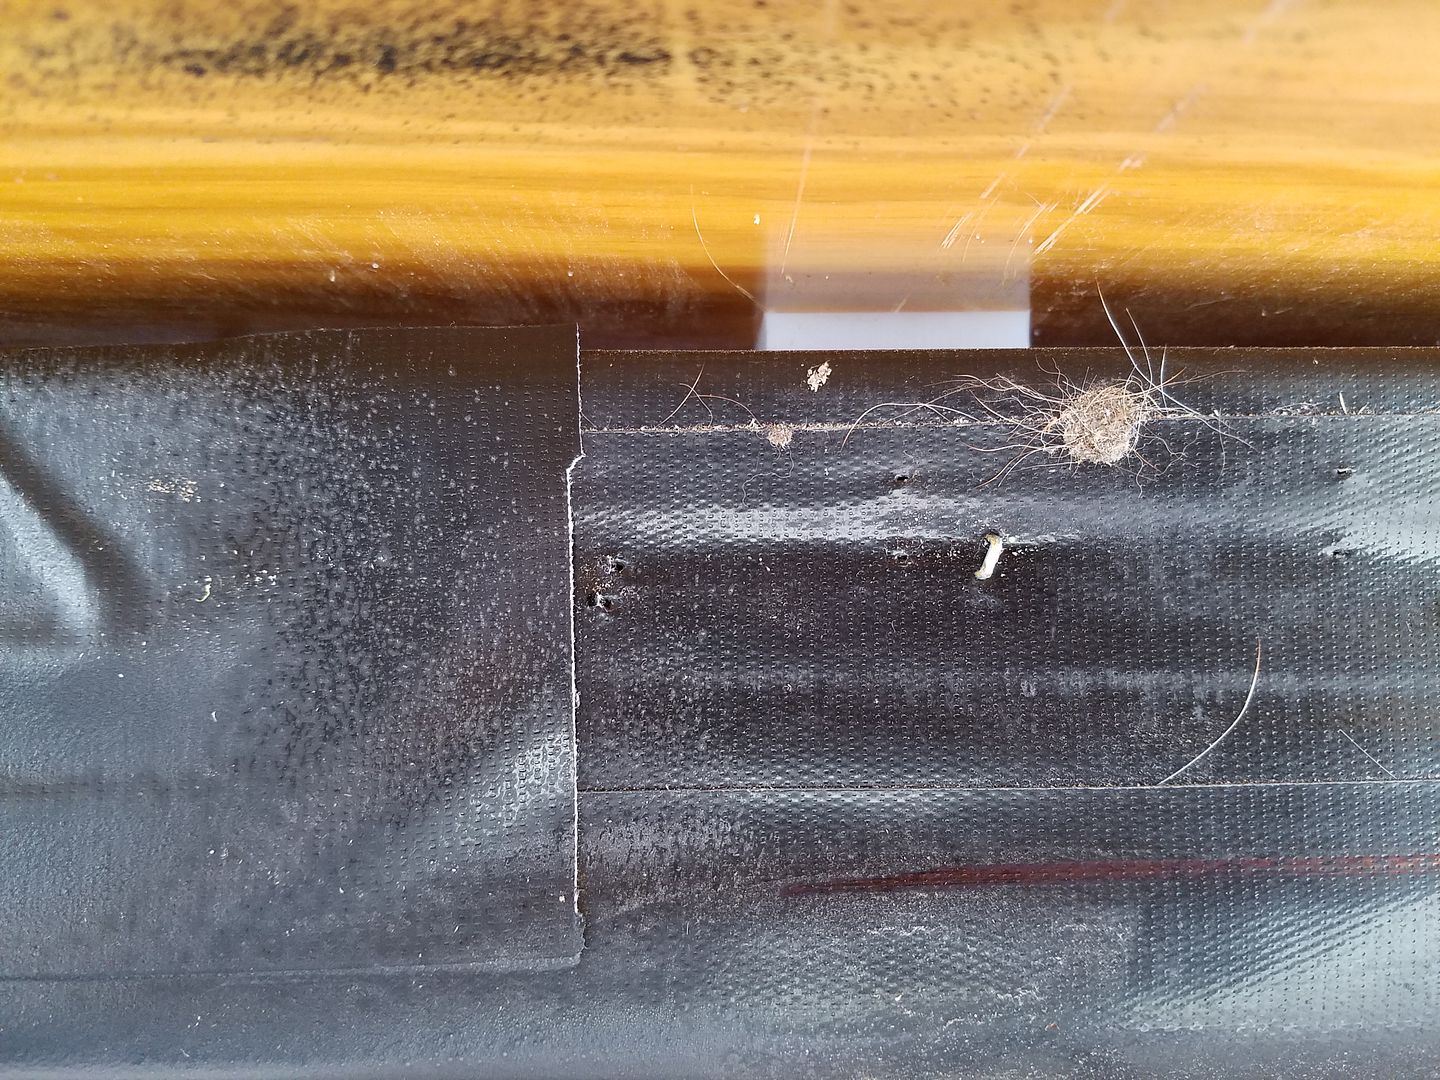
Here's looking toward the back of the slide. You can see the scratches in the slide floor where sand got on top of the plastic block
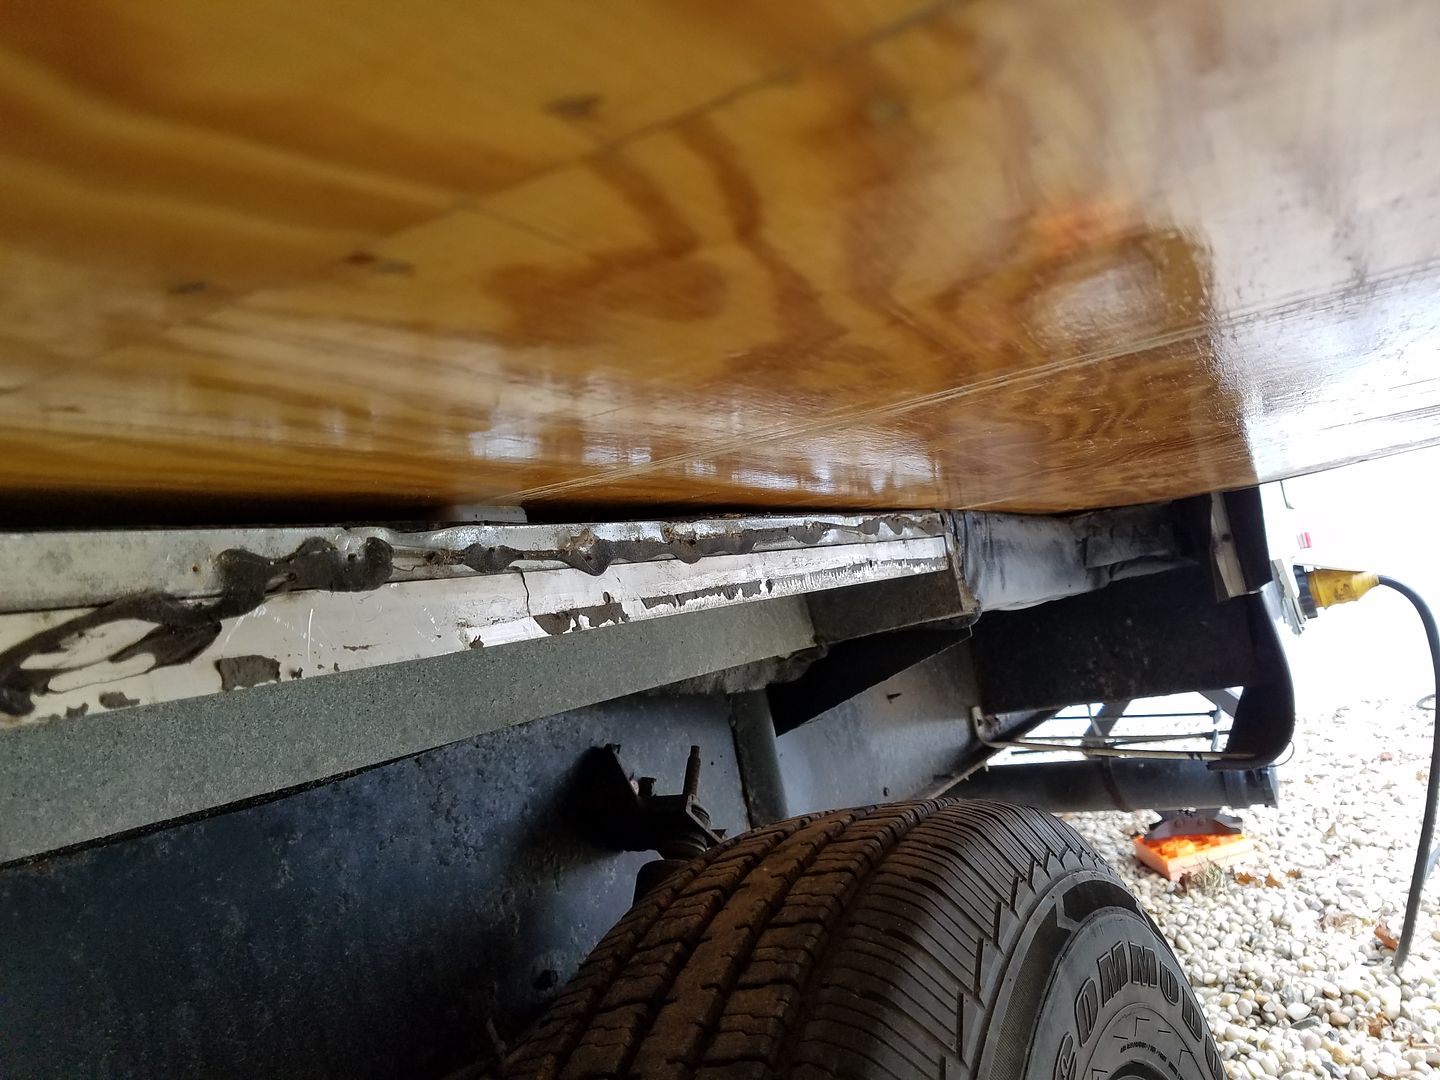
Note looking back toward the rear of the wheel well, the slide floor is sitting directly on the main floor. Here's a closer look
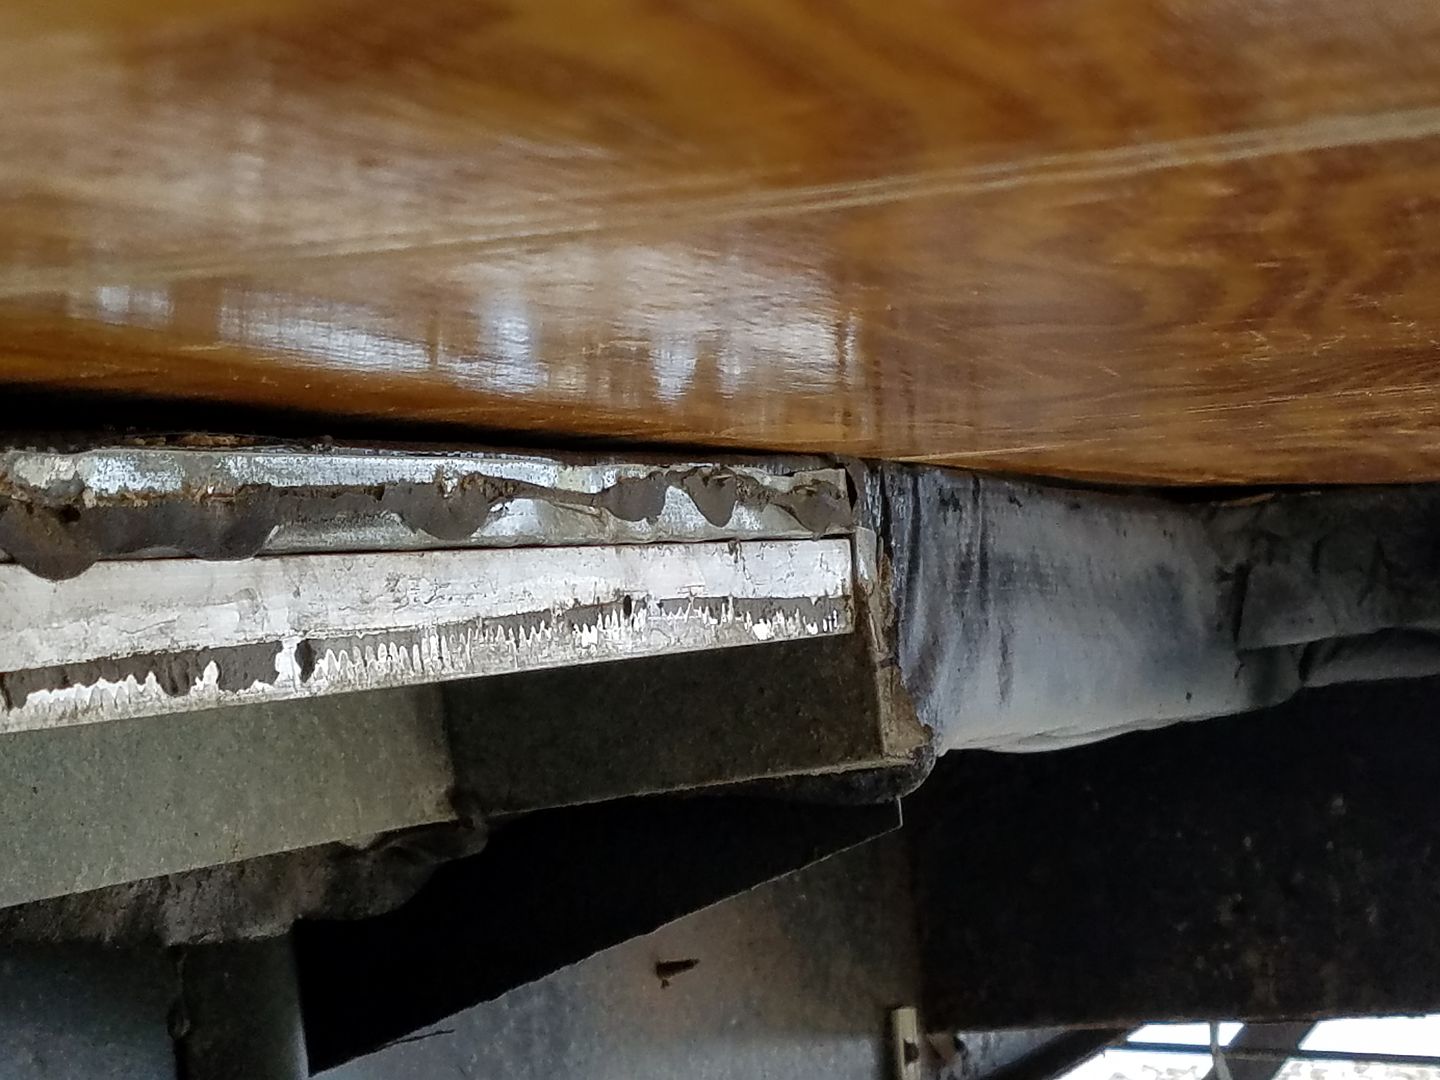
You can see the gap open up again and the plastic block is intact at the rear of the slide. The framing looks straight enough, so I'm thinking maybe I either lost a plastic block in that location of the slide floor is beginning to sag? I re-did the slide floor in 2015 and the scratches just started to appear on the main floor last year.
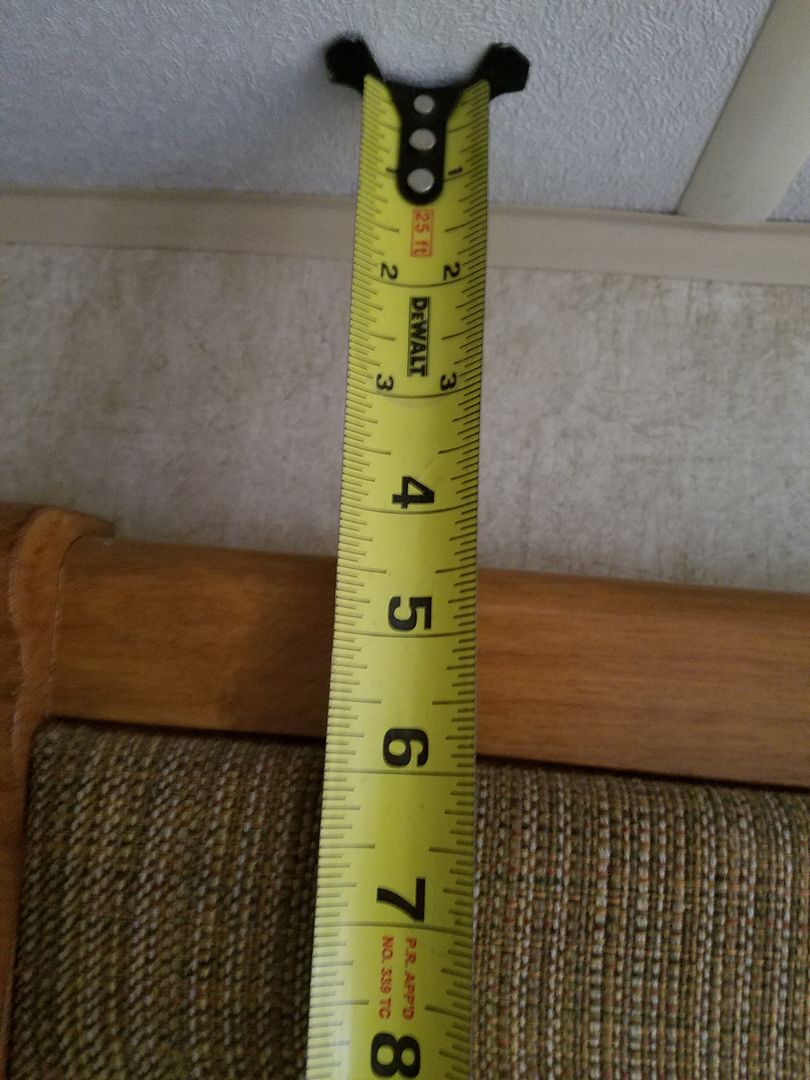
Looking inside, I measured from the top of the slide trim to the ceiling to get an approximate idea of where the slide was, and it's sitting at 3-5/8"
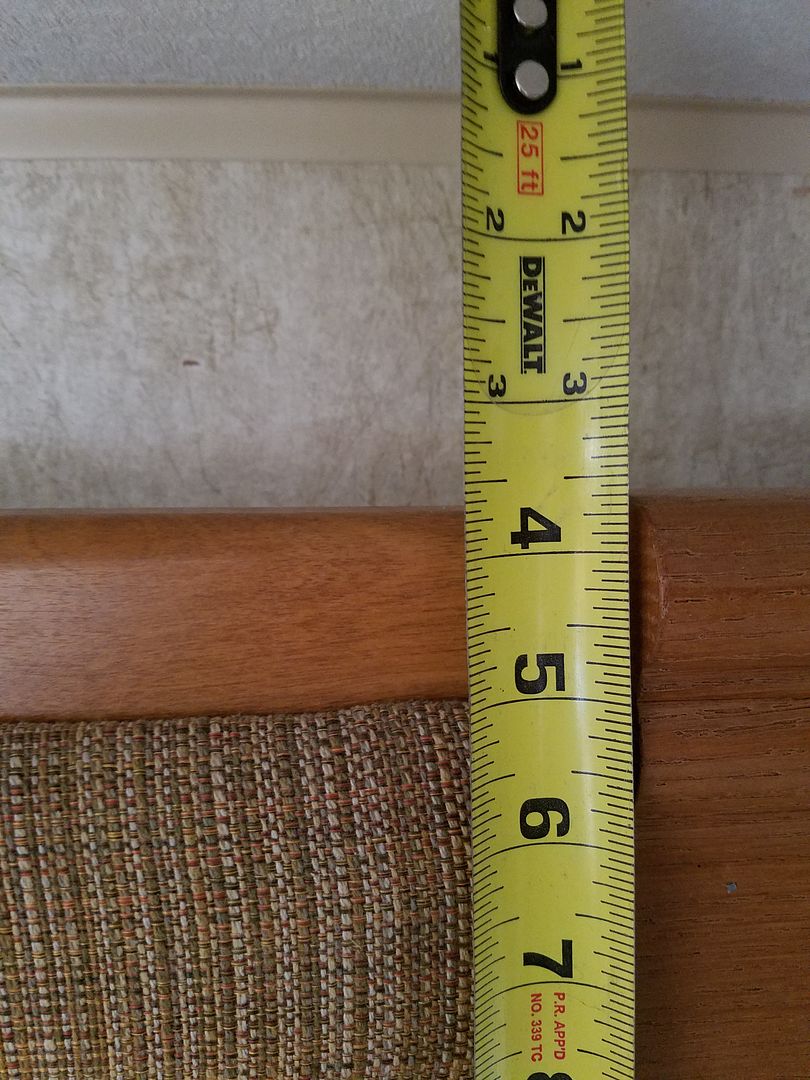
Here is the rear is a different story, it's more like 4-3/8", or 3/4" lower than the front
At any rate, I could not find the little plastic blocks, so I bought a 1' x 1' x 3/8" thick piece of HDPE from Interstate Plastics. I originally thought the blocks were nylon, but it looks like like this hi-density polyethylene has replaced nylon in applications like these.
The OEM blocks are screwed into the floor with recessed screws. I had easy access with the slide floor out but not now, so I'll need to make some aluminum brackets that hold the blocks in place and attach to the frame from the side. Instead of a small block, I may do one 1" wide and 6" long since I have the material.
Plastic will be here Wed so stay tuned for next round of pics, as always comments and ideas welcome.
I was getting some water running under the tarp so I used blue painter's tape to put some cardboard over the baggage compartment when the door was off, so word of caution, don't get blue tape wet!!
As an aside, I need to find out where I can buy one of these pneumatic guns that shoots these 1-1/2" x 1/2" staples...
On to replacing the bottom sweeper seal for the slide. The bulb section on the bottom of the seal closes against the edge of the slide to keep the water out when traveling, but when the slide is open it's job is mainly to keep out the dirt, bugs, and drafts.
Taking the seal off reveals another issue...the slide floor is designed to ride on plastic blocks about 1" square. The blocks hold the slide floor off the main floor by about 5/16"and allow the slide to close with minimal friction and abrasion to the main floor. Last year we noticed that the main floor was getting quite scratched up in one section and here's why:
Here you can see one of the plastic blocks at the front of the slide. There are 5 or 6 of these blocks along the 13' length of the slide floor
Here's a close up of the next one headed toward the rear
Here's looking toward the back of the slide. You can see the scratches in the slide floor where sand got on top of the plastic block
Note looking back toward the rear of the wheel well, the slide floor is sitting directly on the main floor. Here's a closer look
You can see the gap open up again and the plastic block is intact at the rear of the slide. The framing looks straight enough, so I'm thinking maybe I either lost a plastic block in that location of the slide floor is beginning to sag? I re-did the slide floor in 2015 and the scratches just started to appear on the main floor last year.
Looking inside, I measured from the top of the slide trim to the ceiling to get an approximate idea of where the slide was, and it's sitting at 3-5/8"
Here is the rear is a different story, it's more like 4-3/8", or 3/4" lower than the front
At any rate, I could not find the little plastic blocks, so I bought a 1' x 1' x 3/8" thick piece of HDPE from Interstate Plastics. I originally thought the blocks were nylon, but it looks like like this hi-density polyethylene has replaced nylon in applications like these.
The OEM blocks are screwed into the floor with recessed screws. I had easy access with the slide floor out but not now, so I'll need to make some aluminum brackets that hold the blocks in place and attach to the frame from the side. Instead of a small block, I may do one 1" wide and 6" long since I have the material.
Plastic will be here Wed so stay tuned for next round of pics, as always comments and ideas welcome.
Options
- Mark as New
- Bookmark
- Subscribe
- Mute
- Subscribe to RSS Feed
- Permalink
- Report Inappropriate Content
Feb-07-2018 05:04 PM
Dirtpig wrote:
I am shocked to see OSB used in place of plywood in that trailer, what was the mfg thinking!! unreal.
Sadly, OSB is used in floor in a lot of brands. I would venture to say, most. Your Northwood may be the few left using plywood in a TT.
Oh and I like your truck!!! You may have more low end torque, but I have more cylinders.... 🙂 And trust me she has a drinking problem. Just not a pulling problem. Yeh!
2005 Ford F350 Super Duty, 4x4; 6.8L V10 with 4.10 RA, 21,000 GCWR, 11,000 GVWR, upgraded 2 1/2" Towbeast Receiver. Hitched with a 1,700# Reese HP WD, HP Dual Cam to a 2004 Sunline Solaris T310R travel trailer.
Options
- Mark as New
- Bookmark
- Subscribe
- Mute
- Subscribe to RSS Feed
- Permalink
- Report Inappropriate Content
Feb-07-2018 03:42 PM
The mfr was thinking it was cheaper...LOL....at least they glued and stapled the OSB to the 2x3 floor joists so it stiffened it up quite a bit.
John, I used the rubber spray on my slide out repair from 2013. On the outside wall of the slide, there is a 2x4 that attaches to the slide frame and the wall sits on that. The factory had it wrapped in Darco and stapled to death...water got in there and rotted it out. I replaced that 2x4 and sprayed it the rubber coat and it's holing up well, not peeling or showing any signs of cracking or failing. I'll post a pic when I get back to this project. I have another issue I am dealing with on the slide and will post pics on that as well. It' supposed to warm up this weekend, and I should be out of the woods with this flu by then.
John, I used the rubber spray on my slide out repair from 2013. On the outside wall of the slide, there is a 2x4 that attaches to the slide frame and the wall sits on that. The factory had it wrapped in Darco and stapled to death...water got in there and rotted it out. I replaced that 2x4 and sprayed it the rubber coat and it's holing up well, not peeling or showing any signs of cracking or failing. I'll post a pic when I get back to this project. I have another issue I am dealing with on the slide and will post pics on that as well. It' supposed to warm up this weekend, and I should be out of the woods with this flu by then.
Options
- Mark as New
- Bookmark
- Subscribe
- Mute
- Subscribe to RSS Feed
- Permalink
- Report Inappropriate Content
Feb-07-2018 03:11 PM
I am shocked to see OSB used in place of plywood in that trailer, what was the mfg thinking!! unreal.
2015 Nash 25C bumper pull /w 300watts solar my install
My Truck & RV youtube channel
2005 F-350 Diesel 4x4 CC SB SRW
2001 Honda XR400: many mods
12ft Lund WC boat & 9.9 Yamaha 4 stroke on custom loader.
My Truck & RV youtube channel
2005 F-350 Diesel 4x4 CC SB SRW
2001 Honda XR400: many mods
12ft Lund WC boat & 9.9 Yamaha 4 stroke on custom loader.
Options
- Mark as New
- Bookmark
- Subscribe
- Mute
- Subscribe to RSS Feed
- Permalink
- Report Inappropriate Content
Feb-07-2018 01:54 PM
Hi Don,
Your progress looks great!!
The FLex Mend, h'mm I have had good luck with it. It is on my slide floor since 2010 and still bonded well. Also used it on the bottom of the main camper where a rip was. Wonder if your roll was old before you got it or something. I have not had that issue.
I also use Gorilla tape too. I used it on my bottom cover, the chloroplast plastic corrugated looking stuff. Put some on last year and I even used Naphtha to clean the surface before putting it on. Mixed results. Some bonded well, other areas let go by the wheel wells. Maybe spraying up road water got it?? And I even did the heat and press trick on the the gorilla tape too. Adhesives are a science all their own. Sometimes the margin for error is very small.
I for sure like the looks of your rubber spray. If it will stay bonded, that would be a real good fix. Your right, a zillion staples go in these things.
Thanks for sharing.
John
2005 Ford F350 Super Duty, 4x4; 6.8L V10 with 4.10 RA, 21,000 GCWR, 11,000 GVWR, upgraded 2 1/2" Towbeast Receiver. Hitched with a 1,700# Reese HP WD, HP Dual Cam to a 2004 Sunline Solaris T310R travel trailer.
Options
- Mark as New
- Bookmark
- Subscribe
- Mute
- Subscribe to RSS Feed
- Permalink
- Report Inappropriate Content
Feb-07-2018 10:30 AM
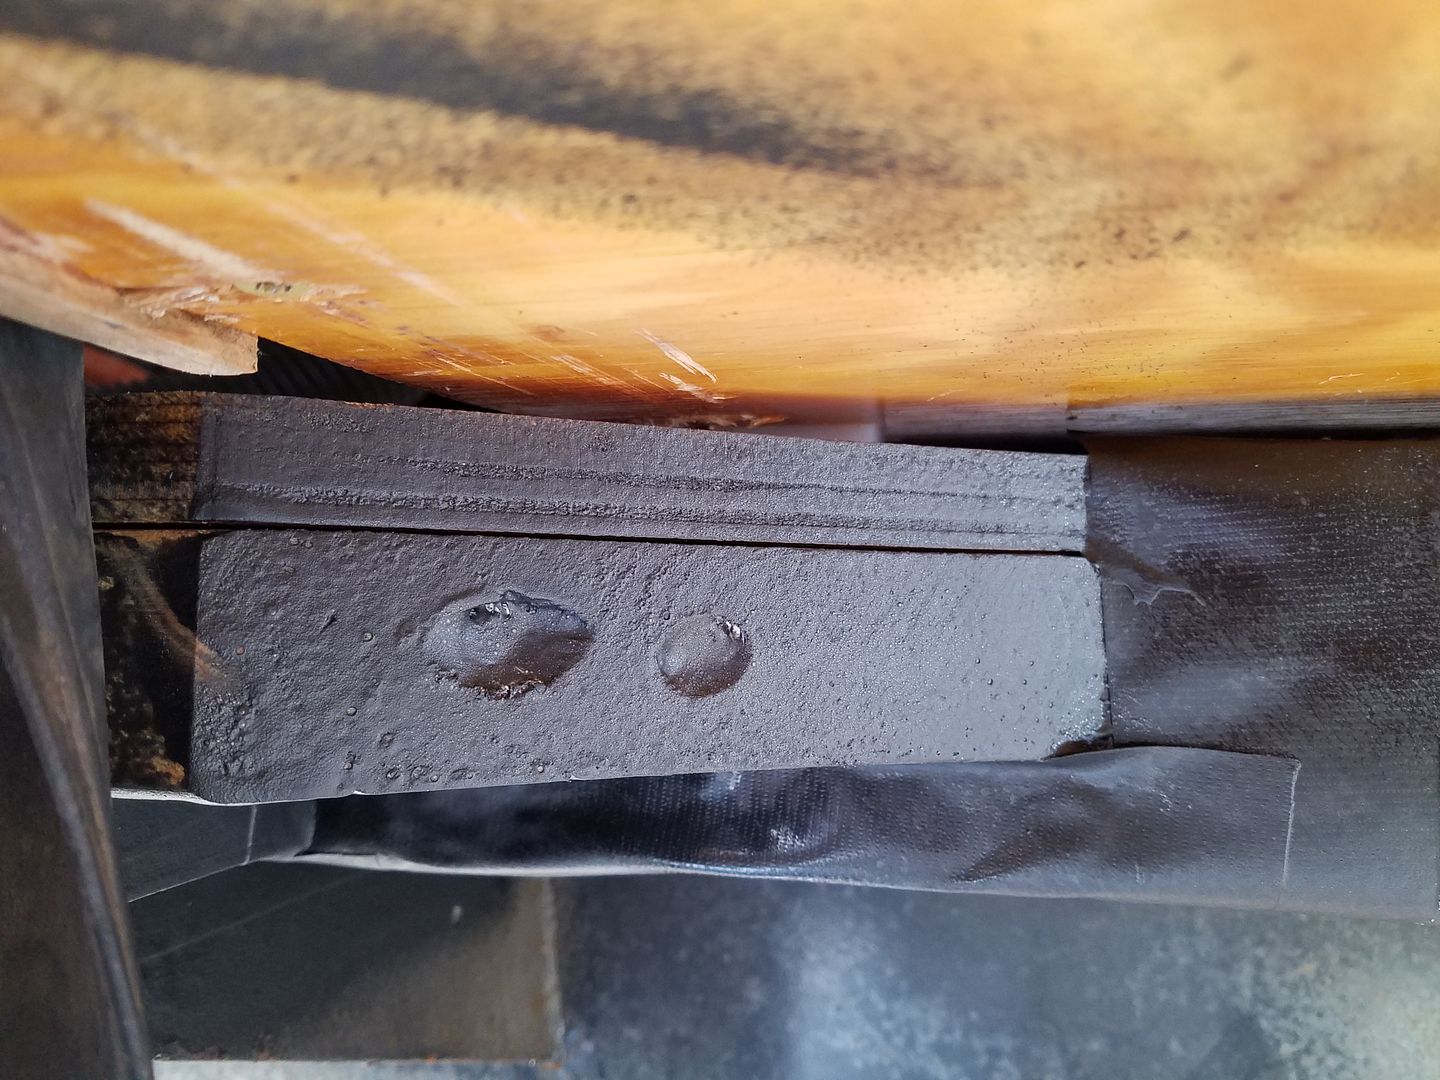
Well, the weather hasn't been the best here in the northeast, but I did manage to make some progress. The fender skirt is back on and the water fill re-attached. The side wiper seals on the slide have been replaced and look to be positioned well.

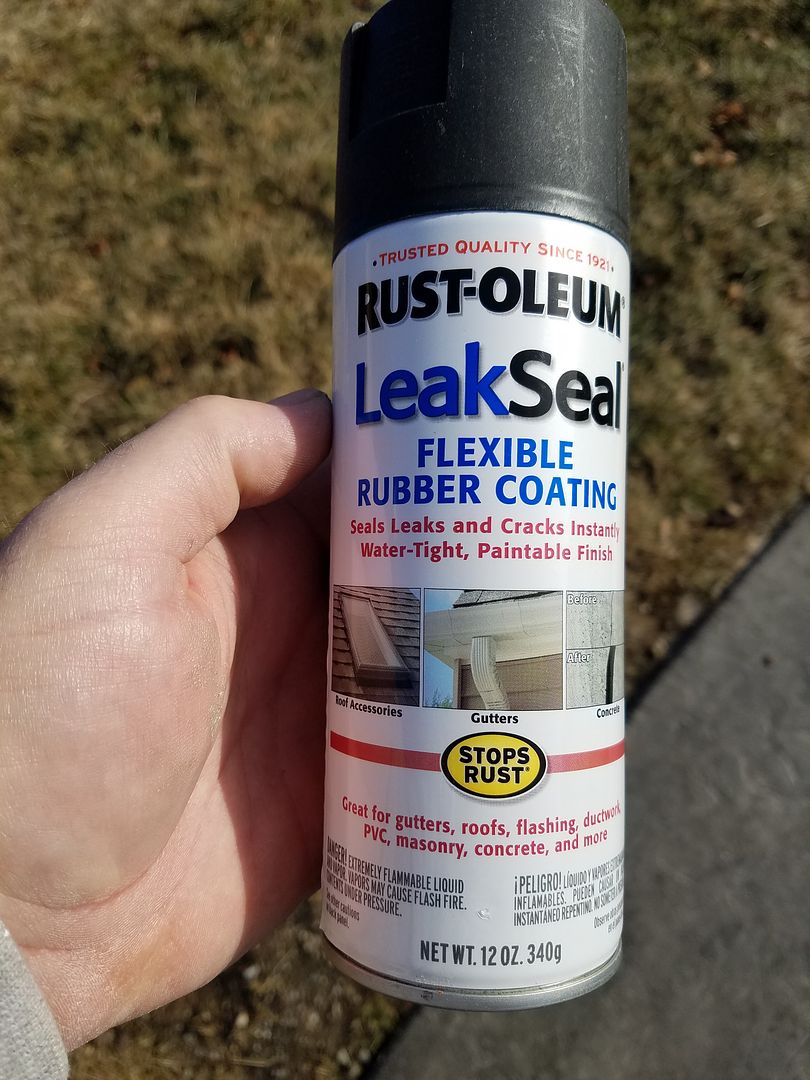
On the rubber spray, that corner block was wrapped in Darco from the factory and had a zillion staples in it. I coated it with CPES, caulked up the screw holes and then sprayed with the rubber coating. If the wood gets wet, it won't absorb the water and water will roll off. The horizontal piece was patched with Gorilla tape and sprayed with rubber seal.
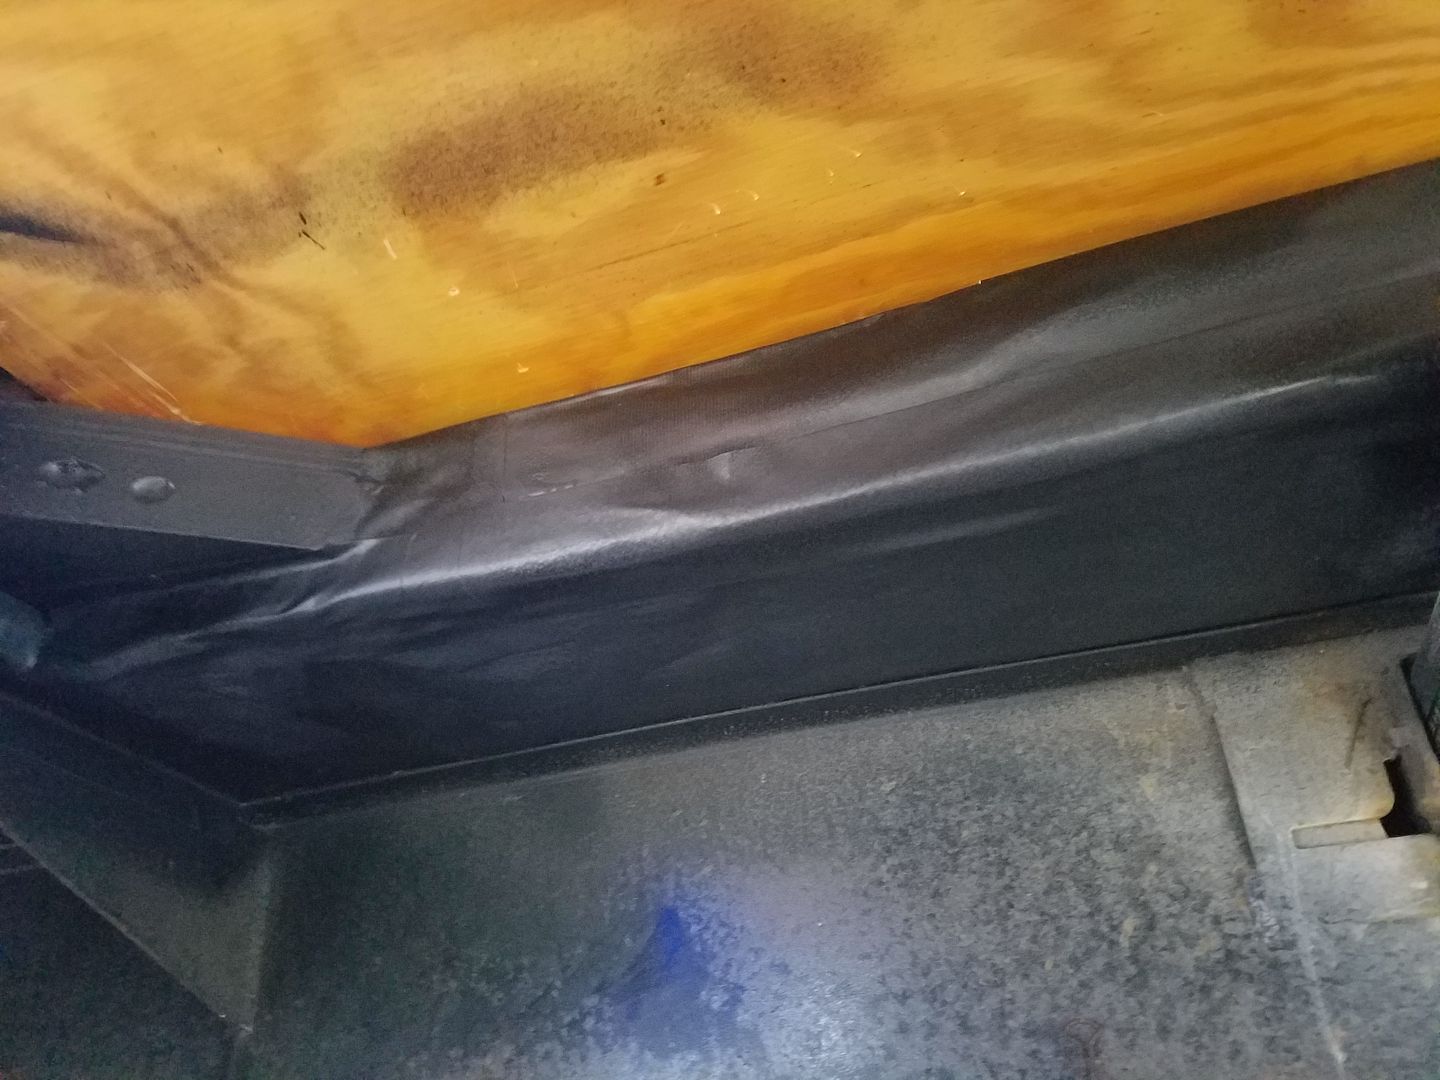
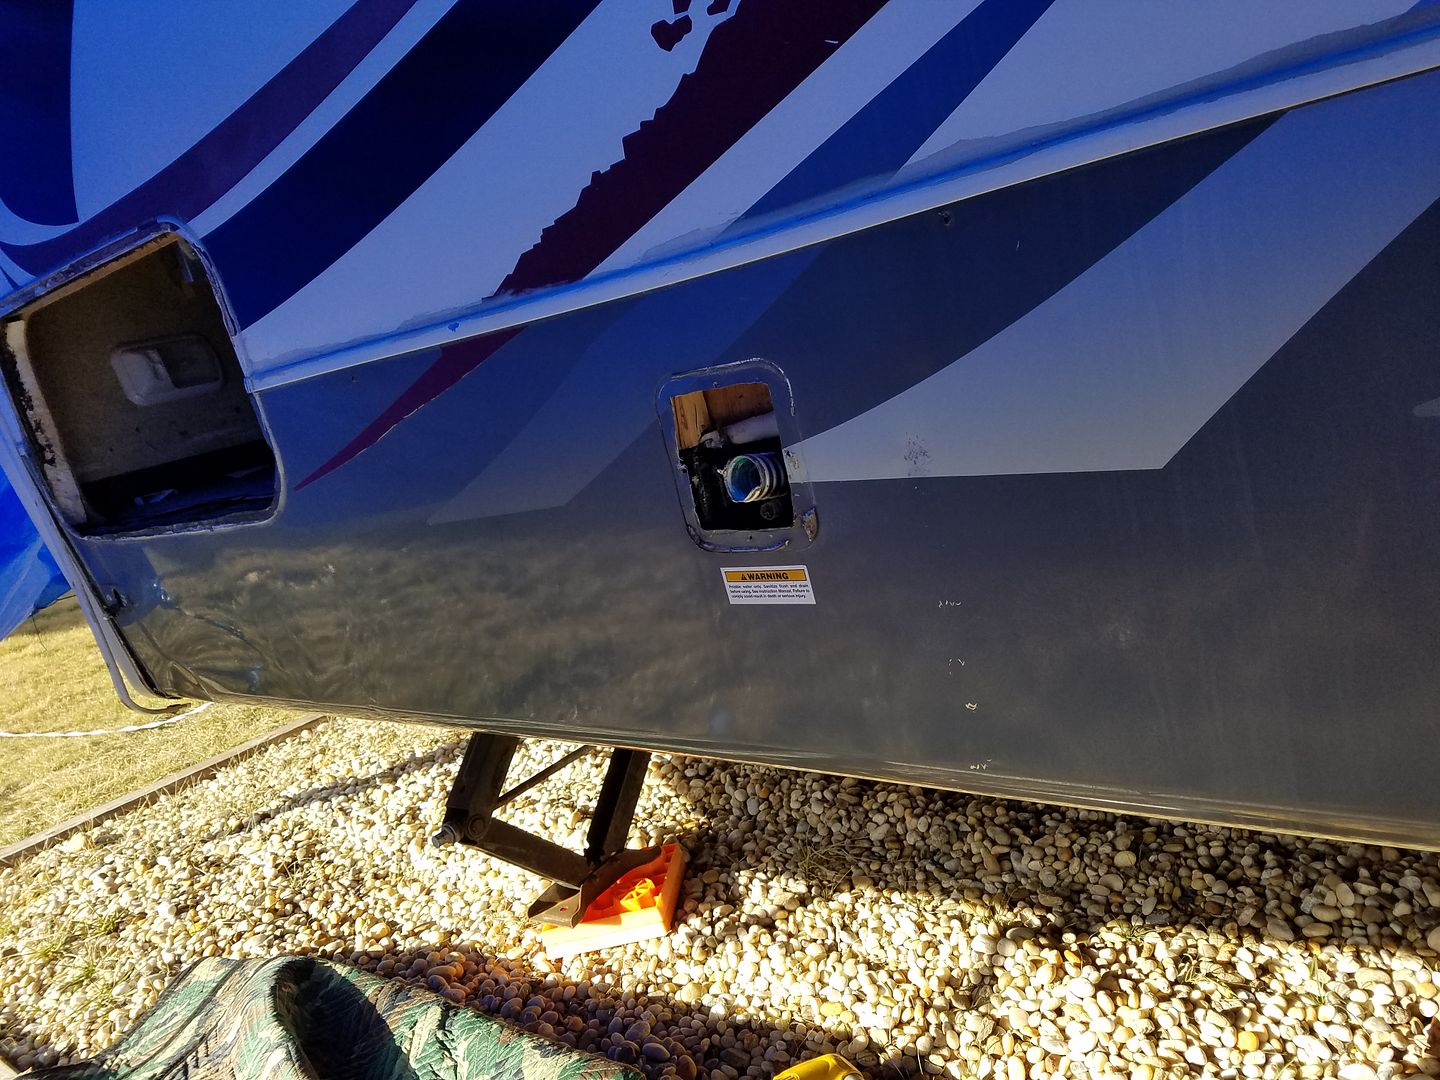
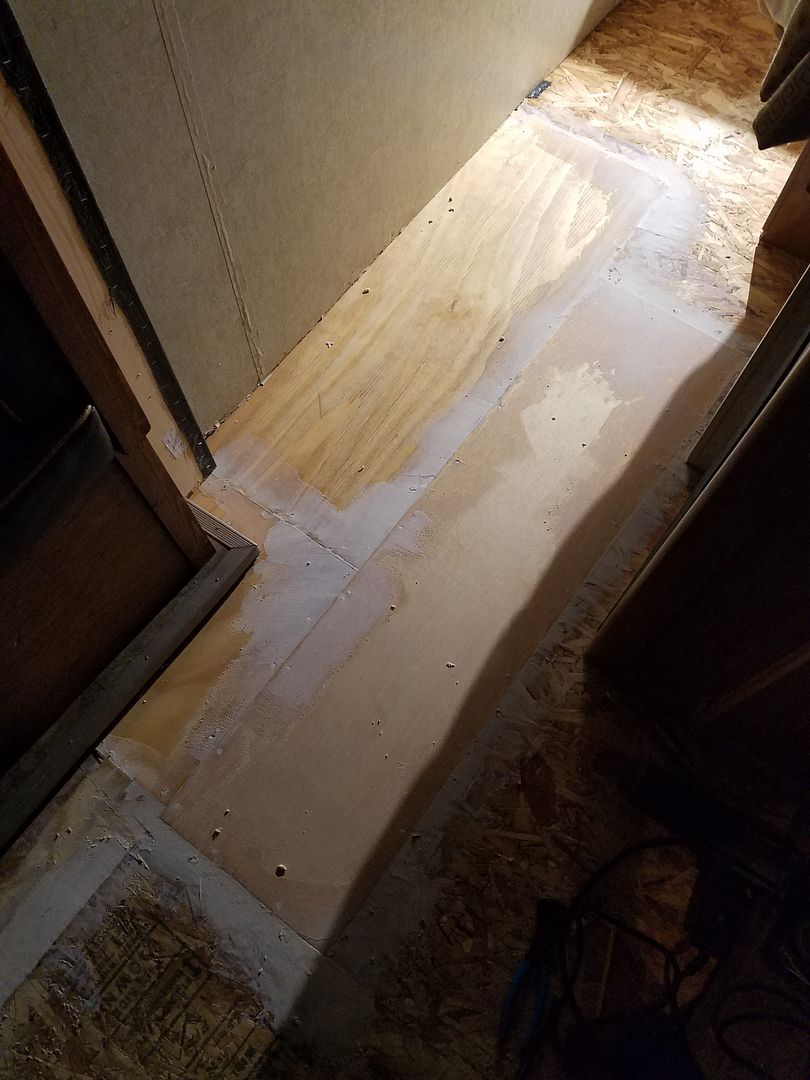
On to fix water damage #2...this I actually caused a few years ago when I left the storage hatch open. The door was not hooked open, but it wasn't latched either, so it was dangling. We got a bad blowing storm up by Lake Erie back in 2014, and water blew in and soaked the floor. It dried out but eventually crumbled due to dry rot. Fortunately the frame was still solid.
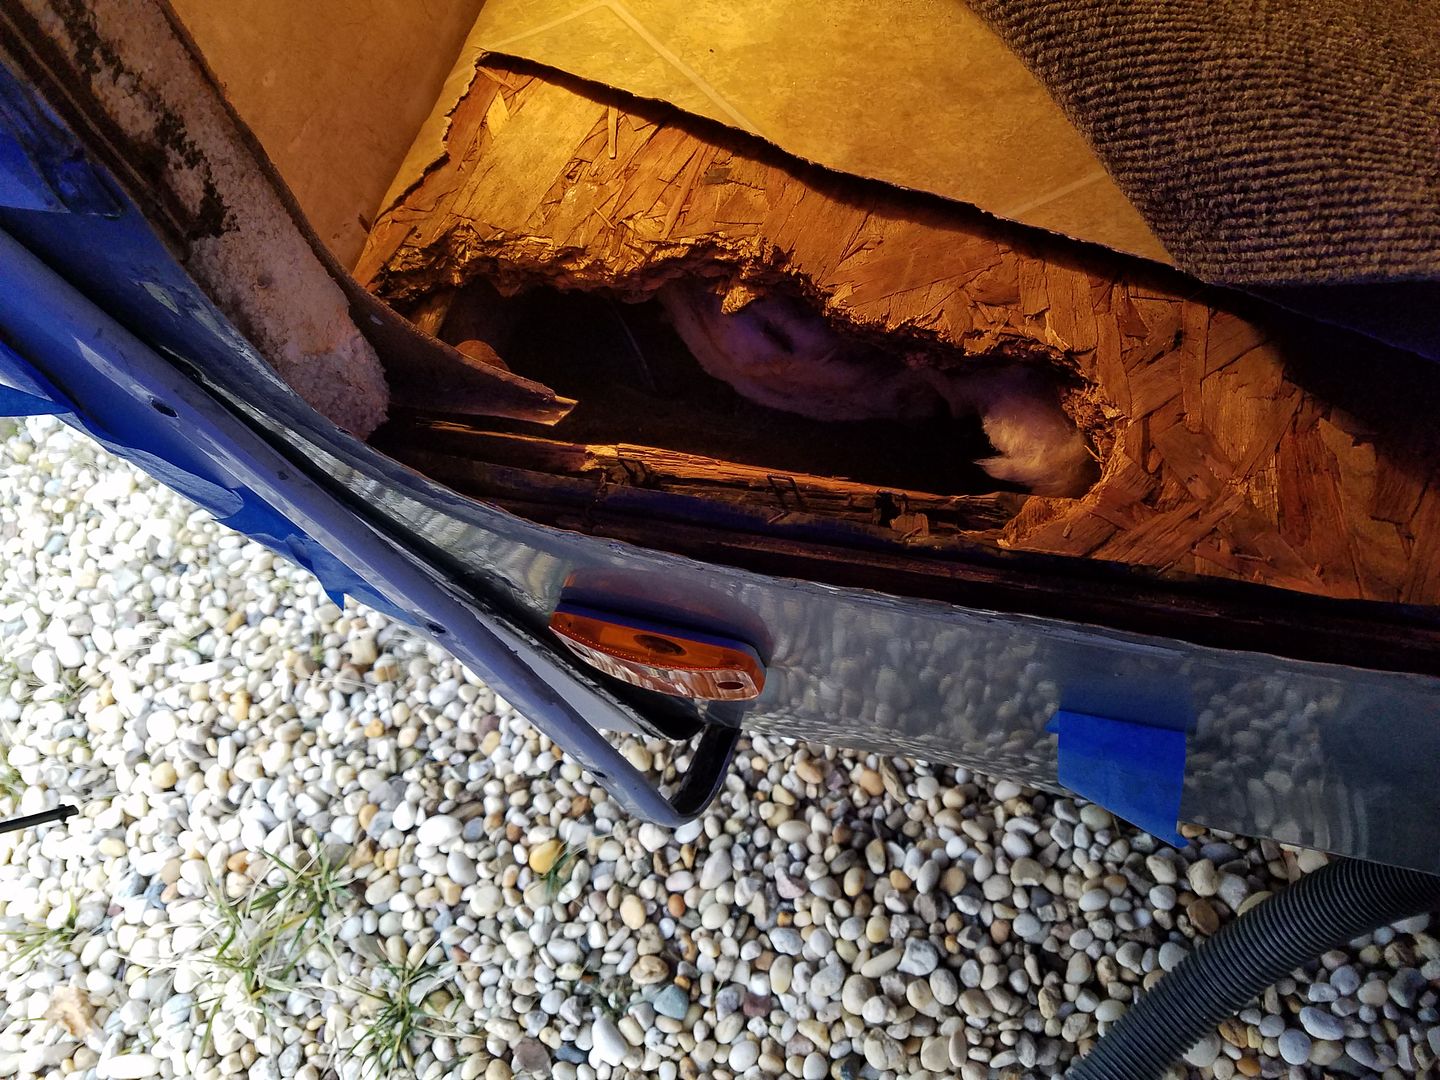
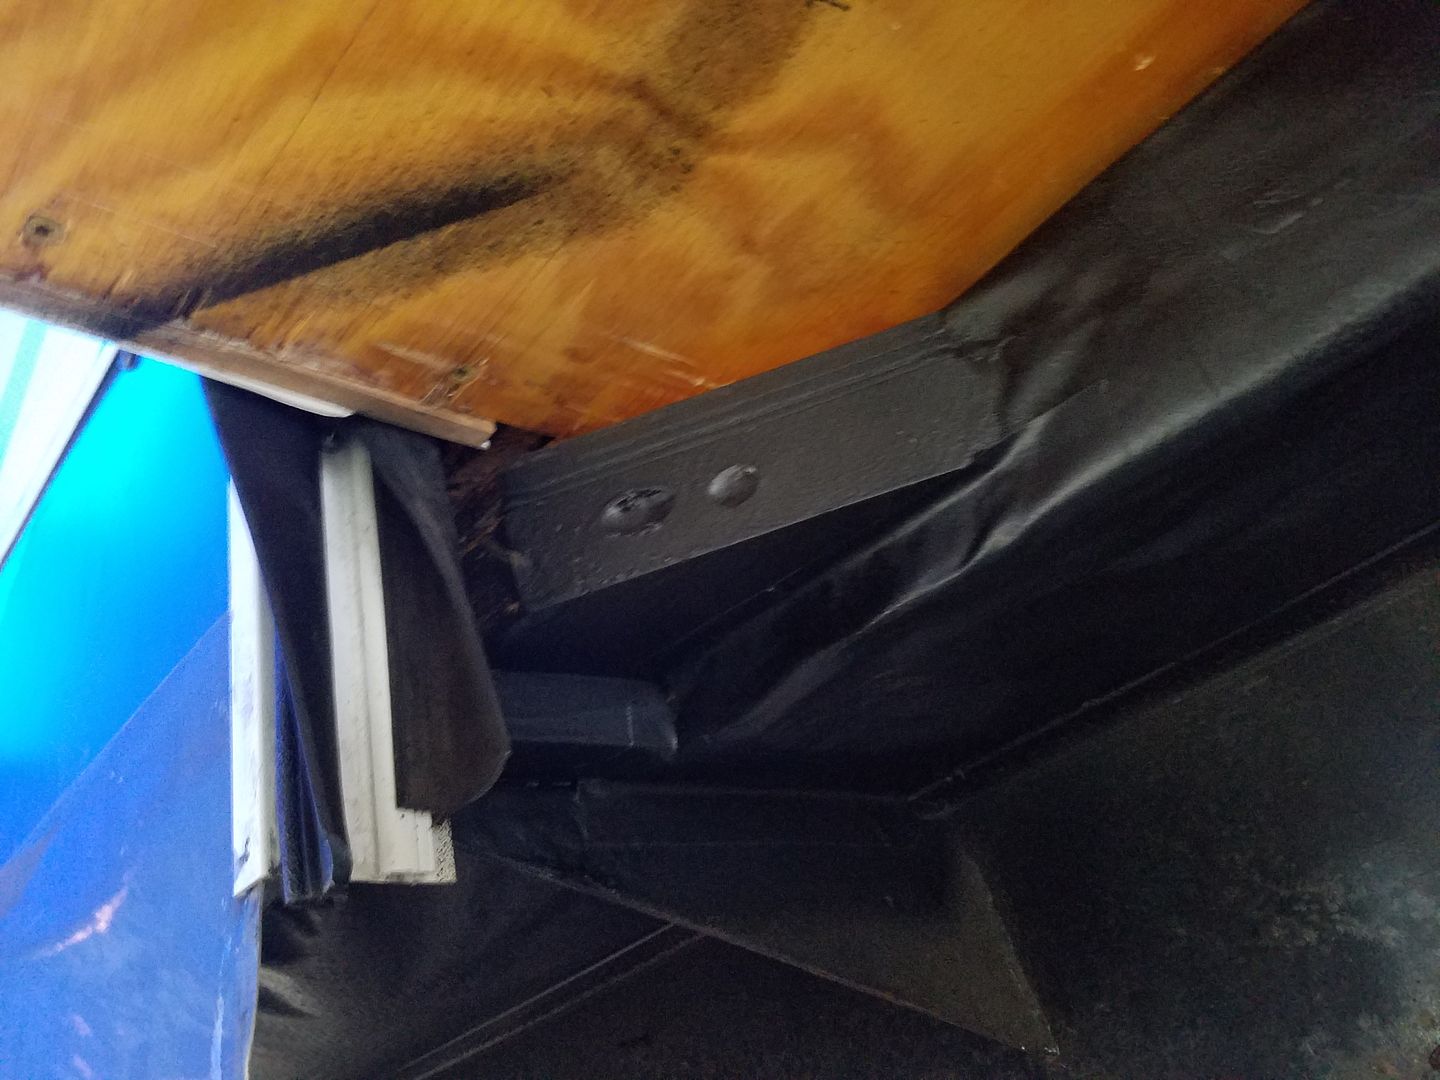
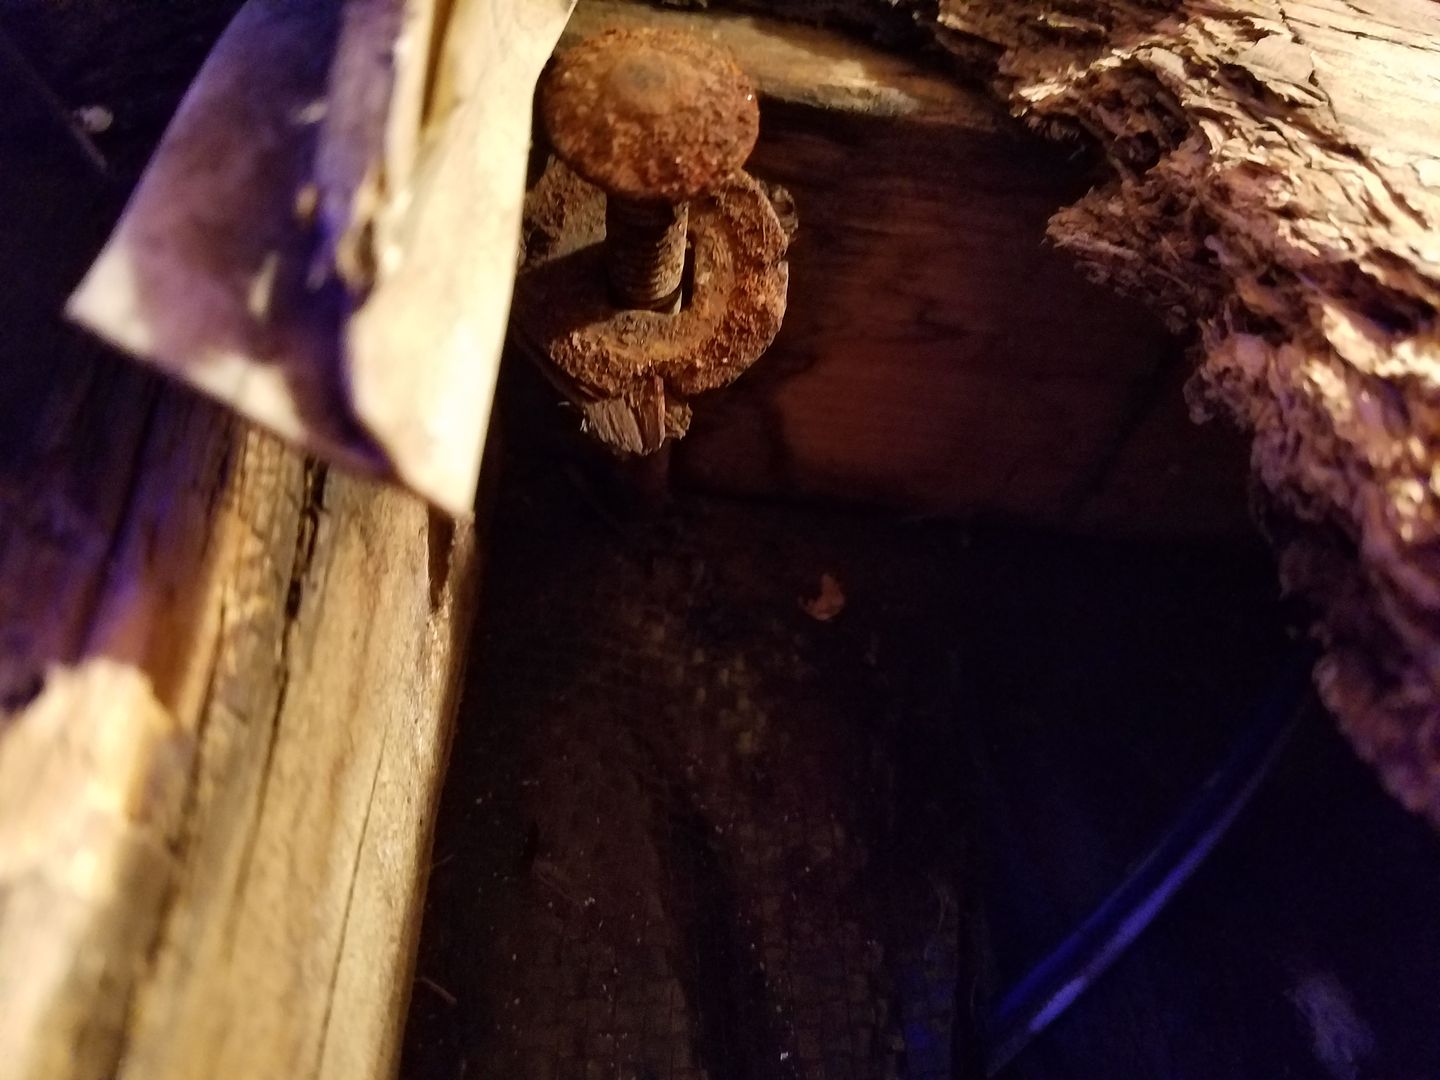
The carraige bolt that fastens the wood frame to the steel outrigger went through the floor, and with the floor gone the bolt is dangling
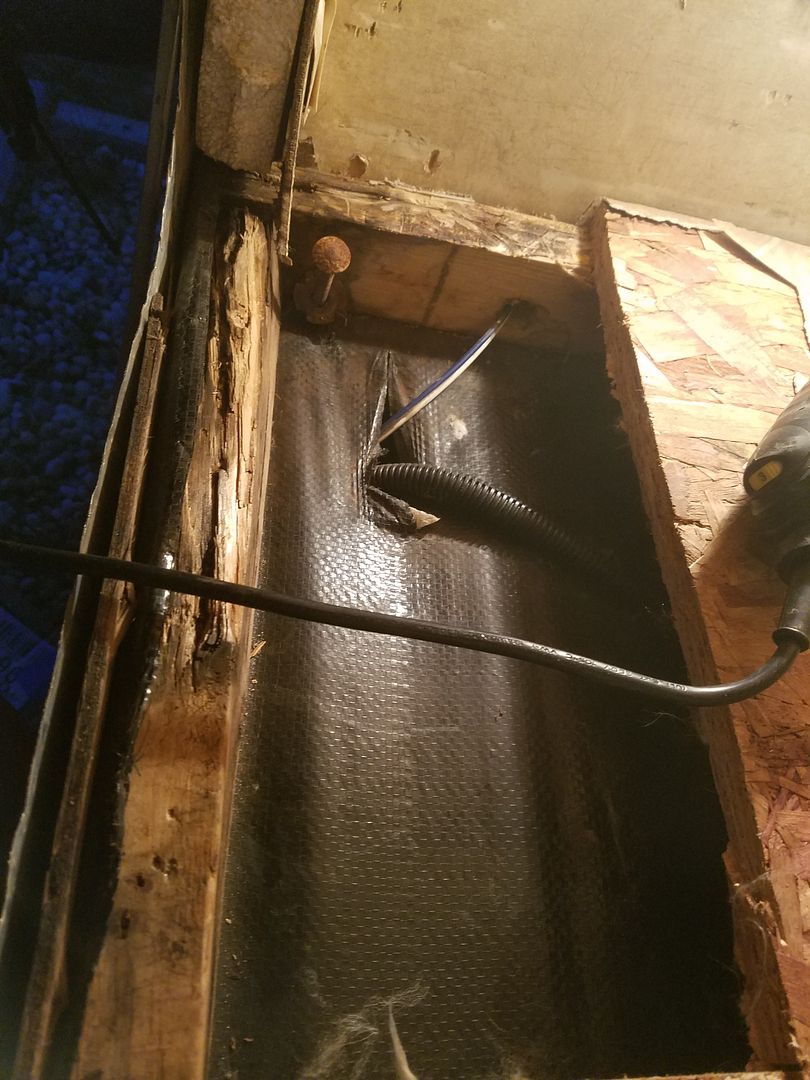
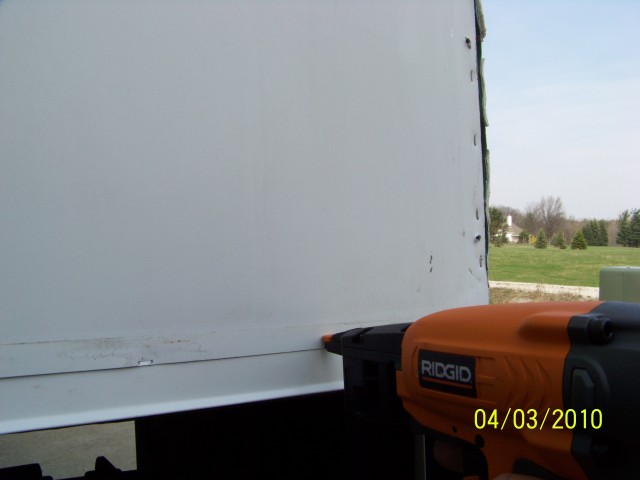
I added a corner bracket to the framing and some plywood scraps under the seams to attach the new floor
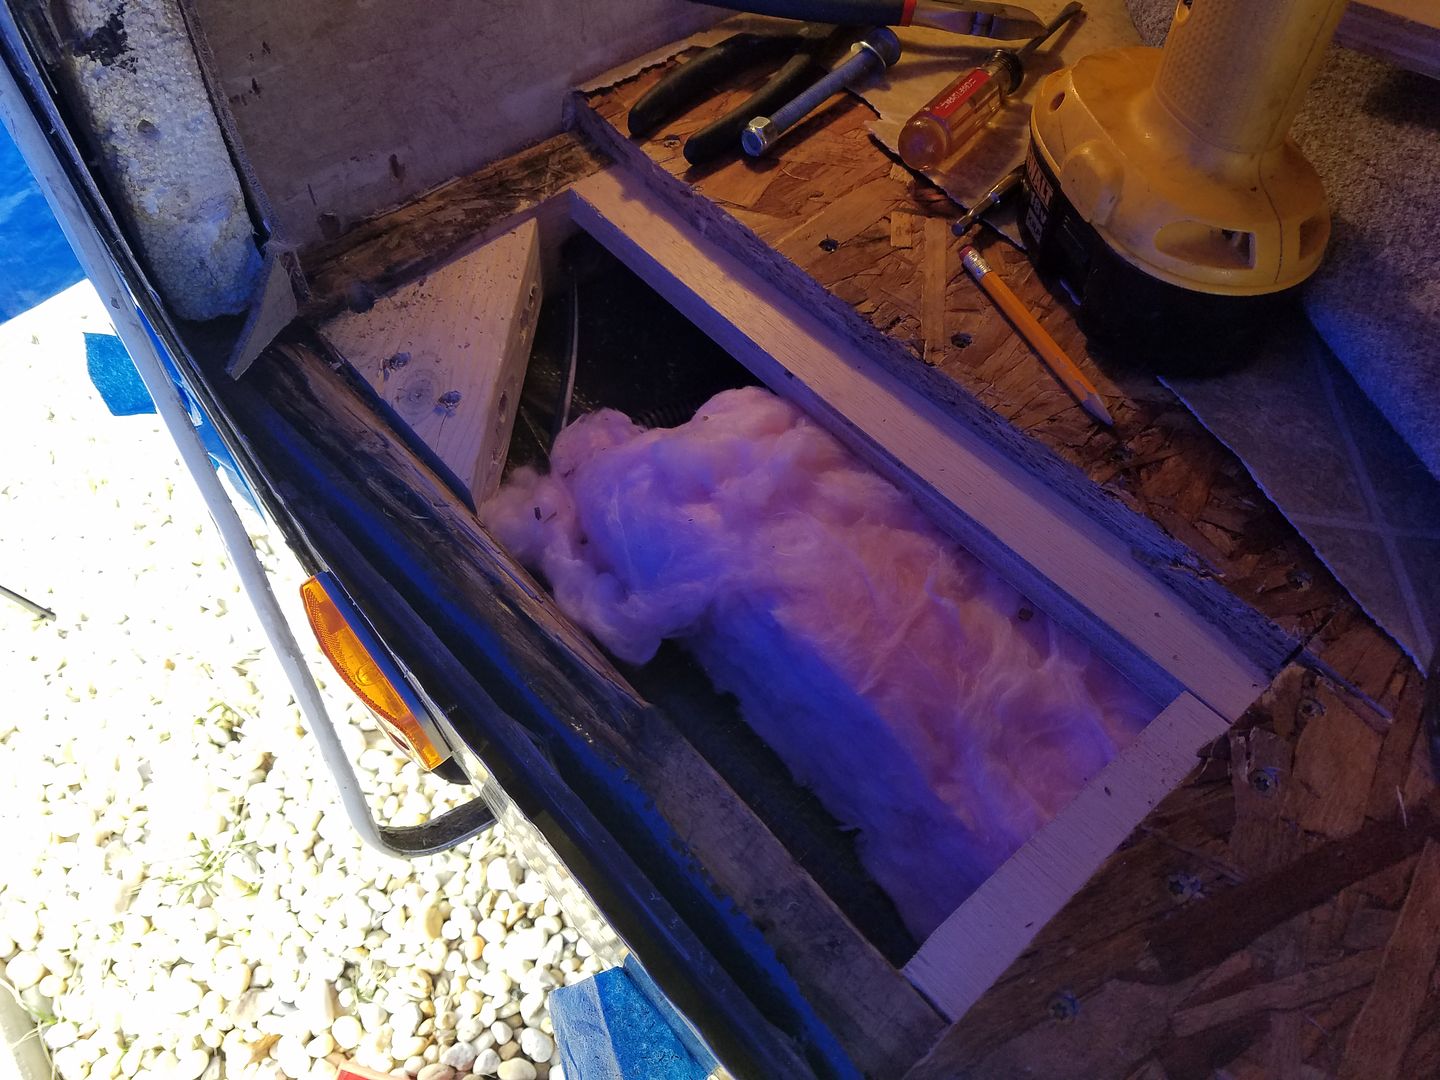
IPlywood installed and seams taped with Gorilla tape.
I should mention that the vinyl floor in here tore at the same time it tore by the main entry door during our first "arctic blast" in Louisville. I have some trunk liner carpet in this storage area so was never too concerned about fixing the floor until the OSB got wet....
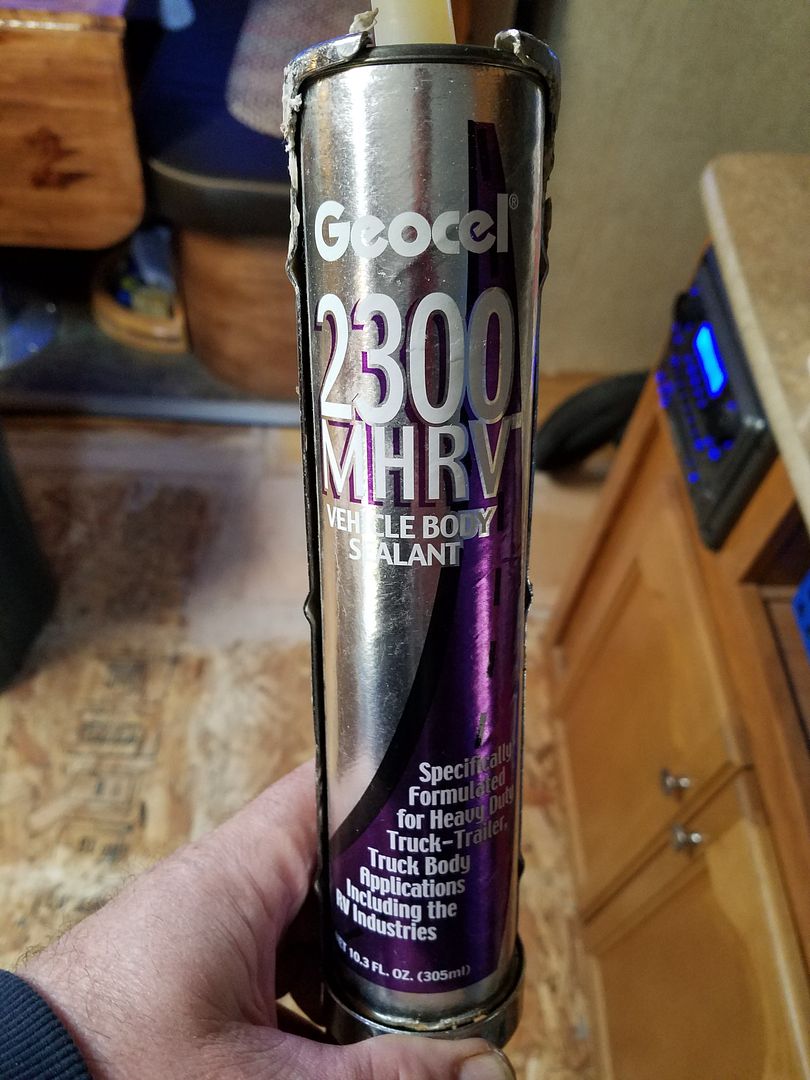
I had a tube of this MHRV sitting around so I used it to seal the flange around the baggage door. It was originally installed with some type of sealant, not putty tape, because the screws go through the jamb of the frame and not from the exterior flange.
I still have work to do on the slide, so more pictures coming, but find myself on the bench with the flu this week...ugh...
JBarca, you mentioned the Belly Tape....I found that stuff on a mobile home repair site a few years back and bought a roll. It's tough like you say, like a roll of Darco with an adhesive backing. The issue I had with it was adhesion...I thought I had the Darco cleaned well, the Belly Mend tape went on great, and when I was under the TT doing a routine inspection the following season, half of it was gone and the other half was hanging off.
So far, the Gorilla Tape has held up well for several years.
On the rubber spray, that corner block was wrapped in Darco from the factory and had a zillion staples in it. I coated it with CPES, caulked up the screw holes and then sprayed with the rubber coating. If the wood gets wet, it won't absorb the water and water will roll off. The horizontal piece was patched with Gorilla tape and sprayed with rubber seal.
On to fix water damage #2...this I actually caused a few years ago when I left the storage hatch open. The door was not hooked open, but it wasn't latched either, so it was dangling. We got a bad blowing storm up by Lake Erie back in 2014, and water blew in and soaked the floor. It dried out but eventually crumbled due to dry rot. Fortunately the frame was still solid.
The carraige bolt that fastens the wood frame to the steel outrigger went through the floor, and with the floor gone the bolt is dangling
I added a corner bracket to the framing and some plywood scraps under the seams to attach the new floor
IPlywood installed and seams taped with Gorilla tape.
I should mention that the vinyl floor in here tore at the same time it tore by the main entry door during our first "arctic blast" in Louisville. I have some trunk liner carpet in this storage area so was never too concerned about fixing the floor until the OSB got wet....
I had a tube of this MHRV sitting around so I used it to seal the flange around the baggage door. It was originally installed with some type of sealant, not putty tape, because the screws go through the jamb of the frame and not from the exterior flange.
I still have work to do on the slide, so more pictures coming, but find myself on the bench with the flu this week...ugh...
JBarca, you mentioned the Belly Tape....I found that stuff on a mobile home repair site a few years back and bought a roll. It's tough like you say, like a roll of Darco with an adhesive backing. The issue I had with it was adhesion...I thought I had the Darco cleaned well, the Belly Mend tape went on great, and when I was under the TT doing a routine inspection the following season, half of it was gone and the other half was hanging off.
So far, the Gorilla Tape has held up well for several years.
Options
- Mark as New
- Bookmark
- Subscribe
- Mute
- Subscribe to RSS Feed
- Permalink
- Report Inappropriate Content
Jan-28-2018 07:39 PM
Looking good Don,
I like your can of rubber spray. I'll have to get a can for pin holes in the Darco. I now use stainless staples if they are exposed to the weather. Found them the last time I was at the lumber yard.
I have found this product works really well repairing torn or cut Daro. Comes in various widths. I just ordered a 4" and 6" roll. I have used this on the bottom of my slide floor and still perfect since 2010. If you want it permanent, warm it with a hair dryer, and press firm. It is not coming off. Do not overheat or it will shrink it.
Flex Mend belly repair tape.
They use this in the manufactured housing industry where the entire bottom of the house on a slab is covered with Darco for patches.
I do use Gorilla tape some time too, all depends where I'm, using it. The warm it and press trick helps on the Gorilla tape too. The Flex Mend is thinner than the Gorilla tape but it is very hard to tear if you can.
2005 Ford F350 Super Duty, 4x4; 6.8L V10 with 4.10 RA, 21,000 GCWR, 11,000 GVWR, upgraded 2 1/2" Towbeast Receiver. Hitched with a 1,700# Reese HP WD, HP Dual Cam to a 2004 Sunline Solaris T310R travel trailer.
Options
- Mark as New
- Bookmark
- Subscribe
- Mute
- Subscribe to RSS Feed
- Permalink
- Report Inappropriate Content
Jan-28-2018 06:39 PM
You are going to have it nicely sealed up. Hopefully avoid any future leaks 😉
Got a link or part number for that seal?
Replacing seals are on our list for this spring 😉
Got a link or part number for that seal?
Replacing seals are on our list for this spring 😉
Options
- Mark as New
- Bookmark
- Subscribe
- Mute
- Subscribe to RSS Feed
- Permalink
- Report Inappropriate Content
Jan-28-2018 05:35 PM
Progress continues with some warm weather this weekend. Got the floor patched inside, I used some floor leveler where the plywood didn't meet exactly with the OSB.
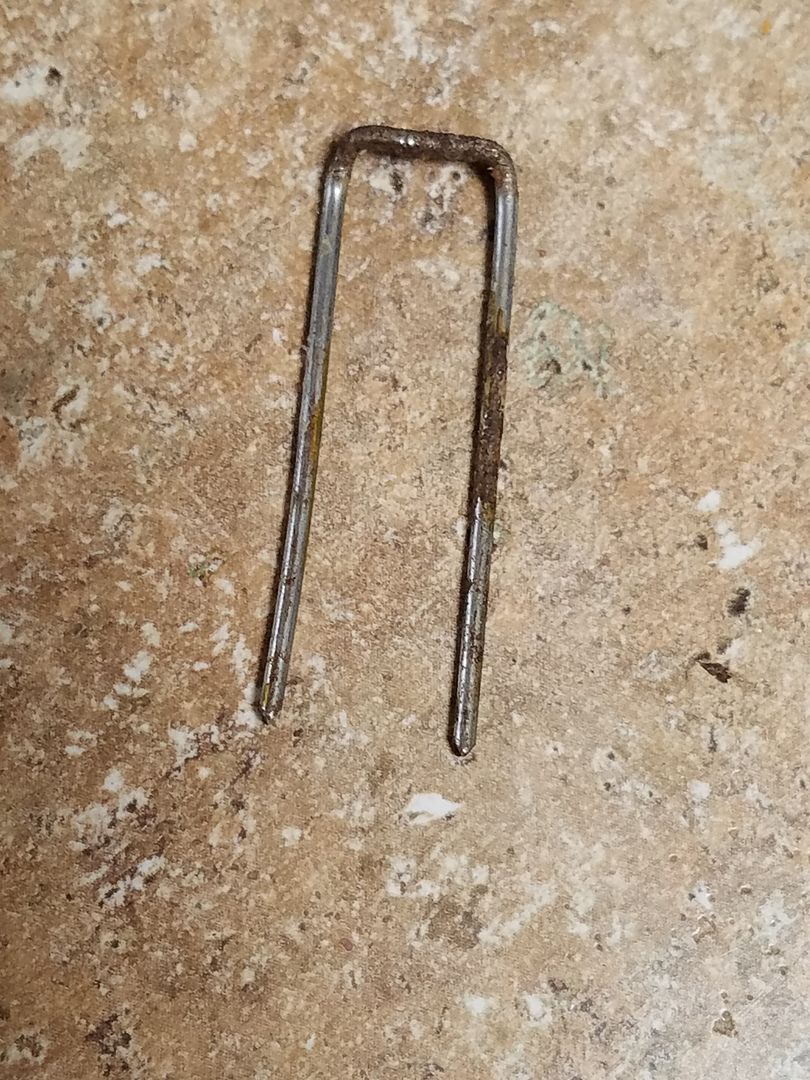
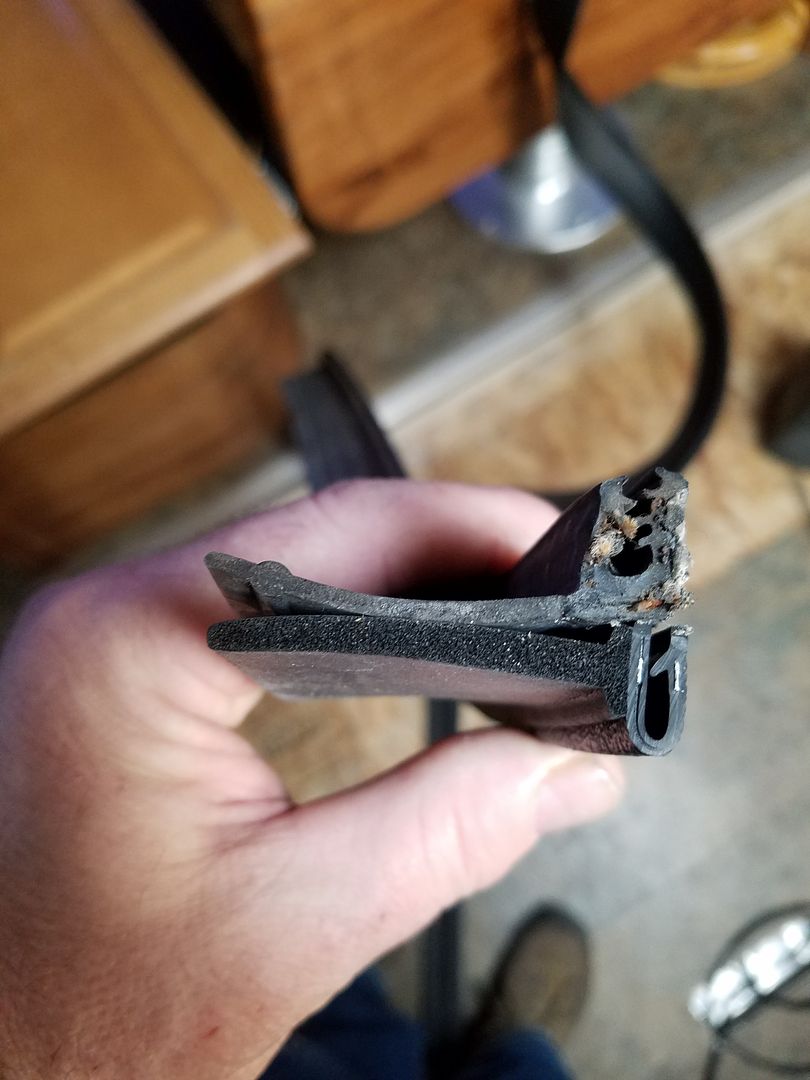
Had a heckuva time finding a replacement for the side wiper seals. The inside seals are still OK but the outsides on both sides are getting dry from UV damage. From what I can tell the original mfr of this seal is Trim-Lok, but I could only find it in 125' lengths (not ideal @ $3/ft...)
I finally found something similar at McMaster-Carr and I could get a 25' roll. Here are the two side by side, original on top and new replacement on bottom. The new one is EPDM "foam" instead of rubber like the original. The foam is supposed to be more durable and stay more pliable over time. I put one side on today and it seals great.
I got the Darco wrapped back around the new framing and sealed in:
I sprayed everything with this to seal up the staple penetrations and seams. I had to cut the Darco in a few places, and I found the best thing to repair it is Gorilla Tape...I spray the edges of the tape with rubber where and that keeps water and dirt from getting under the tape and lifting it.
I some areas I spray the rubber right on the CPES-treated wood in lieu of the Darco...I did this on exposed framing when I replaced the slideout floor in 2015. If the wood gets wet, water won't penetrate, and there is no place for it to get trapped....it will drip off.
It was late when I finally got the aluminum fender skirt back on...I'm also replacing the bottom wiper seal which is arriving tomorrow, so more work to do and more pics to follow.
Options
- Mark as New
- Bookmark
- Subscribe
- Mute
- Subscribe to RSS Feed
- Permalink
- Report Inappropriate Content
Jan-22-2018 02:48 PM
There are steel cross pieces welded across the frame to form a ladder, so to speak, and the front-to-rear 2x3's sit on those. Yes, the ducted heat runs in the floor in a joist cavity.
The tanks sit in between the main frame rails which is where the heat duct runs, so there's no direct tank heat per se, just residual from the warm duct. But the coroplast between the frame rails and under the tanks keeps the cold air out, and there is a layer of reflectix in there also, so the tanks stay usable in pretty cold weather.
Coldest we camped was 5* and still had running water and flushing...I went through 100 lbs of propane in 10 days on that January trip, and that was Murray KY, not the Adirondacks LOL. Also went through about 12 gals of unleaded with the extended run tank on the little 2000w Honda powering a 1500w space heater all night.


