Turn on suggestions
Auto-suggest helps you quickly narrow down your search results by suggesting possible matches as you type.
Showing results for
- Good Sam Community
- Groups
- Travel Trailer Group
- Forum
- Putty or butyl tape?
Options
- Subscribe to RSS Feed
- Mark Topic as New
- Mark Topic as Read
- Float this Topic for Current User
- Bookmark
- Subscribe
- Mute
- Printer Friendly Page
Putty or butyl tape?
Options
- Mark as New
- Bookmark
- Subscribe
- Mute
- Subscribe to RSS Feed
- Permalink
- Report Inappropriate Content
Apr-13-2022 06:15 AM
Found a leak around my outside kitchen compartment door. Planning to remove the door, check for any damage and reinstall the door. Should I use putty tape or butyl tape around the door frame and TT side? Thinking the putty tape would compress and spread, allowing me to trim the part that oozes out. Butyl tape is stickier but wouldn’t squish like the putty tape. Can’t decide which is better?!
2021 Nissan Titan Pro-4X 5.6L V8 4WD - 2019 Keystone Bullet 243BHS
15 REPLIES 15
Options
- Mark as New
- Bookmark
- Subscribe
- Mute
- Subscribe to RSS Feed
- Permalink
- Report Inappropriate Content
Apr-20-2022 07:25 PM
A couple of awesome write-ups JBarca! Thanks for that education. I plan to keep this TT for 10+ years so I'm going the butyl tape route. Looking for naphtha now. Is VM&P naphtha acceptable for this project? Looks like I can get it at Lowes, TSC, etc.
2021 Nissan Titan Pro-4X 5.6L V8 4WD - 2019 Keystone Bullet 243BHS
Options
- Mark as New
- Bookmark
- Subscribe
- Mute
- Subscribe to RSS Feed
- Permalink
- Report Inappropriate Content
Apr-15-2022 08:33 PM
BobsYourUncle wrote:
snip..
On the other side of this, I once had the misfortune of taking out an entry door I had sealed in place with butyl. What a chore, what a mess, and as you say, the bond held fast to both surfaces while I had to break the butyl itself apart. I had a miserable time getting the door out, but not one drop of water made it past my sealing job.
Thanks for the good words Bob. Much appreciated.
The heat gun is your friend and a real need in doing camper repair work dealing with putty tape or butyl. Like you said, the butyl bond is really good, you have to warm it enough to help it let go and not mess up the moldings in the process. Then it is not so bad.
To get the butyl off the molding or siding once they are apart, warm it then scrape. Get the butyl or putty tape as thin as you can with the scrapers. Then with a rag and mineral spirts, soak a little and rub. The mineral spirts will softened up and start dissolving the butyl/putty tape and not harm the paint. A side effect though of mineral sprits (MS) is it leaves a film. Before I reassemble the parts I clean off the surfaces with a high flash cleaner, one that works to remove the MS film, any tiny bits of butyl or putty tape left, evaporates off fast, and not affect the paint. I use Naphtha as it will cut any tiny bits of left over tape, take the grim off and evaporate quick. Aluminum siding or fiberglass I work the same way.
Some have used denatured alcohol (DA) as the high flash cleaner, and it will work to take the oil film off from the MS, but it will not touch any tiny left over bits of butyl or putty tape. I tried DA, but went back to the Naphtha. The little in cost difference for the Naphtha is not that much. I use this brand, SunnySide
https://www.sunnysidecorp.com/product.php?p=t&b=s&n=80032
For sure do not use acetone, that is too powerful, it will take the paint right off the aluminum siding unless you are after the Air Stream look;).
2005 Ford F350 Super Duty, 4x4; 6.8L V10 with 4.10 RA, 21,000 GCWR, 11,000 GVWR, upgraded 2 1/2" Towbeast Receiver. Hitched with a 1,700# Reese HP WD, HP Dual Cam to a 2004 Sunline Solaris T310R travel trailer.
Options
- Mark as New
- Bookmark
- Subscribe
- Mute
- Subscribe to RSS Feed
- Permalink
- Report Inappropriate Content
Apr-15-2022 07:39 PM
:C. THANK YOU John for that informative post ! ! ! !
Me-Her-the kids
2020 Ford F350 SD 6.7
2020 Redwood 3991RD Garnet
2020 Ford F350 SD 6.7
2020 Redwood 3991RD Garnet
Options
- Mark as New
- Bookmark
- Subscribe
- Mute
- Subscribe to RSS Feed
- Permalink
- Report Inappropriate Content
Apr-15-2022 06:51 PM
Wow, John, yet another very excellent, informative and well documented post.
Thank you for taking the time to do this. Your info speaks volumes of the question putty tape vs butyl.
I have also found for myself a lot of what you posted in pics here, especially in my old Citation rebuild. The factory design was very poor at best, and couple that with putty tape and it was a disaster the day it rolled off the assembly line.
I remember how easy the cheap putty tape came off in fragmented chunks. A putty knife running along the seal line sent it in fragments to the floor below. But it was far too late, the old Citation was rotten top to bottom, end to end. Why I fixed it remains a mystery to me to this day. Shoulda towed it to the dump.
On the other side of this, I once had the misfortune of taking out an entry door I had sealed in place with butyl. What a chore, what a mess, and as you say, the bond held fast to both surfaces while I had to break the butyl itself apart. I had a miserable time getting the door out, but not one drop of water made it past my sealing job.
There are those among us who want the easiest way out on any given task. Yeah that's nice, but I'd rather go the extra mile and do the job properly with the right materials. It pays off in the end.
Nice work John, you are a man after my own heart! 🙂 Great looking shop you have there too, I rebuilt the Citation under a tarp in my driveway at the rainy west coast of Canada.
2007 GMC 3500 dually ext. cab 4X4 LBZ Dmax/Allison - 2007 Pacific Coachworks Tango 306RLSS
RV Rebuild Website - Site launched Aug 22, 2021 - www.rv-rebuild.com
RV Rebuild Website - Site launched Aug 22, 2021 - www.rv-rebuild.com
Options
- Mark as New
- Bookmark
- Subscribe
- Mute
- Subscribe to RSS Feed
- Permalink
- Report Inappropriate Content
Apr-15-2022 11:59 AM
Skibane wrote:
^Excellent post, John - Thank you!
BobsYourUncle wrote:
Great write-up John. Excellent! 🙂
Nice to see someone knowledgeable post good sound info with pics to support it.
Thankyou Skibane and Bob. Bob, I do remember you rebuilding your camper from years ago.
Since we are on the topic of butyl versus putty tape, to help the cause, I'll add some more info I have found in my camper restoration efforts on the differences between butyl and putty tape.
Doing total camper restorations from water damage is a very large time-consuming process. There is a great learning in how all these leaks come about, and then how to make what was originally there, last longer, as there is too much work that has been done to not make it better, repeating what the RV industry used when the camper was built, is not good enough in my point of view.
There is a very large difference in bonding strength between putty tape and butyl. Think of this like wood glue, wood glue done right between two pieces of wood is stronger than the wood itself. If you try and break the glue joint, the wood will fracture before the glue lets go. I have found this very same difference between putty tape and high-quality butyl, the bond to the siding or molding/flange is very different. Where the bond is poor, leaks can more easily happen.
A little background to my learnings. This first camper I am going to show you, is the mine, the one in my sig. I had read the horror stories of failing siding seals on a camper in the 2007-time frame, and I tried to do something to slow it down on my camper. I started back in 2009-time frame using Dicor non-sag/non leveling caulk to caulk the moldings to the siding and windows and doors flanged etc. to the siding. I cleaned the black mold and dirt away from the exposed putty tape, once it dried, I caulked the exposed putty tape on front and rear corners, doors, and some windows of my 2004 T310SR Sunline camper. Little did I know back then how effective just caulking the exposed putty tape would be. I also had no clue how far advanced the putty tape failures already were ongoing, just not yet leaking too badly into the camper yet on my then 6-year-old camper. This camper was too big for the barn I had at the time to store inside. So, this data is from a camper living outdoors in the mid-west of central Ohio until 2013 when the new barn came. In Aug. 2016 I retired and took up a new somewhat extreme hobby. Restoring older water infected campers. I guess I like the smell of mildew wet wood…(yuk) I had no idea how far into this I would get as I am today as I now have done 15 water damaged campers being repaired for close friends and family.
I was also buying project campers for a song, 10-to-12-year campers that were from 2004 vintage when I started up to now, 2007 vintage. I now own 5 campers myself. These 5 campers were made at the same factory, and the same approximate time, using the same methods of putty tape on the siding seals. The difference was the owners who had them. All of them other then myself had no idea they were supposed to do roof maintenance, not alone siding leaks, as the owner’s manuals of the time never talked about siding leaks. The campers were in real bad shape water wise. The insides of the campers were good shape, but the walls, floor and ceiling were bad. Little did I realize how much my efforts to stop siding leaks in 2009 had such a positive effect on the life of a camper. I already did Eternabond on the roof of all the seams in 2009, so the roof has always been good on my T310SR. And the siding too other then a slide floor leak I inherited when I bought the camper used in 2007 and a lower front left corner leak that I stopped the leak in 2009.
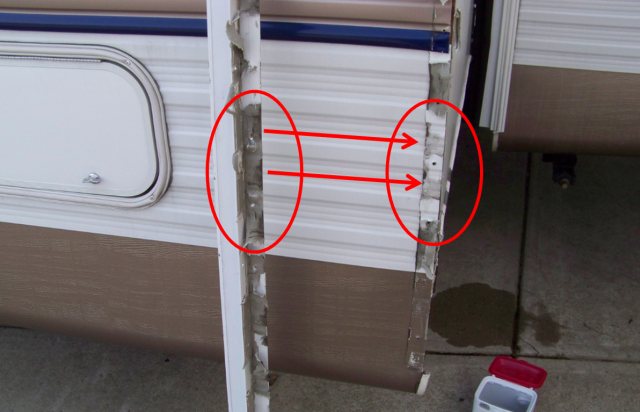
I’ll explain in pictures as they speak for themselves. You will see the white Dicor next to the failing putty tape, the Dicor saved me in this case. Three years ago, I took this front left corner apart to add diamond plate to the bottom siding section and deal with what little rot was in that lower corner from long ago.
I am heating the molding and joint as I remove the corner molding. You can see the Dicro on the edge and the putty tape unfolding from the corner seam.


Now lets look at the front side where roof water runs down the left corner.


You can see, I stopped an active leak path in the corner in 2009 with the Dirco. That putty tape shrunk and released from the siding and the molding in 6 years time and a leak path was well on the way to letting a lot of water into that corner. If it was not for the Dicor I did to stop the leak, I would have had a real mess in a few years.
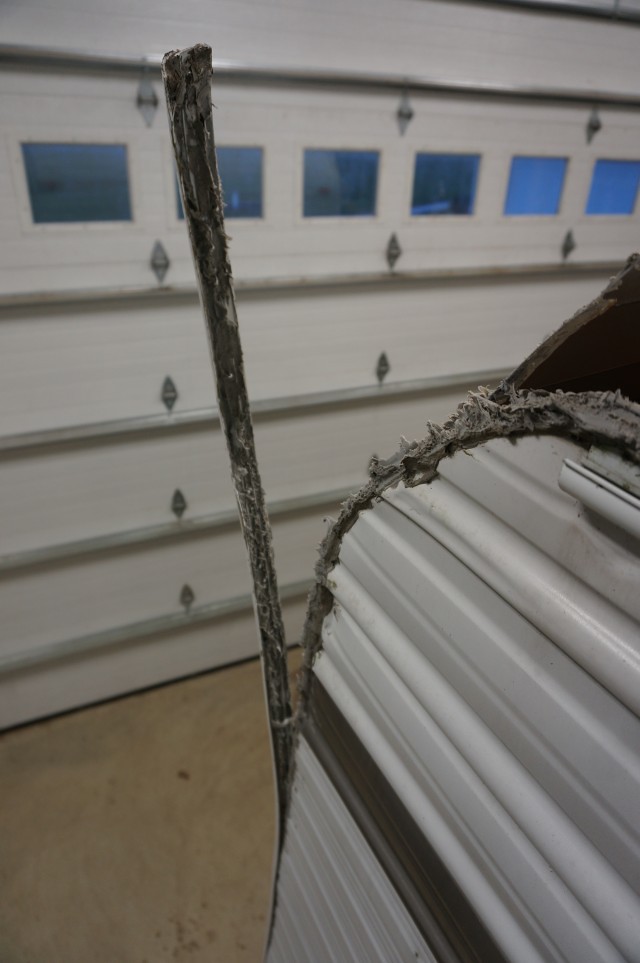
Here is the back side of the molding. You can see the black mold/dirt water path. And the molding where the putty tape totally released from the molding when I took the molding off.

The point I want to make, putty tape does not create a strong long term bond to the moldings/flanges or the siding. It unfolds intact in chucks when you take the joint apart. A large percentage of the putty tape is totally intact from the siding or molding when you dismantle the camper. The bond to the siding and the molding is poor.
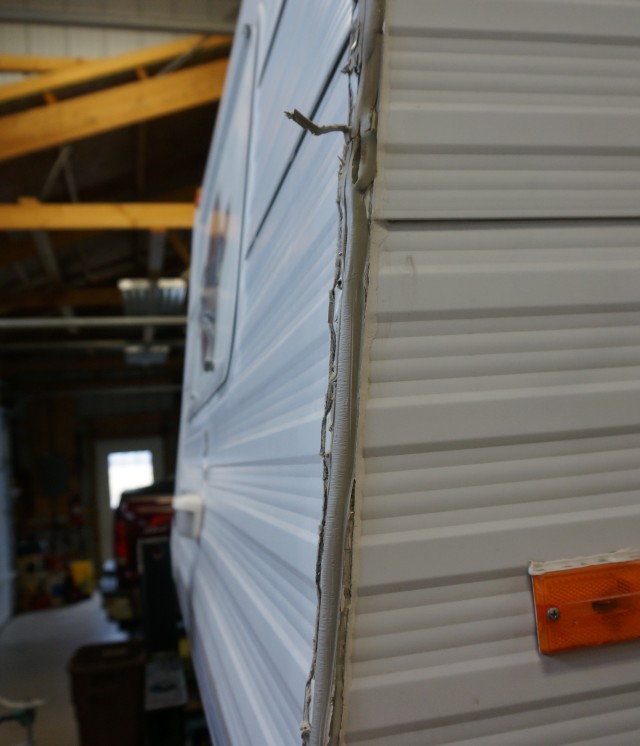
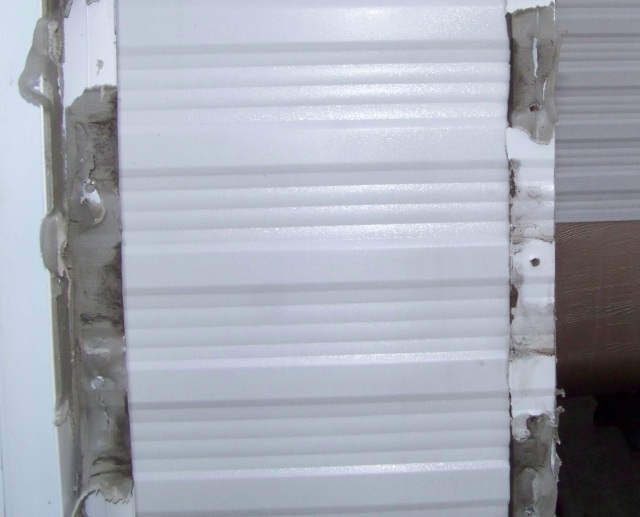
Now, lets look at the same type of corner on the camper I am restoring right now. This friend of mines camper is a 2007 model on a seasonal site. It did get covered every winter for the last 6 years he owned it, no idea what the prior owner did. Four years ago I told him if he wanted to keep his camper a long time, ideally you start with the corner moldings, remove them, scrape off the old putty tape and install new fresh butyl. Then work your way around to every siding seal. Sadly he was late in the game, he only pulled the front two corners off at age 11 years and reset the putty to butyl. He had a lot of water in the camper at that point and he never made it to the rear corners, cargo doors, slide etc. thus why I am restoring it now.
This is what commercial grade butyl looks like when you remove it from a corner joint at 4 years of age. I told him to use Permatite 250-H Butyl and he did as that was what I could get at that time. http://permatite.com/tapes-permatite-250H.php

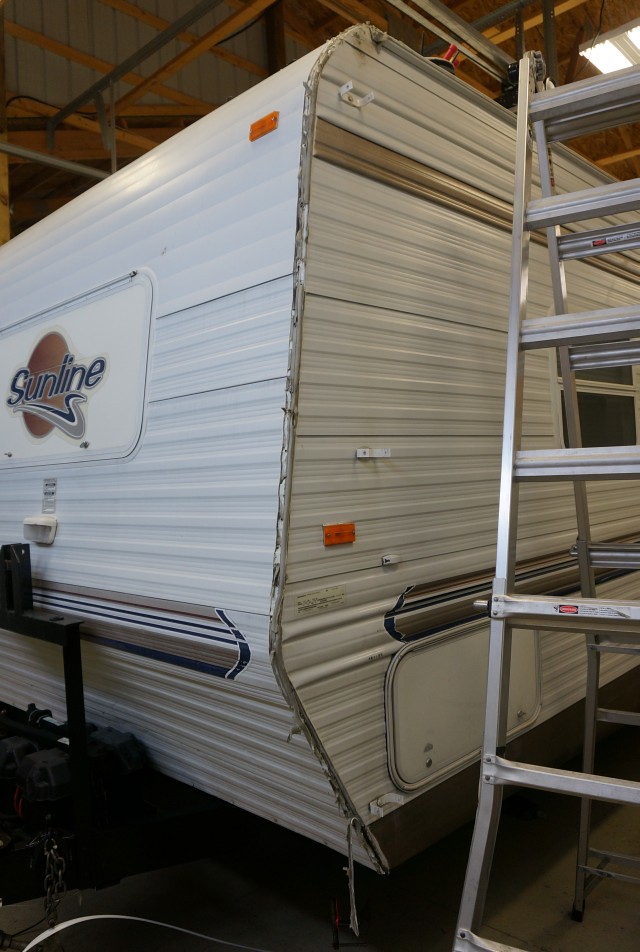
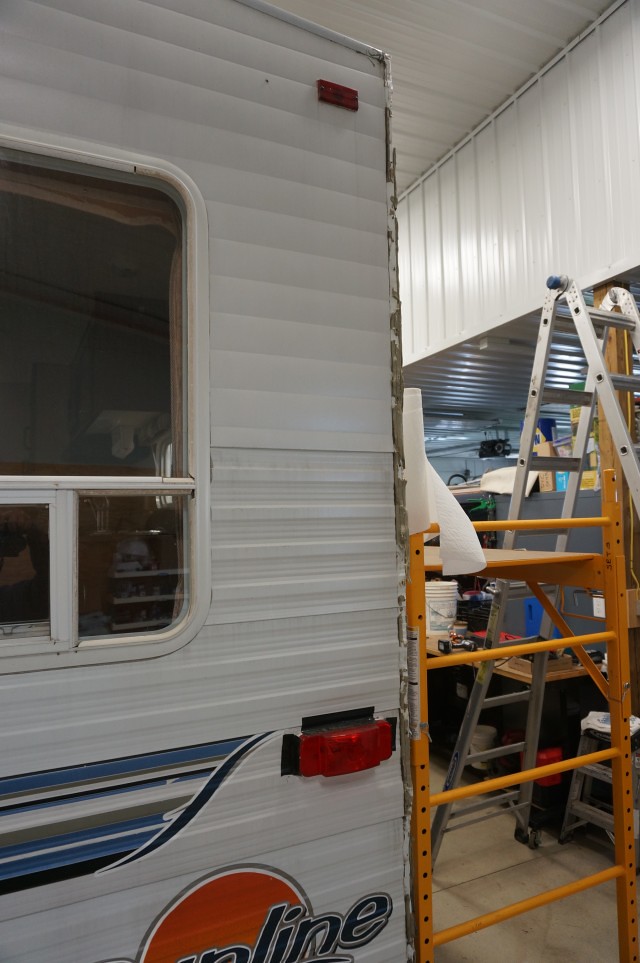
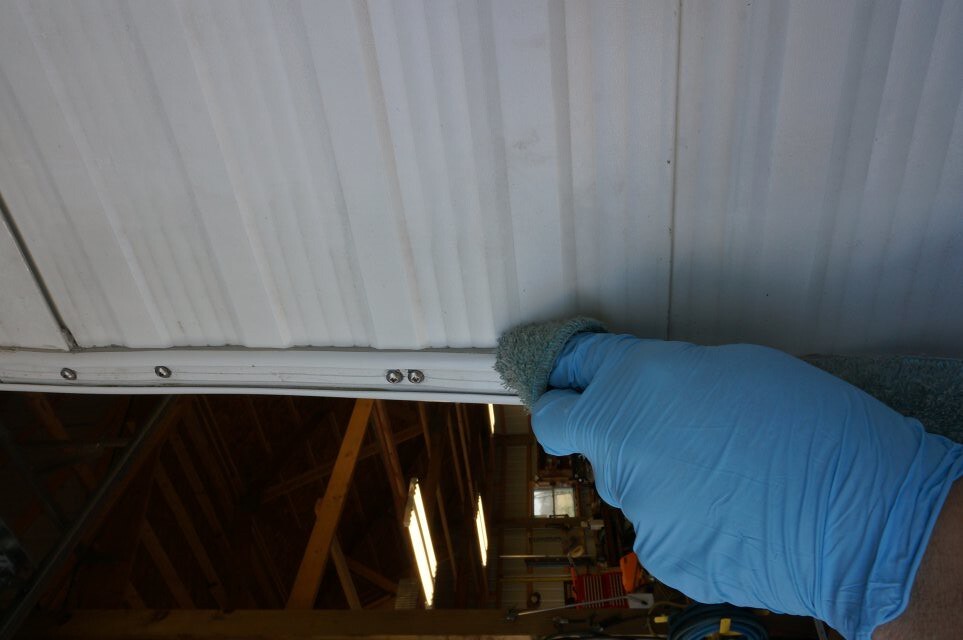
Here, I'm in the process of opening up the front wall.
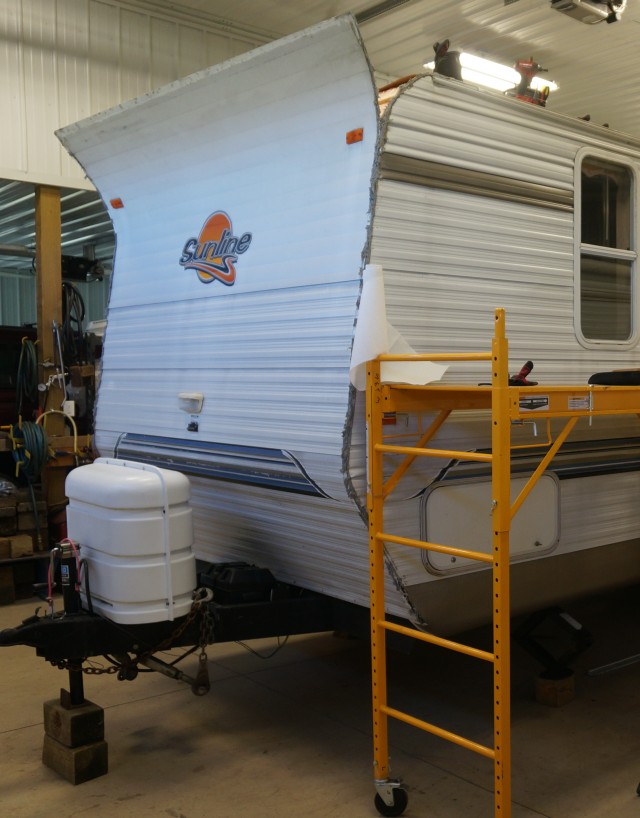
As you can see, the butyl bonded very strong to the siding and the molding. The butyl had to rip itself apart for the molding to come apart. The bond to the siding and the molding is stronger then the butyl itself. This is why I say, use good commercial grade steel building butyl. This is not sold in the RV stores, they sell it in the building industry. The butyl is cheaper then the putty tape at the RV store and the performance is superior.
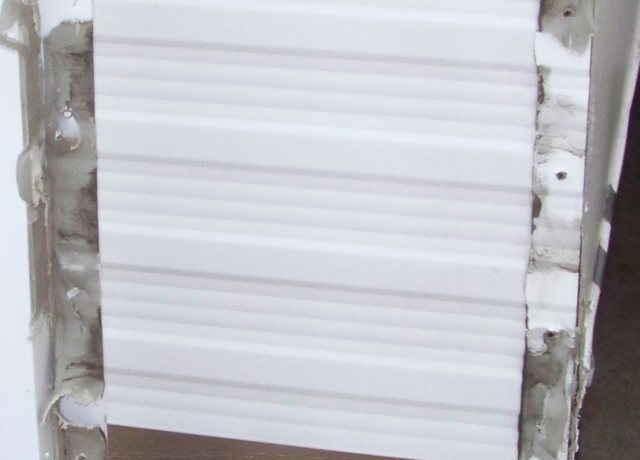
Here are the back corners of that same camper, still on putty tape, he never made it to changing them.


While I only have a sample set of 15 campers I have taken took apart, including, Keystone, Coachman, Gulfstream, and Sunline, all of them used putty tape, and all of them had putty tape failures that had broking bonds to the molding or siding. None of them showed the bond to the siding or molding like the butyl I showed above.
I have lots of end results of failed putty tape pictures if you want to see them. Here is some of them online in my Flick'r photo site. https://www.flickr.com/photos/camper-johnb/collections
Hope this helps,
John
2005 Ford F350 Super Duty, 4x4; 6.8L V10 with 4.10 RA, 21,000 GCWR, 11,000 GVWR, upgraded 2 1/2" Towbeast Receiver. Hitched with a 1,700# Reese HP WD, HP Dual Cam to a 2004 Sunline Solaris T310R travel trailer.
Options
- Mark as New
- Bookmark
- Subscribe
- Mute
- Subscribe to RSS Feed
- Permalink
- Report Inappropriate Content
Apr-14-2022 01:34 AM
The big advantage of butyl is that it can easily and cleanly be removed. This makes re-bedding much easier. No sealant is perfect or will last forever.
Options
- Mark as New
- Bookmark
- Subscribe
- Mute
- Subscribe to RSS Feed
- Permalink
- Report Inappropriate Content
Apr-13-2022 09:29 PM
Great write-up John. Excellent! 🙂
Nice to see someone knowledgeable post good sound info with pics to support it.
If anyone cares to see another prime example of putty tape failure and disaster, have a look at my RV Rebuild website. The entire thing was "sealed" with putty tape, and the entire thing failed, resulting in the rotten old carcass I rebuilt.
2007 GMC 3500 dually ext. cab 4X4 LBZ Dmax/Allison - 2007 Pacific Coachworks Tango 306RLSS
RV Rebuild Website - Site launched Aug 22, 2021 - www.rv-rebuild.com
RV Rebuild Website - Site launched Aug 22, 2021 - www.rv-rebuild.com
Options
- Mark as New
- Bookmark
- Subscribe
- Mute
- Subscribe to RSS Feed
- Permalink
- Report Inappropriate Content
Apr-13-2022 09:19 PM
^Excellent post, John - Thank you!
Options
- Mark as New
- Bookmark
- Subscribe
- Mute
- Subscribe to RSS Feed
- Permalink
- Report Inappropriate Content
Apr-13-2022 09:00 PM
penguin149 wrote:
Found a leak around my outside kitchen compartment door. Planning to remove the door, check for any damage and reinstall the door. Should I use putty tape or butyl tape around the door frame and TT side? Thinking the putty tape would compress and spread, allowing me to trim the part that oozes out. Butyl tape is stickier but wouldn’t squish like the putty tape. Can’t decide which is better?!
Hi,
I have some info that may help you make a decision. I have dealt with a great number of putty tape failures, I restore older campers in the 10 to 15 year range so far. I'm now on my 15th camper rot repair so I have seen first hand the damage from failed putty tape. Siding leaks can be as bad, and in many some cases, worse then roof leaks as there are so many holes in the siding.
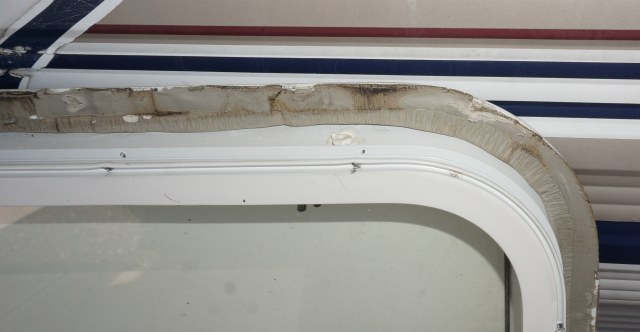
This is what a putty tape failure looks like. This was a 13 year old camper at the time of the pics. This is a front window but cargo doors, corner moldings, entry doors or any siding leak failure looks the same when putty tape gets older. It did not take 13 years to get to the stage, the leak started years before.
Putty tape is easy to trim, that is a fact. They alter the sealing compound to make it trim easier on purpose, the side effect is less performance over time.
What you are seeing in these pics is when the putty tape shrinks. And it does shrink, and the UV from the sun accelerates it. When the tape shrinks, it will split in the middle or pull away/separate from the siding or the cargo door flange etc. That starts a leak path. Slowly over time the leak path keeps getting bigger, you can see the water and dirt staining in the putty tape. The tape lifted that is how the dirt was driven into the joint. When the leak path gets long enough, water enters the wall cavities and it is down hill from there.

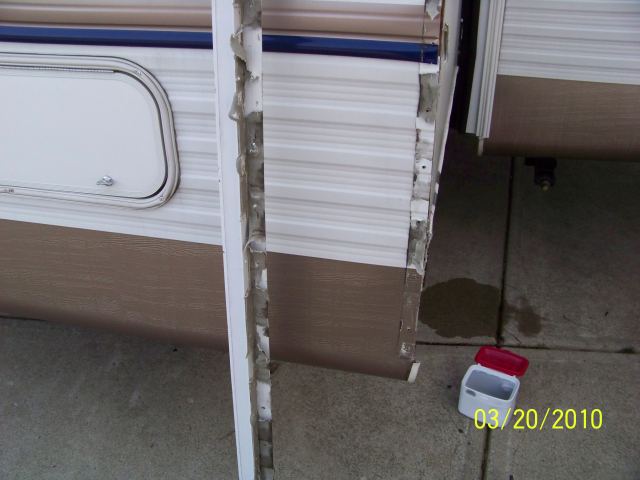
Close ups
Here is a slide flange removed on a 6 year old camper where the same putty tape failure had started. You can see how the putty tape tears apart when you remove the flange. I caught this leak path just in time before it leaked inside.

Commercial steel building butyl tape is different then putty tape. When you are putting up a million dollar building you do not want leaks in 3 to 5 years like can happen on putty tape. You want 20 year plus quality sealing tape.
I use the GSSI brand, MB-10A part number for their butyl tape. I buy it here. $6.50 a 50 ft roll. for 1/8" thick 1" wide https://www.bestmaterials.com/detail.aspx?ID=19987
I buy it by the case and I go through 3 to 4 cases a year. The case size is cheaper and I have higher odds of it being shipped and not damaged. If you do not want to order it online, then find a building/roof supply place in your area and ask them for their best butyl sealing tape.
I have learned how to trim the butyl, it's not hard to do, but there is a learning curve. Temperature plays a big role in the learning. Too much heat, it is bubble gum, to little and it is harder to trim. A heat gun is your friend, both in removing the old putty tape flange seal and putting new butyl down. Keep the heat gun moving, do not stand still with it. Pending the outside temps will guide you as to use a lot of heat or not much.
In the winter months, my shop is 55F and I need to warm the molding and the butyl to flow on purpose as I tighten the screws, Here is a corner molding. On metal corrugated siding I add extra butyl strips in the valleys of the siding and I fully line the molding. As I tighten the screws, the butyl will ozz and I want it to flow everywhere in that corner.

To trim, I use plastic scrapers from Harbor freight to not scratch the siding. I get the right temp and I can push the scraper right up the joint and trim. I add a little heat is I have to, but not much while trimming or it gets too goo'ey


To clean up any stingers, I use Naphtha on a rag and lightly wipe away stringers to create a clean trim.
If you want close to a bullet proof seal, after a day or two if I used Naphtha, I go back with Proflex RV sealant over the top of the exposed butyl. It creates a 2nd seal and keeps any dirt from sticking to the butyl. There are tricks on how to tool out, smooth out Proflex too, it comes out really smooth and you can push it where you want it. Just do not apply in long lengths, 2 to 3 feet and they tool it out. You have to work quick as once it start to set, it will all glob up. Use a wet soapy finger you will not have any on your fingers. Do not apply in hot sun or sun hot siding, it dries too fast on you.
If you plan to keep your camper 5 to 20 years, use the butyl, it's worth it. If you are going to sell the camper in 3 years, well putty tape will get you through that much.
Hope this helps
John
2005 Ford F350 Super Duty, 4x4; 6.8L V10 with 4.10 RA, 21,000 GCWR, 11,000 GVWR, upgraded 2 1/2" Towbeast Receiver. Hitched with a 1,700# Reese HP WD, HP Dual Cam to a 2004 Sunline Solaris T310R travel trailer.
Options
- Mark as New
- Bookmark
- Subscribe
- Mute
- Subscribe to RSS Feed
- Permalink
- Report Inappropriate Content
Apr-13-2022 05:26 PM
Butyl is far superior to putty.
I have had the pleasure of removing dried up cracked leak prone putty more than once, Once butyl is used, it is no longer going to be a problem.
There is a trick to working with it. Keep it in the refridgerator.
I hve a spare fridge for my butyl and other non food items that are better kept cold
I have had the pleasure of removing dried up cracked leak prone putty more than once, Once butyl is used, it is no longer going to be a problem.
There is a trick to working with it. Keep it in the refridgerator.
I hve a spare fridge for my butyl and other non food items that are better kept cold
Huntindog
100% boondocking
2021 Grand Design Momentum 398M
2 bathrooms, no waiting
104 gal grey, 104 black,158 fresh
FullBodyPaint, 3,8Kaxles, DiscBrakes
17.5LRH commercial tires
1860watts solar,800 AH Battleborn batterys
2020 Silverado HighCountry CC DA 4X4 DRW
100% boondocking
2021 Grand Design Momentum 398M
2 bathrooms, no waiting
104 gal grey, 104 black,158 fresh
FullBodyPaint, 3,8Kaxles, DiscBrakes
17.5LRH commercial tires
1860watts solar,800 AH Battleborn batterys
2020 Silverado HighCountry CC DA 4X4 DRW
Options
- Mark as New
- Bookmark
- Subscribe
- Mute
- Subscribe to RSS Feed
- Permalink
- Report Inappropriate Content
Apr-13-2022 07:49 AM
Wow, pretty strong statements here. I like working with the putty tape better. I picked up some butyl tape by mistake once and found it difficult to work with. Went back to the trailer supply store and got good information about the benefits and advantages of both types. For my application, on both my trailer and older tent trailer, the putty was actually better.
I do like the advice to "use what was there" before. I can't remember what the guy told me but it had to do with possible staining and black streaks on fiberglass siding. Again, talk to someone in the know.
I do like the advice to "use what was there" before. I can't remember what the guy told me but it had to do with possible staining and black streaks on fiberglass siding. Again, talk to someone in the know.
2017 Toyota Tundra, Double Cab, 5.7L V8
2006 Airstream 25 FB SE
Equalizer Hitch
2006 Airstream 25 FB SE
Equalizer Hitch
Options
- Mark as New
- Bookmark
- Subscribe
- Mute
- Subscribe to RSS Feed
- Permalink
- Report Inappropriate Content
Apr-13-2022 07:23 AM
I’ve had putty tape dry out too.
Winnebago 2101DS TT & 2022 Chevy Silverado 1500 LTZ Z71, WindyNation 300 watt solar-Lossigy 200 AH Lithium battery. Prefer boondocking, USFS, COE, BLM, NPS, TVA, state camps. Bicyclist. 14 yr. Army -11B40 then 11A - (MOS 1542 & 1560) IOBC & IOAC grad
Options
- Mark as New
- Bookmark
- Subscribe
- Mute
- Subscribe to RSS Feed
- Permalink
- Report Inappropriate Content
Apr-13-2022 07:21 AM
Definitely use the butyl tape. Putty tape is cheap and will not last. It will dry out, crack and cause a leak. It is no good for anything.
Use pure butyl tape not a putty butyl blend. It is the most expensive of the 3, but also the best choice. It is a bit more firm, but it will compress. Super sticky but that is what you want. Tighten the screws slowly and evenly, preferably when it is warmer as opposed to a cold day. The excess that oozes out can be easily trimmed and removed with a plastic putty knife. Don't use anything metal.
If it continues to squish out a bit over time, just trim it again. The butyl will remain soft and pliable for years to come, and will keep a good solid seal, unlike that cheap putty junk.
2007 GMC 3500 dually ext. cab 4X4 LBZ Dmax/Allison - 2007 Pacific Coachworks Tango 306RLSS
RV Rebuild Website - Site launched Aug 22, 2021 - www.rv-rebuild.com
RV Rebuild Website - Site launched Aug 22, 2021 - www.rv-rebuild.com
Options
- Mark as New
- Bookmark
- Subscribe
- Mute
- Subscribe to RSS Feed
- Permalink
- Report Inappropriate Content
Apr-13-2022 07:09 AM
I used ProFlex RV sealant.
I put blue painters tape on the wall around the frame leaving about an 1/8" space before I removed the hatch frame. Applied a generous amount of ProFlex between the tape and opening and reinstalled the hatch. Once secured I cleaned the excess with acetone damp rags. Then I removed the tape and gave it one final damp rag wipe to remove the edge the tape left.
Using the painters tape helps cleaning the excess and leaves a real nice, clean appearance.
2011 Ford F-150 EcoBoost SuperCab Max Tow, 2084# Payload, 11,300# Tow,
Timbrens
2013 KZ Durango 2857
Timbrens
2013 KZ Durango 2857


