Turn on suggestions
Auto-suggest helps you quickly narrow down your search results by suggesting possible matches as you type.
Showing results for
- Good Sam Community
- Groups
- Motorhome Group
- Forum
- Re: Repairing a hole in the front cap
Options
- Subscribe to RSS Feed
- Mark Topic as New
- Mark Topic as Read
- Float this Topic for Current User
- Bookmark
- Subscribe
- Mute
- Printer Friendly Page
Repairing a hole in the front cap
Options
- Mark as New
- Bookmark
- Subscribe
- Mute
- Subscribe to RSS Feed
- Permalink
- Report Inappropriate Content
Aug-22-2013 07:38 PM
After a thunderstorm about 2 weeks ago, I discovered a hole in my front cap caused by a falling limb. My insurance has a high deductible, and I didn't want to have the coach in the shop for an extended time, so I tackled the repair myself. Having a good friend that builds/repairs boats means I got a lot of good free advice, which was a big help. I've made a few pictures of the repair process that may help someone else if they have this same problem.
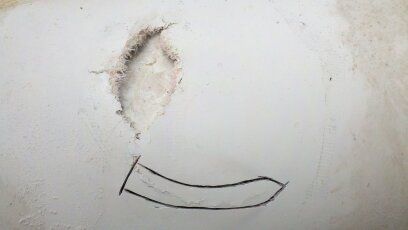
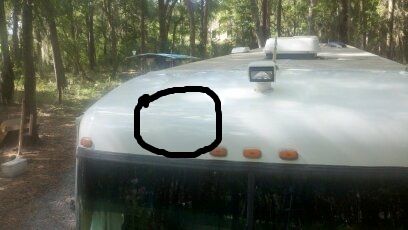
The first picture is of the damage area on the curved area of the front cap. The black line outlines a crack that has to be cut out. (and yes, the coach roof is very dirty in this picture)
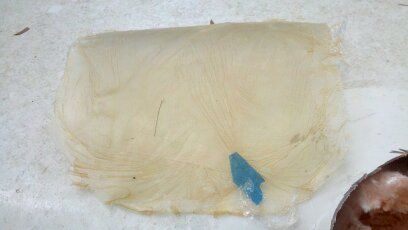
After cutting out the damaged area, I taped some saran wrap onto the outer surface of the curve close to the damaged area, and built up 3 layers of fiberglass. This gave me a backing plate to be inserted into the back side of the hole, with the backing plate having a curve that closely matches what must be achieved in the repair.
This picture shows the 3 layers of fiberglass on the saran wrap, but it has been moved upward from where I made the backing plate.
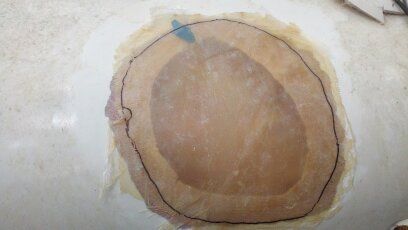
I took the backing plate, placed it over the hole and marked it for trimming to size. I had ground out about 1 1/2 inches around the hole front and back for adhesion, and made the backing plate this size. At only 3 layers thick, the backing plate could be flexed enough to insert into the hole. This picture shows the backing plate being marked for cutting to size.
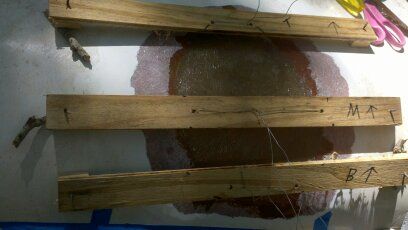
I fabricated some supports to span over the hole to attach support wires. The wires run through holes in the fiberglass backing plate. Before inserting the backing with wires attached, rosin was applied to the inner part of the hole, to the backing plate, and then two layers of fiberglass mat with rosin were added onto the backing plate. The backing plate was then flexed and inserted into the hole, and pulled up tight with the wires. Caution...wear gloves because this is messy. The next picture shows the backing plate wired into place waiting for the rosin to cure.
After the cure was completed, I removed the supports and wires, did some grinding to smooth out minor problems with the backing repair, and then added more layers of fiberglass on the outside. The remainder of the repair was standard auto body type work with applying the fiberglass, grinding/sanding smooth, filling imperfections with bondo and spot putty, primer, etc.
Here's the finished repair after repainting the front cap above the windshield. I had 2 part paint matched to the color of the existing gelcoat. The repaired area is circled.
The only significant costs was the 1/2 gallon of paint at $162.
The repair took about 2 weeks working between thunderstorms as we seem to be having a lot of rain lately.
Fred
The first picture is of the damage area on the curved area of the front cap. The black line outlines a crack that has to be cut out. (and yes, the coach roof is very dirty in this picture)
After cutting out the damaged area, I taped some saran wrap onto the outer surface of the curve close to the damaged area, and built up 3 layers of fiberglass. This gave me a backing plate to be inserted into the back side of the hole, with the backing plate having a curve that closely matches what must be achieved in the repair.
This picture shows the 3 layers of fiberglass on the saran wrap, but it has been moved upward from where I made the backing plate.
I took the backing plate, placed it over the hole and marked it for trimming to size. I had ground out about 1 1/2 inches around the hole front and back for adhesion, and made the backing plate this size. At only 3 layers thick, the backing plate could be flexed enough to insert into the hole. This picture shows the backing plate being marked for cutting to size.
I fabricated some supports to span over the hole to attach support wires. The wires run through holes in the fiberglass backing plate. Before inserting the backing with wires attached, rosin was applied to the inner part of the hole, to the backing plate, and then two layers of fiberglass mat with rosin were added onto the backing plate. The backing plate was then flexed and inserted into the hole, and pulled up tight with the wires. Caution...wear gloves because this is messy. The next picture shows the backing plate wired into place waiting for the rosin to cure.
After the cure was completed, I removed the supports and wires, did some grinding to smooth out minor problems with the backing repair, and then added more layers of fiberglass on the outside. The remainder of the repair was standard auto body type work with applying the fiberglass, grinding/sanding smooth, filling imperfections with bondo and spot putty, primer, etc.
Here's the finished repair after repainting the front cap above the windshield. I had 2 part paint matched to the color of the existing gelcoat. The repaired area is circled.
The only significant costs was the 1/2 gallon of paint at $162.
The repair took about 2 weeks working between thunderstorms as we seem to be having a lot of rain lately.
Fred
Fred & Vicki
St. Augustine, Florida
St. Augustine, Florida
Labels:
- Labels:
-
Class A
24 REPLIES 24
Options
- Mark as New
- Bookmark
- Subscribe
- Mute
- Subscribe to RSS Feed
- Permalink
- Report Inappropriate Content
Feb-12-2015 05:47 PM
Thanks everyone this helps .I too am going to take this on my own. Every bit of info helps.
Options
- Mark as New
- Bookmark
- Subscribe
- Mute
- Subscribe to RSS Feed
- Permalink
- Report Inappropriate Content
Aug-23-2013 07:15 PM
Fred, thanx for the pics...always helps to SEE the steps in a repair...great job!!!!!!!!
DadD45
2004 Cross Country Coachmen
2001 Wrangler behind
JUST HAVIN' FUN!!!
2004 Cross Country Coachmen
2001 Wrangler behind
JUST HAVIN' FUN!!!
Options
- Mark as New
- Bookmark
- Subscribe
- Mute
- Subscribe to RSS Feed
- Permalink
- Report Inappropriate Content
Aug-23-2013 07:13 PM
fcooper
You did a fantastic repair jog. Looks great
You did a fantastic repair jog. Looks great
Bob and Ann
Schnauzer - Della (Rainbow B 3/31/17)
Chihuahua - Lola (Rainbow B 12/26/18)
Autumn-Red Poodle
2019 Tiffin 40 IP Bus
Powerglide Chassis
Cummins 450
Onan 10,000 Watt
Four Slide/ 1.5 Bath
2021 Jeep Unlimited Sahara Toad
Demco Dominator & Airforce One
Schnauzer - Della (Rainbow B 3/31/17)
Chihuahua - Lola (Rainbow B 12/26/18)
Autumn-Red Poodle
2019 Tiffin 40 IP Bus
Powerglide Chassis
Cummins 450
Onan 10,000 Watt
Four Slide/ 1.5 Bath
2021 Jeep Unlimited Sahara Toad
Demco Dominator & Airforce One
Options
- Mark as New
- Bookmark
- Subscribe
- Mute
- Subscribe to RSS Feed
- Permalink
- Report Inappropriate Content
Aug-23-2013 07:02 PM
Outstanding outcome.
1993 Damon Challenger
http://www.rv.net/forum/index.cfm/fuseaction/thread/tid/26989746.cfm
http://www.rv.net/forum/index.cfm/fuseaction/thread/tid/26989746.cfm
Options
- Mark as New
- Bookmark
- Subscribe
- Mute
- Subscribe to RSS Feed
- Permalink
- Report Inappropriate Content
Aug-23-2013 11:47 AM
Great job. Sure is nice to have friends that can answer your questions.
Options
- Mark as New
- Bookmark
- Subscribe
- Mute
- Subscribe to RSS Feed
- Permalink
- Report Inappropriate Content
Aug-22-2013 09:00 PM
Thanks for sharing the pic Fred, nice job!
Options
- Mark as New
- Bookmark
- Subscribe
- Mute
- Subscribe to RSS Feed
- Permalink
- Report Inappropriate Content
Aug-22-2013 09:00 PM
Nice work! Good skill to learn.
Jayco Designer 30 RKS Medallion pkg, Trail Air pin
'05 F350 6.0 PSD CC 4x4 DRW LB B&W Companion, Edge Insight
“Certainly, travel is more than the seeing of sights; it is a change that goes on, deep and permanent, in the ideas of living." Miriam Beard
'05 F350 6.0 PSD CC 4x4 DRW LB B&W Companion, Edge Insight
“Certainly, travel is more than the seeing of sights; it is a change that goes on, deep and permanent, in the ideas of living." Miriam Beard
Options
- Mark as New
- Bookmark
- Subscribe
- Mute
- Subscribe to RSS Feed
- Permalink
- Report Inappropriate Content
Aug-22-2013 08:36 PM
Awesome job. Hope I don't have to learn how to do it though. 🙂
2003 Revolution 40C Class A. Electric smart car as a Toad on a smart car trailer
Life is not measured by the number of breaths we take but rather by the moments that take our breath away.
Life is not measured by the number of breaths we take but rather by the moments that take our breath away.
Options
- Mark as New
- Bookmark
- Subscribe
- Mute
- Subscribe to RSS Feed
- Permalink
- Report Inappropriate Content
Aug-22-2013 08:28 PM
Looks good Fred!!!!!
DICK
DICK
40' 2010 Phaeton QTH
toad--2013 GMC Sierra Crew Cab pickup 4X4
Viet Vet '65, Ia Drang Valley survivor (We Were Soldiers)
Elks
www.4ezdaz.com Same site, different URL
toad--2013 GMC Sierra Crew Cab pickup 4X4
Viet Vet '65, Ia Drang Valley survivor (We Were Soldiers)
Elks
www.4ezdaz.com Same site, different URL
Options
- Mark as New
- Bookmark
- Subscribe
- Mute
- Subscribe to RSS Feed
- Permalink
- Report Inappropriate Content
Aug-22-2013 08:23 PM
Looks perfect Fred, thanks....


