Turn on suggestions
Auto-suggest helps you quickly narrow down your search results by suggesting possible matches as you type.
Showing results for
- Good Sam Community
- Everything RV
- RV Tips & Tricks
- Re: Annual Brake Inspection and Axle Re - Lube (Pi...
Options
- Subscribe to RSS Feed
- Mark Topic as New
- Mark Topic as Read
- Float this Topic for Current User
- Bookmark
- Subscribe
- Mute
- Printer Friendly Page
Annual Brake Inspection and Axle Re - Lube (Pic's)
Options
- Mark as New
- Bookmark
- Subscribe
- Mute
- Subscribe to RSS Feed
- Permalink
- Report Inappropriate Content
Mar-04-2006 07:35 PM
Fellow Campers
(EDIT 4-24-06) I have added a few new things dealing with drum temperatures at the end of this post and updated some other tips from forum members. Edits will show in blue text.
Had severe spring camping fever today and started getting the TT ready for the season. Shown below is how I do my annual brake check and axle relube.
Be glad to hear from others on the methods they use. Always open to learning from others here. Also this may help someone who wants to do their own.
My axles are Dexter 3,500# axles, 10" diameter x 2 1/4" wide brakes on an underslung axle setup.
If you want to read up more on this, see the Dexter manual. They have good manuals.
Dexter Resource Library
(Edit 5-19-07) Note: If the link does not reach a working web site,go to under service manuals. They change the links from time to time.
Since pictures are worth a million words here is the process I use.
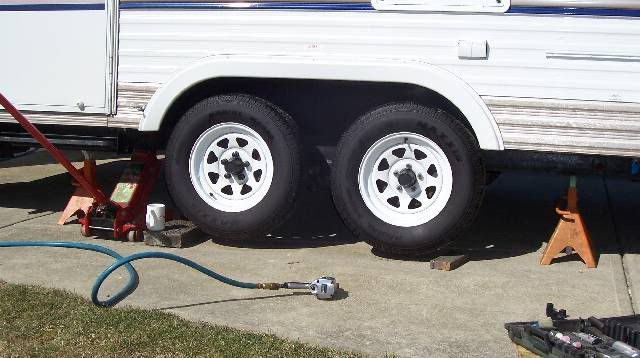
First I level the TT with the tongue jack, block the opposite side wheels and jack up one side of the TT. I install jack stands both front and rear. Never trust a jack. (The coffee mug next to the jack is optional:))
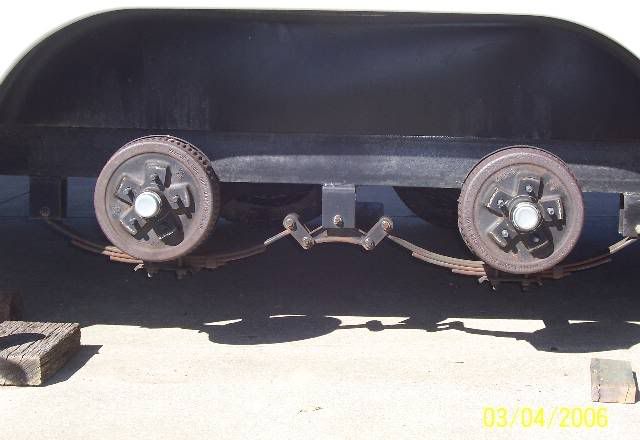
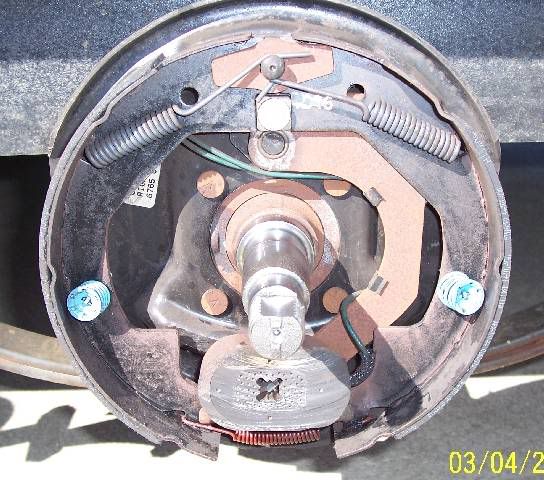
Then I take both tires off and you can see the axles real easy now. Looks like this.
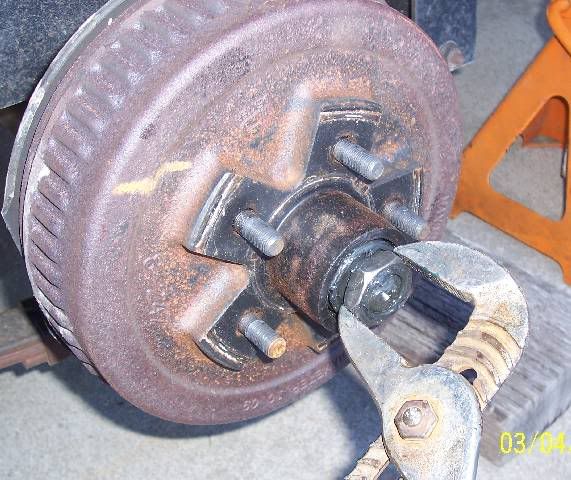
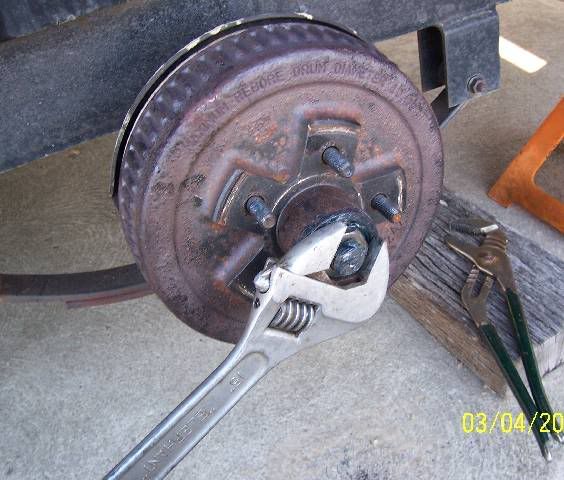
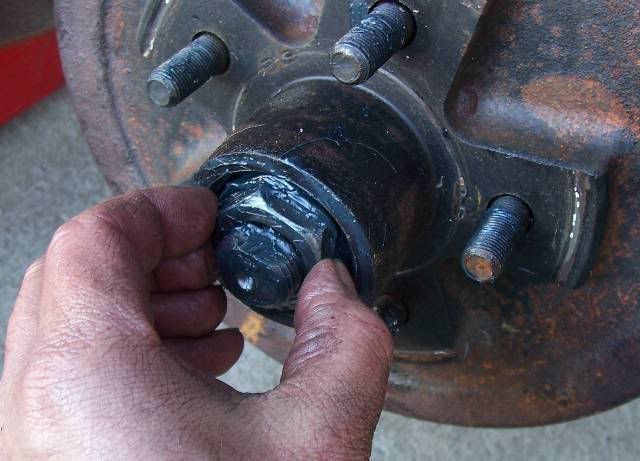
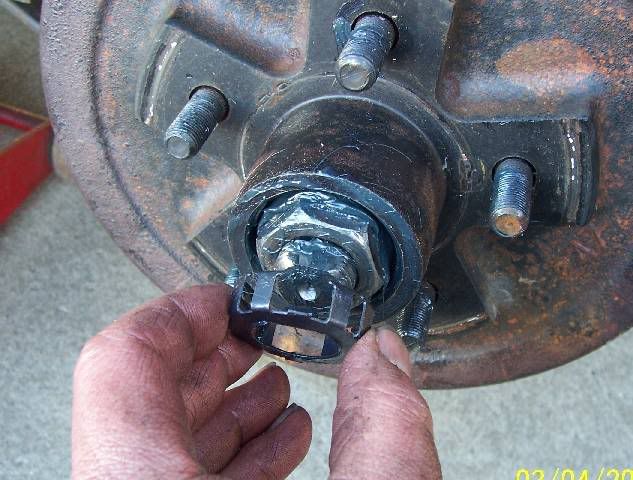
Then I start to pull the brake drums. I use a thin blade screw driver and lightly tap under the dust cap and pop it off. Take off the axle nut keeper and unscrew the axle nut. Most times it comes off by hand, but sometimes it needs a little help. These are right hand threads on mine.
Next the drums pull off and the outboard bearing cone and washer comes out. If your brake drums are not grove worn they will come off fairly easy. If it seems hung on the brake shoes and won't come off, you may have to unadjust the brakes first to get the shoes out of the worn groove in the drum.
You will find lots of brake dust. Do not breath it.
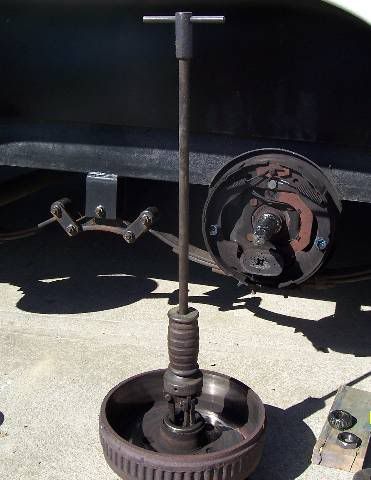
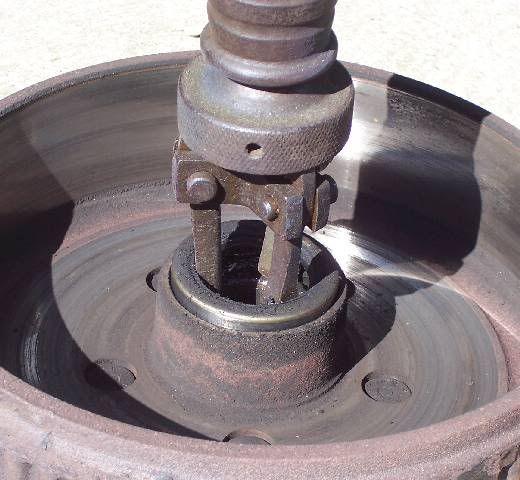
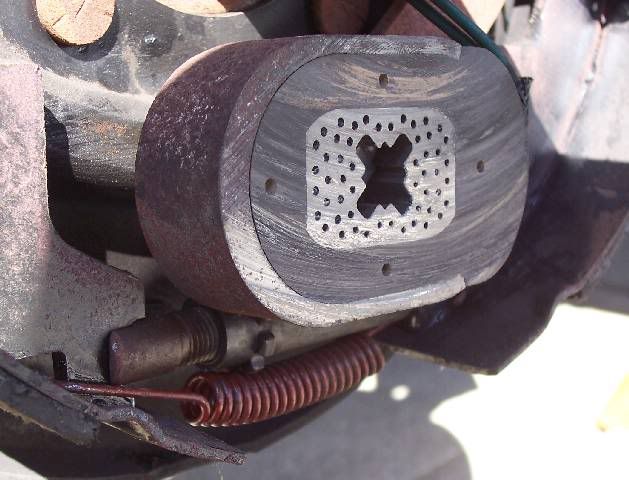
Next area is to get the grease seals out of the brake drum. I use a slide hammer puller. See the following reply's by other forum members on alternate seal pulling methods.
Close up of puller.
Once all the parts are off, need to clean them all up. The bearings get soaked and cleaned in degreaser. When cleaning I always keep the bearing as a matched set with the race they came from. I also clean out all the old grease from the hubs and clean up the brake shoe area ready for inspection. This is the first cleaning on this new TT after a year of use. WOW I was amazed on how little grease Dexter put in at the factory. Yes the bearings where covered, but I'm sure glad I did not go more than a year. A good point to clarify brought up by fellow forum members, make absolutely sure you dry out the solvent from the bearings. Using compressed air works well for this. Left over solvent will breakdown the new grease.
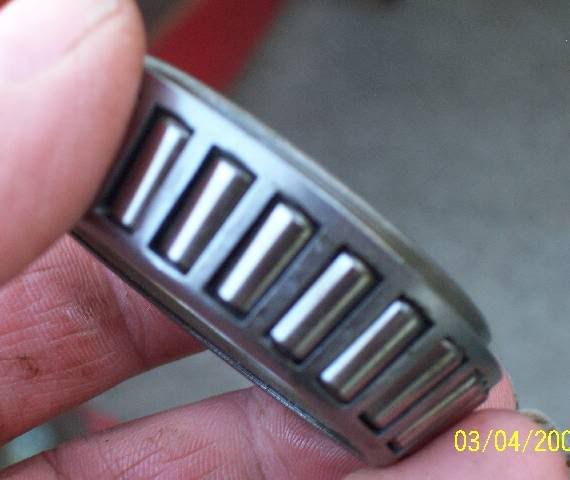
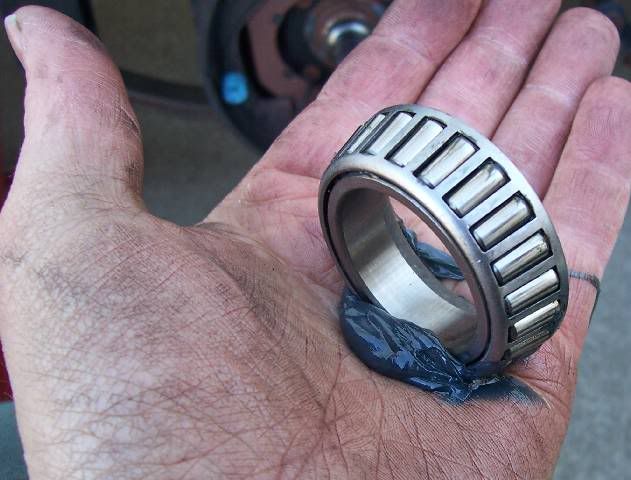
The bearing cones need to be closely inspected for corrosion or any type of wear on the rollers. You are looking for uneven wear, wear that looks burnished in one area and bright and shinny in others. This is uneven. Also look for corrosion pits, (small little holes)
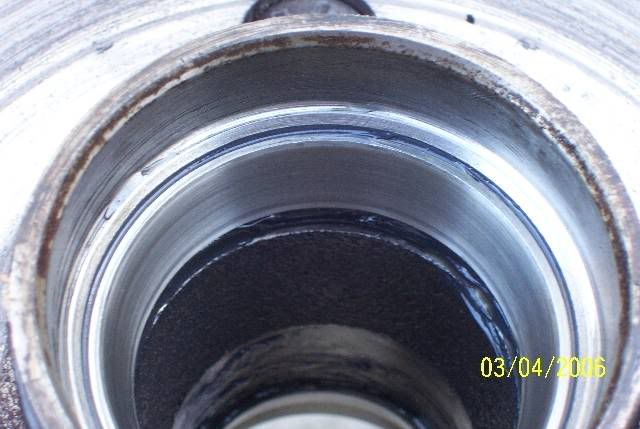
All bearing races also need to be inspected as well. Again you are looking for uneven wear and pitting, small little holes in the metal or signs of galled metal.
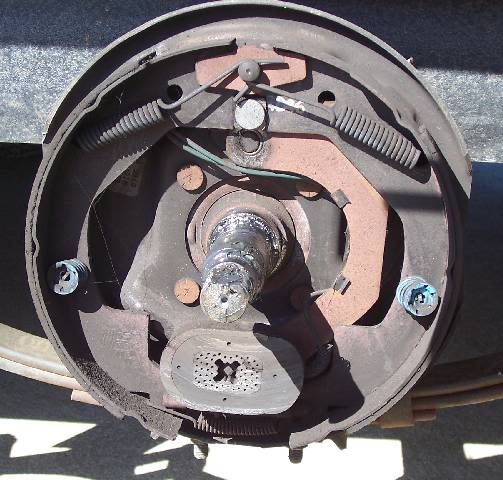
Then I inspect the brake shoes, linkage, springs, keepers etc. to make sure everything is OK.
Then comes the magnets, to make sure they are wearing correctly and do a close look at the brake adjuster to make sure it is not froze up. I very cautiously and with a rag in place, spray a little WD 40 on the brake adjuster. If you get any on the shoes, use brake cleaner to get it off. Taking the adjuster out and using Never Seize or grease on the threads also helps the adjuster from rusting. Just make sure you do not get any grease on the shoes.
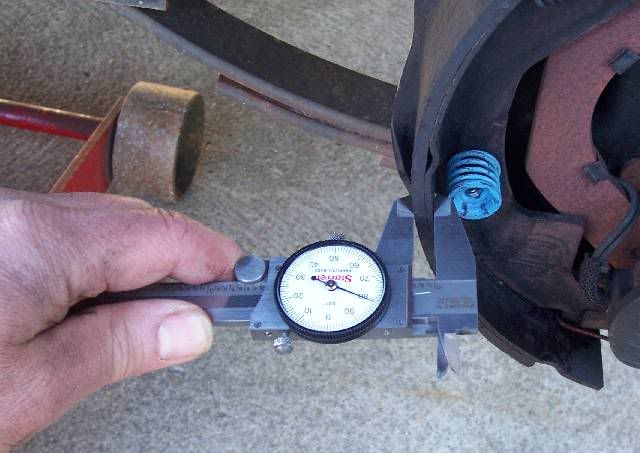
I measure and record the brake shoe thickness. I use the area by the shoe keeper pins so I always measure the same spot. Since I track my towing mileage, each year I can compare to last year and get a rate of wear per how many miles. This is just a heads up on when to buy new shoes for the next season.
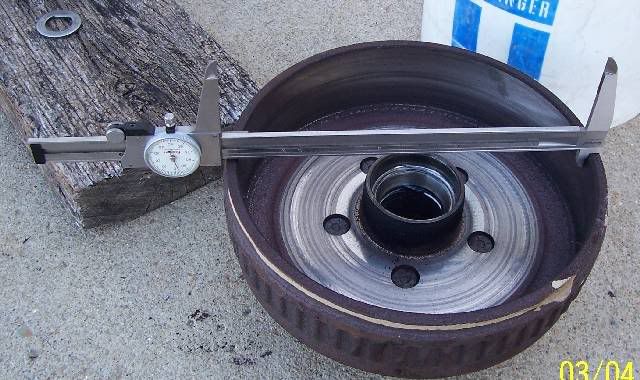
I then insect the brake drum for wear on the ID and the magnet surface. I'm also tracking the drum wear with measurements.
Now it's time to put things back together. Grease job at it's best. One of these days I'm going to buy bearing packer but for now I do it the hand way. Put a glob of good quality high temp wheel bearing grease in your hand and press and rock the grease into all the rollers.
Once all bearings are greased, I grease up the inner races and install the new seal.
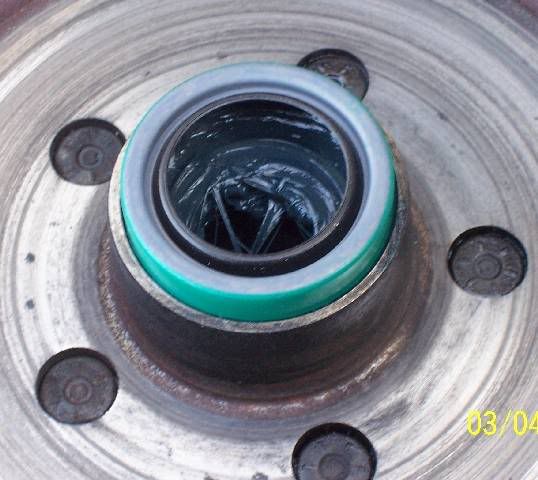
I use a wood block and gently and evenly tap the seal in flush.

Then I put a light coat of grease on the axle and lube up the outer race and gently push the wheel drum on. I slightly rotate the drum and push so I can feel the seal going on the axle. Install the bearing washer and nut and I set the preload. At this step you are taking all the excess play out of the bearings and then creating some running clearance.
I tighten the axle nut and rotate the drum. Tighten to like 50 ft lb of pull.
I rotate the drum a few times to make sure the bearings are seated. Then I hold the drum and back off the nut. Then by finger tight I take out all excess thread to the bearing inner race and stop. Do not move the drum, if you do, retorque and start over.
Then I put the axle nut keeper on. Personally I like the older style castle nut and cotter pin, but this keeper is the new thing Dexter does.
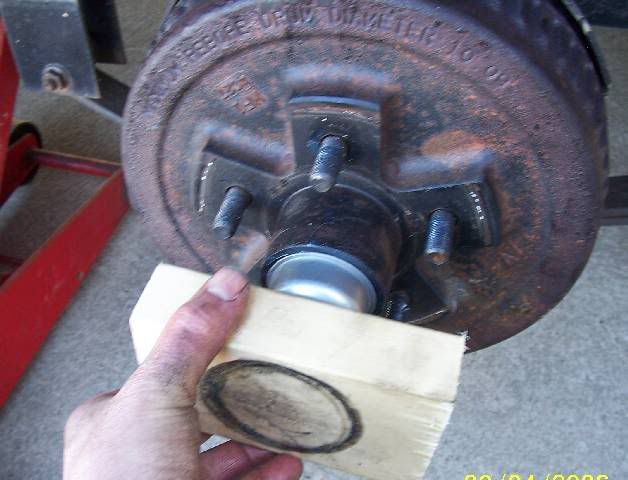
Then I use a block of wood and gently tap the grease cap back on.
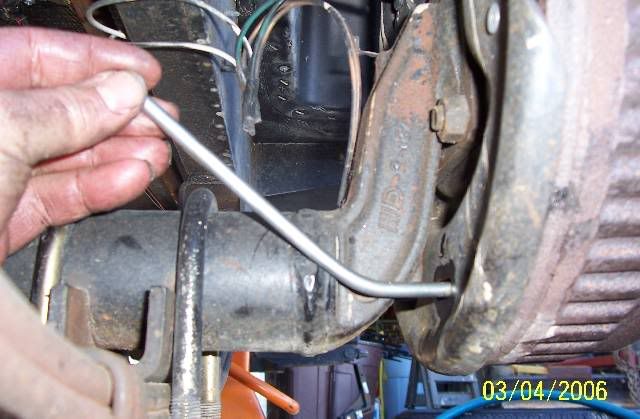
Since I have under slung axles, a treat to crawl under and get to the adjusters, this time I will adjust them with the wheels off. I had to make a tool to get in there with. All my regular brake tools do not work as you have to go in at an angle. This is what the tool looks like.

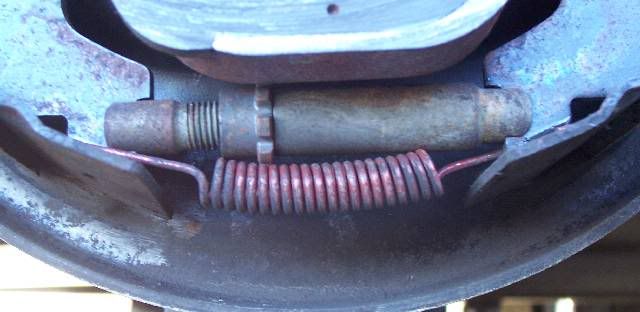
Now before you start adjusting, get a real good mental image of what the brake adjuster looks like. You are fishing in the dark. When I did the first 200 mile adjustment, I had to pull a drum to figure this thing out. They do not have the self adjuster lock tab like on automotive brakes to deal with in manual adjustment. Thank goodness.... The spring keeps the adjuster from moving, it drops in the sloted tabs on the adjuster stud. However I would reallllllly like self adjusting brakes. Having to adjust brakes manually is taking a step backswords like 50 years.... here is what mine looks like. The curved end of the tool especially helps.
Here is how the brake tool sneaks in from the back.
Once I get the drag set right and even, the wheels go on. I torque each lug set in a torque pattern. On my first camping trip out after putting the wheels on, the torque wrench comes with me and I recheck them at the camp site. And then I check the torque about 2 - 3 more times at the start of camping trips until I know they stop moving.
(EDIT 4-24-06) This is a new section is about hub/drum temperatures and checking that your brakes are adjusted equal. Here is some data from my setup. Yours may vary pending brand and setup.
Once you have gone through the procedure above on setting the brake shoe tension, I do a drag test to make sure all brakes are working even with each other. Meaning all 4 brakes are applying at the same time.
One way I do this is what I call a drag test. There are other methods, this is only one of them. It helps to have pulled a few miles to seat everything, but the test can be done directly after rebuilding and then later after 50 to 100 miles or when ever needed.
I use my gravel drive way and my son as a spotter. I have him watch one side and both wheels. I start driving about 15 - 20 feet, about 5MPH, let off the gas and then lock the brakes up. A slight drag will occur. The spotter looks to see if both wheels came on at once. The little dirt pile in front of the tire helps show this in case he missed it. The dirt pile should be similar.
Do this on both sides. Tweak the brake adjusters as needed to get all 4 to lock at once and come on at the same time. Again the little pile of dirt just ahead of the tires help tell you if they are all locking at about the same point.
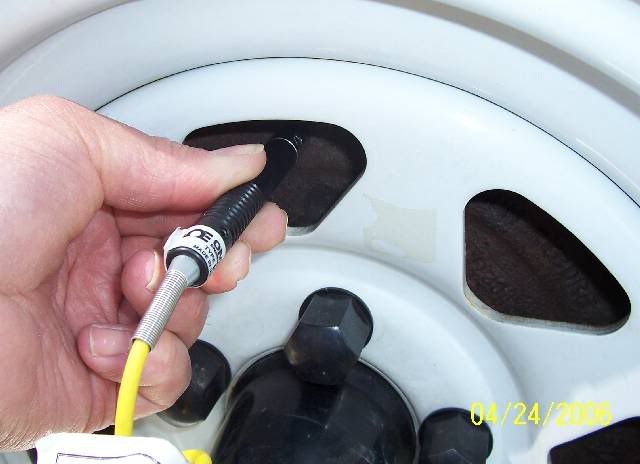
The next topic is hub and drum temperatures. These can help tell you if you have one brake working a lot harder than the rest or a bad bearing or to tight a bearing. When checking temperature, use the same spot when you move to all wheels. This will give you better comparison if one wheel is too hot. The drums are hotter the further to the edge you go.
Here is the hub temp. I have plastic hub caps so next to it is as close as I can get to the bearings. I use the same spot on all wheels. Ideally right on the bearing housing is best.
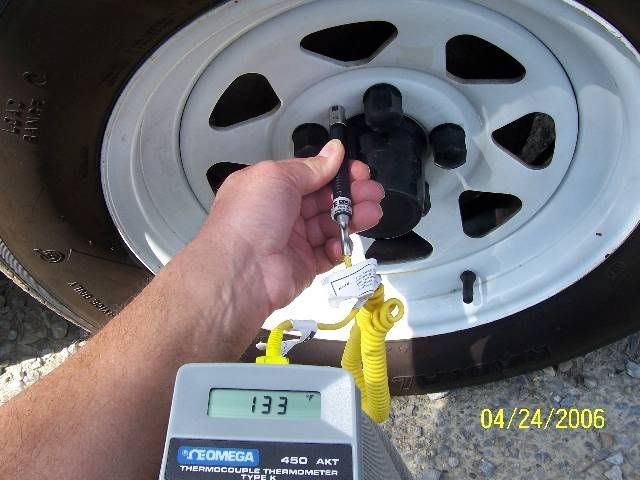
Next area is the drum temp. I sneak through the spoke holes.

I put the probe right on the OD of the drum. I do this so I can measure the same spot on all 4 wheels.
Here are some of my TT temps. These work on my rig. Yours may be different and how many times you brake affect these. Again key is are they all in the same range? Range meaning within 5 - 15 degrees not 30 to 40 plus degrees apart.
My 6400# loaded TT doing 60 MPH highway driving for 30 miles. Little braking, pulled into rest stop and took these.
Front Left Hub: 104F Drum: 156F
Rear Left Hub: 107F Drum: 156F
Front Right Hub: 112F Drum: 144F
Rear Right Hub: 106F Drum: 147F
I then traveled the rest of the way home, another 80 miles. Pulled in my drive way and took these. Here I had more stop and go traffic in town.
Front Left Hub: 132F Drum: 168F
Rear Left Hub: 129F Drum: 169F
Front Right Hub: 130F Drum: 165F
Rear Right Hub: 122F Drum: 155F
In the past I have had one wheel show a drum temp at ~ 200 - 205F. I found that a drum temp. this hot while the others where in the 150 to 170 range showed that that wheel was adjusted to tight in relation to the others. It was doing more stopping then the rest. The drag test showed it locked first. After adjusting, it was even with the rest.
Well this is what I do. Any tips on what you do?
Thanks
John
(EDIT 4-24-06) I have added a few new things dealing with drum temperatures at the end of this post and updated some other tips from forum members. Edits will show in blue text.
Had severe spring camping fever today and started getting the TT ready for the season. Shown below is how I do my annual brake check and axle relube.
Be glad to hear from others on the methods they use. Always open to learning from others here. Also this may help someone who wants to do their own.
My axles are Dexter 3,500# axles, 10" diameter x 2 1/4" wide brakes on an underslung axle setup.
If you want to read up more on this, see the Dexter manual. They have good manuals.
Dexter Resource Library
(Edit 5-19-07) Note: If the link does not reach a working web site,go to under service manuals. They change the links from time to time.
Since pictures are worth a million words here is the process I use.
First I level the TT with the tongue jack, block the opposite side wheels and jack up one side of the TT. I install jack stands both front and rear. Never trust a jack. (The coffee mug next to the jack is optional:))
Then I take both tires off and you can see the axles real easy now. Looks like this.
Then I start to pull the brake drums. I use a thin blade screw driver and lightly tap under the dust cap and pop it off. Take off the axle nut keeper and unscrew the axle nut. Most times it comes off by hand, but sometimes it needs a little help. These are right hand threads on mine.
Next the drums pull off and the outboard bearing cone and washer comes out. If your brake drums are not grove worn they will come off fairly easy. If it seems hung on the brake shoes and won't come off, you may have to unadjust the brakes first to get the shoes out of the worn groove in the drum.
You will find lots of brake dust. Do not breath it.
Next area is to get the grease seals out of the brake drum. I use a slide hammer puller. See the following reply's by other forum members on alternate seal pulling methods.
Close up of puller.
Once all the parts are off, need to clean them all up. The bearings get soaked and cleaned in degreaser. When cleaning I always keep the bearing as a matched set with the race they came from. I also clean out all the old grease from the hubs and clean up the brake shoe area ready for inspection. This is the first cleaning on this new TT after a year of use. WOW I was amazed on how little grease Dexter put in at the factory. Yes the bearings where covered, but I'm sure glad I did not go more than a year. A good point to clarify brought up by fellow forum members, make absolutely sure you dry out the solvent from the bearings. Using compressed air works well for this. Left over solvent will breakdown the new grease.
The bearing cones need to be closely inspected for corrosion or any type of wear on the rollers. You are looking for uneven wear, wear that looks burnished in one area and bright and shinny in others. This is uneven. Also look for corrosion pits, (small little holes)
All bearing races also need to be inspected as well. Again you are looking for uneven wear and pitting, small little holes in the metal or signs of galled metal.
Then I inspect the brake shoes, linkage, springs, keepers etc. to make sure everything is OK.
Then comes the magnets, to make sure they are wearing correctly and do a close look at the brake adjuster to make sure it is not froze up. I very cautiously and with a rag in place, spray a little WD 40 on the brake adjuster. If you get any on the shoes, use brake cleaner to get it off. Taking the adjuster out and using Never Seize or grease on the threads also helps the adjuster from rusting. Just make sure you do not get any grease on the shoes.
I measure and record the brake shoe thickness. I use the area by the shoe keeper pins so I always measure the same spot. Since I track my towing mileage, each year I can compare to last year and get a rate of wear per how many miles. This is just a heads up on when to buy new shoes for the next season.
I then insect the brake drum for wear on the ID and the magnet surface. I'm also tracking the drum wear with measurements.
Now it's time to put things back together. Grease job at it's best. One of these days I'm going to buy bearing packer but for now I do it the hand way. Put a glob of good quality high temp wheel bearing grease in your hand and press and rock the grease into all the rollers.
Once all bearings are greased, I grease up the inner races and install the new seal.
I use a wood block and gently and evenly tap the seal in flush.
Then I put a light coat of grease on the axle and lube up the outer race and gently push the wheel drum on. I slightly rotate the drum and push so I can feel the seal going on the axle. Install the bearing washer and nut and I set the preload. At this step you are taking all the excess play out of the bearings and then creating some running clearance.
I tighten the axle nut and rotate the drum. Tighten to like 50 ft lb of pull.
I rotate the drum a few times to make sure the bearings are seated. Then I hold the drum and back off the nut. Then by finger tight I take out all excess thread to the bearing inner race and stop. Do not move the drum, if you do, retorque and start over.
Then I put the axle nut keeper on. Personally I like the older style castle nut and cotter pin, but this keeper is the new thing Dexter does.
Then I use a block of wood and gently tap the grease cap back on.
Since I have under slung axles, a treat to crawl under and get to the adjusters, this time I will adjust them with the wheels off. I had to make a tool to get in there with. All my regular brake tools do not work as you have to go in at an angle. This is what the tool looks like.
Now before you start adjusting, get a real good mental image of what the brake adjuster looks like. You are fishing in the dark. When I did the first 200 mile adjustment, I had to pull a drum to figure this thing out. They do not have the self adjuster lock tab like on automotive brakes to deal with in manual adjustment. Thank goodness.... The spring keeps the adjuster from moving, it drops in the sloted tabs on the adjuster stud. However I would reallllllly like self adjusting brakes. Having to adjust brakes manually is taking a step backswords like 50 years.... here is what mine looks like. The curved end of the tool especially helps.
Here is how the brake tool sneaks in from the back.
Once I get the drag set right and even, the wheels go on. I torque each lug set in a torque pattern. On my first camping trip out after putting the wheels on, the torque wrench comes with me and I recheck them at the camp site. And then I check the torque about 2 - 3 more times at the start of camping trips until I know they stop moving.
(EDIT 4-24-06) This is a new section is about hub/drum temperatures and checking that your brakes are adjusted equal. Here is some data from my setup. Yours may vary pending brand and setup.
Once you have gone through the procedure above on setting the brake shoe tension, I do a drag test to make sure all brakes are working even with each other. Meaning all 4 brakes are applying at the same time.
One way I do this is what I call a drag test. There are other methods, this is only one of them. It helps to have pulled a few miles to seat everything, but the test can be done directly after rebuilding and then later after 50 to 100 miles or when ever needed.
I use my gravel drive way and my son as a spotter. I have him watch one side and both wheels. I start driving about 15 - 20 feet, about 5MPH, let off the gas and then lock the brakes up. A slight drag will occur. The spotter looks to see if both wheels came on at once. The little dirt pile in front of the tire helps show this in case he missed it. The dirt pile should be similar.
Do this on both sides. Tweak the brake adjusters as needed to get all 4 to lock at once and come on at the same time. Again the little pile of dirt just ahead of the tires help tell you if they are all locking at about the same point.
The next topic is hub and drum temperatures. These can help tell you if you have one brake working a lot harder than the rest or a bad bearing or to tight a bearing. When checking temperature, use the same spot when you move to all wheels. This will give you better comparison if one wheel is too hot. The drums are hotter the further to the edge you go.
Here is the hub temp. I have plastic hub caps so next to it is as close as I can get to the bearings. I use the same spot on all wheels. Ideally right on the bearing housing is best.
Next area is the drum temp. I sneak through the spoke holes.
I put the probe right on the OD of the drum. I do this so I can measure the same spot on all 4 wheels.
Here are some of my TT temps. These work on my rig. Yours may be different and how many times you brake affect these. Again key is are they all in the same range? Range meaning within 5 - 15 degrees not 30 to 40 plus degrees apart.
My 6400# loaded TT doing 60 MPH highway driving for 30 miles. Little braking, pulled into rest stop and took these.
Front Left Hub: 104F Drum: 156F
Rear Left Hub: 107F Drum: 156F
Front Right Hub: 112F Drum: 144F
Rear Right Hub: 106F Drum: 147F
I then traveled the rest of the way home, another 80 miles. Pulled in my drive way and took these. Here I had more stop and go traffic in town.
Front Left Hub: 132F Drum: 168F
Rear Left Hub: 129F Drum: 169F
Front Right Hub: 130F Drum: 165F
Rear Right Hub: 122F Drum: 155F
In the past I have had one wheel show a drum temp at ~ 200 - 205F. I found that a drum temp. this hot while the others where in the 150 to 170 range showed that that wheel was adjusted to tight in relation to the others. It was doing more stopping then the rest. The drag test showed it locked first. After adjusting, it was even with the rest.
Well this is what I do. Any tips on what you do?
Thanks
John
2005 Ford F350 Super Duty, 4x4; 6.8L V10 with 4.10 RA, 21,000 GCWR, 11,000 GVWR, upgraded 2 1/2" Towbeast Receiver. Hitched with a 1,700# Reese HP WD, HP Dual Cam to a 2004 Sunline Solaris T310R travel trailer.
45 REPLIES 45
Options
- Mark as New
- Bookmark
- Subscribe
- Mute
- Subscribe to RSS Feed
- Permalink
- Report Inappropriate Content
Mar-06-2006 07:48 PM
BarneyS wrote:
John,
Thank you for a very informative and helpful post! I have asked Admin to make it a sticky at the top of the Towing forum. I, and I'm sure all of our members, appreciate your well thought out and helpful posts. Wish I could take pictures like you do!:B
Thanks again for all your efforts.
Barney
Barney and other camper friends,
OK I'm humbled now. WOW thanks for the kind words. 🙂 Glad this has helped. That was the intent plus to learn some more myself from others.
There are more good comments still coming in from others methods which is what I was after as well. I'll wait a little more and then maybe go add a few more good tips to the words to make it a little clearer. Then we can all benefit.
The cut and paste into MS word with pic's and all, never realized that. :C
This site is one of the best things that has come along in a long while. We help each other in many ways, make new friends across the county and into other countries, be safer, free education and just plain have some fun. That camping spirit is alive and well here on the Open Roads Forum.:)
Thanks
John
2005 Ford F350 Super Duty, 4x4; 6.8L V10 with 4.10 RA, 21,000 GCWR, 11,000 GVWR, upgraded 2 1/2" Towbeast Receiver. Hitched with a 1,700# Reese HP WD, HP Dual Cam to a 2004 Sunline Solaris T310R travel trailer.
Options
- Mark as New
- Bookmark
- Subscribe
- Mute
- Subscribe to RSS Feed
- Permalink
- Report Inappropriate Content
Mar-06-2006 06:19 PM
JBarca wrote:
No I can't take credit for inventing that puller. I had the one in the pic for a long time. End up acquiring it for doing some work back when I was like 16. Which at this point, let's just say was a while ago... It is a inside/outside slide hammer puller. You can flip the jaws around and the cone on the bottom locks them. Mine is made by Proto. Searched them on the web and they still make it, just slightly updated.
Proto Gear Puller Set
Now why to be so careful when removing to replace. The ID of the seal is still messed up using the puller. However I did not scratch up the hub bore that the seal is pressed in. If you do not have a puller the options are sort of a screw drive with a hammer and dig and pry. Yeh it works, but if you have the puller, it is easier.
A long long long time ago an old mechanic (one of my mentors) in the automotive industry showed me a trick to popping out grease seals that I still use today. Most of the time the seal comes out undamaged and can be reused using this method, although it takes a little practice to get that good.
After you pull the outer nut, washer and bearing, but before you remove the drum. Simply thread ONLY the nut back on to the spindle a few turns. As you slide the drum off, hook the inside edge of the seal against the back of the nut and give the drum a sharp pull. The grease seal (and usually the inner bearing) will be left dangling on the spindle behind the nut.
I know it sounds like it shouldn't work, and that it might even damage a bearing or race in the process, but it doesn't. Like I said, most of the time the grease seal comes out so gently it can be cleaned and reused. I've been doing my bearings this way for about 15 years. Never replaced a wheelbearing yet. And the only grease seals I've ever replaced were due to age, not damage from removal. That includes not only the trailers, but also the FWD vehicles I had with rear drum brakes.
-Jimmy
- '11 Ford Expedition XL 5.4L (Primary tow vehicle)
- '04 Mercury Grand Marquis 4.6L (Backup tow vehicle
- '04 Ford Freestar SES 3.9L (another Backup tow vehicle)
- '97 Lincoln Mark VIII 32v 4.6L (another Backup tow vehicle)
- '95 Ford Ranger XLT 4.0L (final Backup)
Options
- Mark as New
- Bookmark
- Subscribe
- Mute
- Subscribe to RSS Feed
- Permalink
- Report Inappropriate Content
Mar-06-2006 05:34 PM
That is excellent, thanks. I needed that. Been procrastinating about adjusting my brakes.
Options
- Mark as New
- Bookmark
- Subscribe
- Mute
- Subscribe to RSS Feed
- Permalink
- Report Inappropriate Content
Mar-05-2006 07:13 PM
Hi JBarca, That's my Fleetwood 250RKS. Also my balpein hammer and seal puller. Great job on your post. This will help a lot of folks out.
Options
- Mark as New
- Bookmark
- Subscribe
- Mute
- Subscribe to RSS Feed
- Permalink
- Report Inappropriate Content
Mar-05-2006 03:01 PM
John,
Thank you for a very informative and helpful post! I have asked Admin to make it a sticky at the top of the Towing forum. I, and I'm sure all of our members, appreciate your well thought out and helpful posts. Wish I could take pictures like you do!:B
Thanks again for all your efforts.
Barney
Thank you for a very informative and helpful post! I have asked Admin to make it a sticky at the top of the Towing forum. I, and I'm sure all of our members, appreciate your well thought out and helpful posts. Wish I could take pictures like you do!:B
Thanks again for all your efforts.
Barney
2004 Sunnybrook Titan 30FKS TT
Hensley "Arrow" 1400# hitch (Sold)
Not towing now.
Former tow vehicles were 2016 Ram 2500 CTD, 2002 Ford F250, 7.3 PSD, 1997 Ram 2500 5.9 gas engine
Hensley "Arrow" 1400# hitch (Sold)
Not towing now.
Former tow vehicles were 2016 Ram 2500 CTD, 2002 Ford F250, 7.3 PSD, 1997 Ram 2500 5.9 gas engine
Options
- Mark as New
- Bookmark
- Subscribe
- Mute
- Subscribe to RSS Feed
- Permalink
- Report Inappropriate Content
Mar-05-2006 02:07 PM
JBarca, that was an excellent presentation, it would be great if there was more of that here on the R.V. net. Basic RV maintenance, made easy. thankyou.
Ron:)
Ron:)
Options
- Mark as New
- Bookmark
- Subscribe
- Mute
- Subscribe to RSS Feed
- Permalink
- Report Inappropriate Content
Mar-05-2006 11:58 AM
Thanks a lot. The is a great post with the pictures.
Although I have done this several times myself, I thought that it is well worth keeping. For those who would like to do the same here is a an easy way to do it.
Highlite and drag the mouse over JBarca's entire post. Then RIGHT click on your mouse.
Click on COPY
Open your Word program and PASTE
Then click on your "Printer" icon.
Now you have a copy (with nice color pictures) to keep and refer to.
Thanks again to JBarca.
If you have to ask why I drive a Diesel, then you will never understand.
2016 Ram 3500 DRW
Cummins(370/800) 68RE Auto 3.73 Rear
2018 Momentum 376TH
2016 Ram 3500 DRW
Cummins(370/800) 68RE Auto 3.73 Rear
2018 Momentum 376TH
Options
- Mark as New
- Bookmark
- Subscribe
- Mute
- Subscribe to RSS Feed
- Permalink
- Report Inappropriate Content
Mar-05-2006 09:30 AM
JBarca
I went to the website to check out that tool, it comes in a set for $478. I believe I can make one for less than $20.00. As for my sig. picture, I think it was taken in Tennessee and sent to me. It is sort of a jab to those who post their $500,000. rig as a sig picture!
I went to the website to check out that tool, it comes in a set for $478. I believe I can make one for less than $20.00. As for my sig. picture, I think it was taken in Tennessee and sent to me. It is sort of a jab to those who post their $500,000. rig as a sig picture!
Options
- Mark as New
- Bookmark
- Subscribe
- Mute
- Subscribe to RSS Feed
- Permalink
- Report Inappropriate Content
Mar-05-2006 07:10 AM
Very nicely done that should help allot of folks. The description for the packing can be hard to explain but it's always easier to show someone than to explain to someone.
Not to add much but how's this for the repacking description: Place a dab of grease in the opposite hand you'll be holding the bearing in, then holding it wide end down and at an angle, press and rock the edge of the bearing against your palm and occasionally moving into the grease a bit in your palm working the grease into bearing between the inner and outer housing (excess grease that gathers in the middle just put back in the pile from time to time) until it begins to come out the top edge, then move over a little (turn the whole beaing as one do not rotate the housing). Keep this up working your way around until grease has oozed out of the top gap all the way around the bearing and you're sure it is totally full.
Not to add much but how's this for the repacking description: Place a dab of grease in the opposite hand you'll be holding the bearing in, then holding it wide end down and at an angle, press and rock the edge of the bearing against your palm and occasionally moving into the grease a bit in your palm working the grease into bearing between the inner and outer housing (excess grease that gathers in the middle just put back in the pile from time to time) until it begins to come out the top edge, then move over a little (turn the whole beaing as one do not rotate the housing). Keep this up working your way around until grease has oozed out of the top gap all the way around the bearing and you're sure it is totally full.
1994 Dodge Ram 2500 5.9L Engine, 3.9 rear ratio, 135" Wheel Base, GVWR 7,500lbs, GCWR 14,000lbs, GTWR 9,200lbs, Class IV Reese Receiver, Husky WD Hitch, Prodigy Brake Controller
1994 Sportsmen mod# 2301, 23' Length, GVWR 5,512
1994 Sportsmen mod# 2301, 23' Length, GVWR 5,512
Options
- Mark as New
- Bookmark
- Subscribe
- Mute
- Subscribe to RSS Feed
- Permalink
- Report Inappropriate Content
Mar-05-2006 06:59 AM
To All.
Thanks for the nice comments. I'm glad this helped some folks. That was the intent. I have learned so many things in such a short time here on RV Net that every now and then we need to give back. There are many ways to do a brake job, this was how I learned so figured would see if I could improve the task with feed back from others.
Now to some specific questions:
The Dexter book says underslung axles requires a special brake adjusting tool but never showed what it looked like....
What I made is a piece of 1/4" round stock, cut to length of your choice, forge (beat with hammer) the end to give you that blade shape. The round tip comes along for the ride. Then bend to suit your needs.
------------------------------------------------------------------
I fully agree to tight and too loose is bad news. To much heat one way or the other. We actually preload Timken's with indicators on certain machines requiring high precision and no end play at work.
In this case I did not come up with this tightening method, Dexter did. I may not have used the right words, and may need to change what I wrote. Right out of the Dexter manual, See page 51 of the Dexter manual.
Basically they are using the 50 ft. lb # to seat the bearings and take out all the play. Then you back off the torque while not rotating the drum, then bring the nut back up finger tight. This in theory is close to no preload or slope on the Timkens. If the words I used did not translate this, sorry. I meant it to be.
----------------------------------------------------------------
No I can't take credit for inventing that puller. I had the one in the pic for a long time. End up acquiring it for doing some work back when I was like 16. Which at this point, let's just say was a while ago... It is a inside/outside slide hammer puller. You can flip the jaws around and the cone on the bottom locks them. Mine is made by Proto. Searched them on the web and they still make it, just slightly updated.
Proto Gear Puller Set
Now why to be so careful when removing to replace. The ID of the seal is still messed up using the puller. However I did not scratch up the hub bore that the seal is pressed in. If you do not have a puller the options are sort of a screw drive with a hammer and dig and pry. Yeh it works, but if you have the puller, it is easier.
And oh yeh, I see your sig pic every now and then. LOL... Where in the world did you find that thing???? The pic does not seem to match the 94 Bounder in your sig. The pic is more like a 48 or 52 Dodge straight truck with a "structure" on it....
Thanks to all for responding. More welcome too.
Thanks
John
Thanks for the nice comments. I'm glad this helped some folks. That was the intent. I have learned so many things in such a short time here on RV Net that every now and then we need to give back. There are many ways to do a brake job, this was how I learned so figured would see if I could improve the task with feed back from others.
Now to some specific questions:
GoldHEMI wrote:
Thanks for the tips. I'm getting ready to adjust my brakes and I'm hoping I don't have to remove the wheel and drum. Now I know what the brake adjustment tool should look like.
The Dexter book says underslung axles requires a special brake adjusting tool but never showed what it looked like....
What I made is a piece of 1/4" round stock, cut to length of your choice, forge (beat with hammer) the end to give you that blade shape. The round tip comes along for the ride. Then bend to suit your needs.
------------------------------------------------------------------
Fulltimers wrote:
Nice job. The only thing I hate doing is the brake adjustment. The rest is kinda fun. One note though, the Axle nut does have a torque spec. Too tight or too lose can be bad news.
I fully agree to tight and too loose is bad news. To much heat one way or the other. We actually preload Timken's with indicators on certain machines requiring high precision and no end play at work.
In this case I did not come up with this tightening method, Dexter did. I may not have used the right words, and may need to change what I wrote. Right out of the Dexter manual, See page 51 of the Dexter manual.
Basically they are using the 50 ft. lb # to seat the bearings and take out all the play. Then you back off the torque while not rotating the drum, then bring the nut back up finger tight. This in theory is close to no preload or slope on the Timkens. If the words I used did not translate this, sorry. I meant it to be.
----------------------------------------------------------------
Retiredblade wrote:
JBarca, did you invent that seal remover? That is a good idea. Only question I have, why be so careful to remove the seals when you are replacing them with new ones?
No I can't take credit for inventing that puller. I had the one in the pic for a long time. End up acquiring it for doing some work back when I was like 16. Which at this point, let's just say was a while ago... It is a inside/outside slide hammer puller. You can flip the jaws around and the cone on the bottom locks them. Mine is made by Proto. Searched them on the web and they still make it, just slightly updated.
Proto Gear Puller Set
Now why to be so careful when removing to replace. The ID of the seal is still messed up using the puller. However I did not scratch up the hub bore that the seal is pressed in. If you do not have a puller the options are sort of a screw drive with a hammer and dig and pry. Yeh it works, but if you have the puller, it is easier.
And oh yeh, I see your sig pic every now and then. LOL... Where in the world did you find that thing???? The pic does not seem to match the 94 Bounder in your sig. The pic is more like a 48 or 52 Dodge straight truck with a "structure" on it....
Thanks to all for responding. More welcome too.
Thanks
John
2005 Ford F350 Super Duty, 4x4; 6.8L V10 with 4.10 RA, 21,000 GCWR, 11,000 GVWR, upgraded 2 1/2" Towbeast Receiver. Hitched with a 1,700# Reese HP WD, HP Dual Cam to a 2004 Sunline Solaris T310R travel trailer.
Options
- Mark as New
- Bookmark
- Subscribe
- Mute
- Subscribe to RSS Feed
- Permalink
- Report Inappropriate Content
Mar-05-2006 06:06 AM
That is a great post JBarca, one of the best I've seen on here!
Dave & Jerrolyn, Zachary, Jake & Maxx and lab "Cody"
'00 Newmar Dutch Star 4093 CAT powered pusher.
http://community.webshots.com/user/Buzzcut39
'00 Newmar Dutch Star 4093 CAT powered pusher.
http://community.webshots.com/user/Buzzcut39
Options
- Mark as New
- Bookmark
- Subscribe
- Mute
- Subscribe to RSS Feed
- Permalink
- Report Inappropriate Content
Mar-05-2006 03:01 AM
JBarca, did you invent that seal remover? That is a good idea. Only question I have, why be so careful to remove the seals when you are replacing them with new ones?
Options
- Mark as New
- Bookmark
- Subscribe
- Mute
- Subscribe to RSS Feed
- Permalink
- Report Inappropriate Content
Mar-04-2006 09:07 PM
Fantastic job and seminar! Haven't done mine in years. CALM DOWN, I watch someone local do it for me.
They may have tried to get me in Air Force ( plsne got tired) but I fooled them,. Heavy work I supervise and light work I groan...but RV'ing I go.
(pt Wolf)(pt Mastiff)
ME > USAF-retired, still chauffeur. WIFE > Navigator BOSS
They may have tried to get me in Air Force ( plsne got tired) but I fooled them,. Heavy work I supervise and light work I groan...but RV'ing I go.
Travelin Two Tails
Ballot N Bandit
(pt Wolf)(pt Mastiff)
ME > USAF-retired, still chauffeur. WIFE > Navigator BOSS
'03 F250 6.0 PSD Super Duty Camper Special
'02 28ft Wildwood FKSS
Options
- Mark as New
- Bookmark
- Subscribe
- Mute
- Subscribe to RSS Feed
- Permalink
- Report Inappropriate Content
Mar-04-2006 08:48 PM
Nice job. The only thing I hate doing is the brake adjustment. The rest is kinda fun. One note though, the Axel nut does have a torque spec. Too tight or too lose can be bad news.
Fulltimers
Fulltimers Weblog
Fulltimers Weblog
2003 Rexhall Aerbus 3550BSL
W-22 Workhorse
2005 Saturn Vue (Mr. Toad)
3.5L V6 Automatic
Options
- Mark as New
- Bookmark
- Subscribe
- Mute
- Subscribe to RSS Feed
- Permalink
- Report Inappropriate Content
Mar-04-2006 08:27 PM
To JBarca:
John, your clear explanation and GREAT photos will really help a lot of us. Thank you, very much, for taking the time to post these!
John, your clear explanation and GREAT photos will really help a lot of us. Thank you, very much, for taking the time to post these!


