Turn on suggestions
Auto-suggest helps you quickly narrow down your search results by suggesting possible matches as you type.
Showing results for
- Good Sam Community
- Everything RV
- RV Tips & Tricks
- Re: Annual Brake Inspection and Axle Re - Lube (Pi...
Options
- Subscribe to RSS Feed
- Mark Topic as New
- Mark Topic as Read
- Float this Topic for Current User
- Bookmark
- Subscribe
- Mute
- Printer Friendly Page
Annual Brake Inspection and Axle Re - Lube (Pic's)
Options
- Mark as New
- Bookmark
- Subscribe
- Mute
- Subscribe to RSS Feed
- Permalink
- Report Inappropriate Content
Mar-04-2006 07:35 PM
Fellow Campers
(EDIT 4-24-06) I have added a few new things dealing with drum temperatures at the end of this post and updated some other tips from forum members. Edits will show in blue text.
Had severe spring camping fever today and started getting the TT ready for the season. Shown below is how I do my annual brake check and axle relube.
Be glad to hear from others on the methods they use. Always open to learning from others here. Also this may help someone who wants to do their own.
My axles are Dexter 3,500# axles, 10" diameter x 2 1/4" wide brakes on an underslung axle setup.
If you want to read up more on this, see the Dexter manual. They have good manuals.
Dexter Resource Library
(Edit 5-19-07) Note: If the link does not reach a working web site,go to under service manuals. They change the links from time to time.
Since pictures are worth a million words here is the process I use.
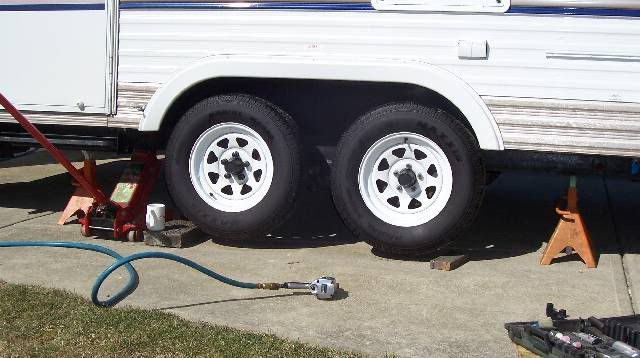
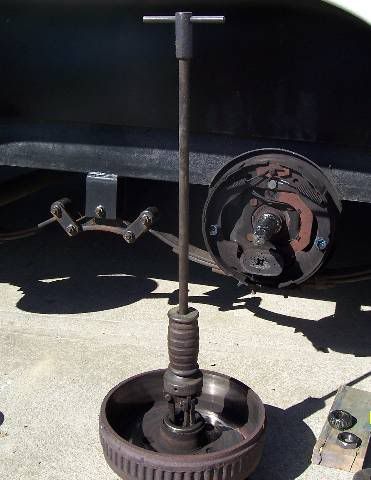
First I level the TT with the tongue jack, block the opposite side wheels and jack up one side of the TT. I install jack stands both front and rear. Never trust a jack. (The coffee mug next to the jack is optional:))
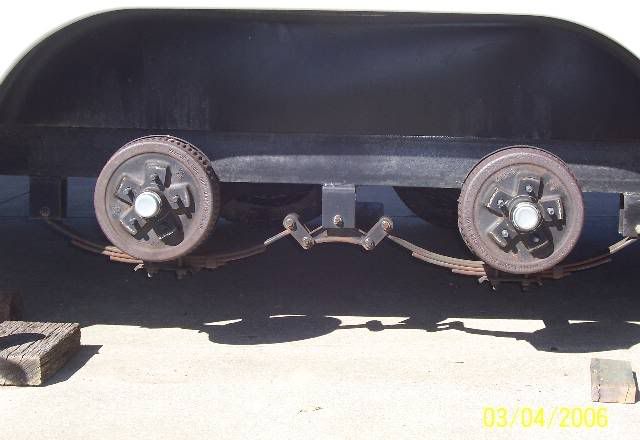
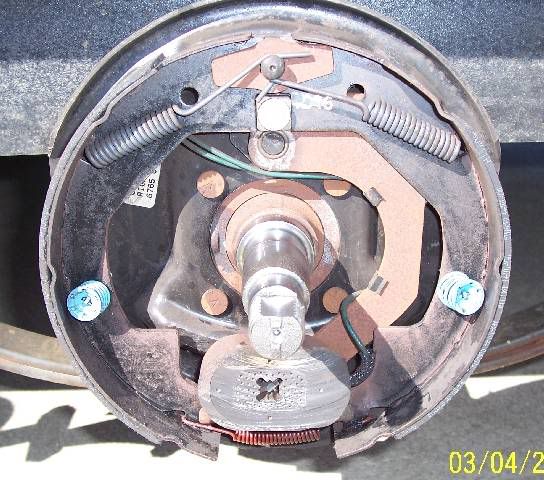
Then I take both tires off and you can see the axles real easy now. Looks like this.
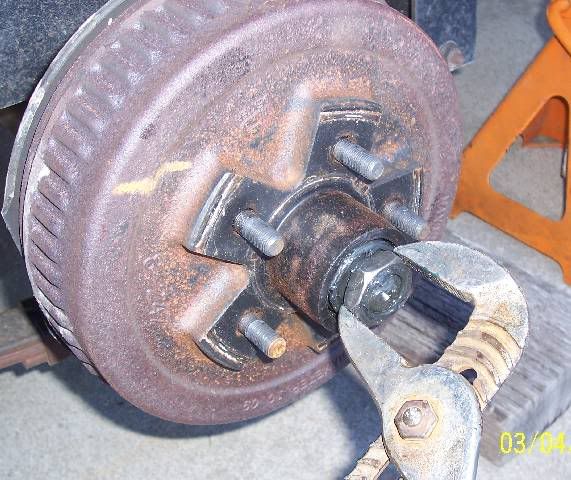
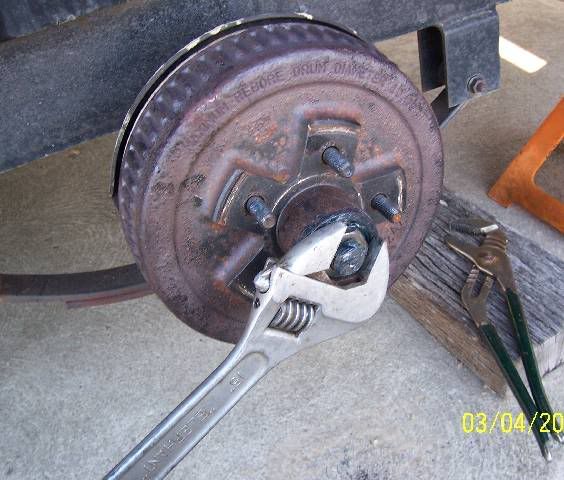
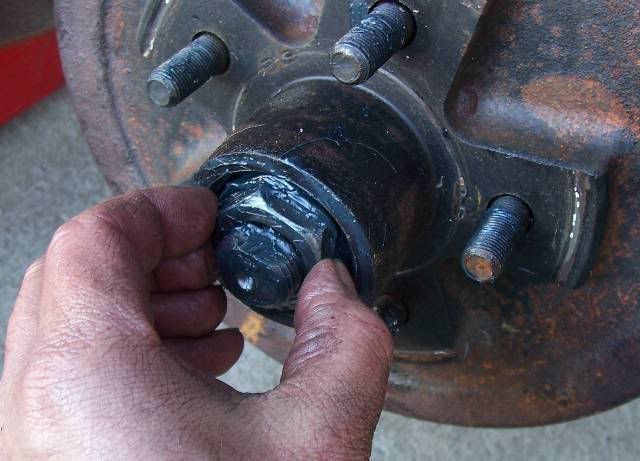
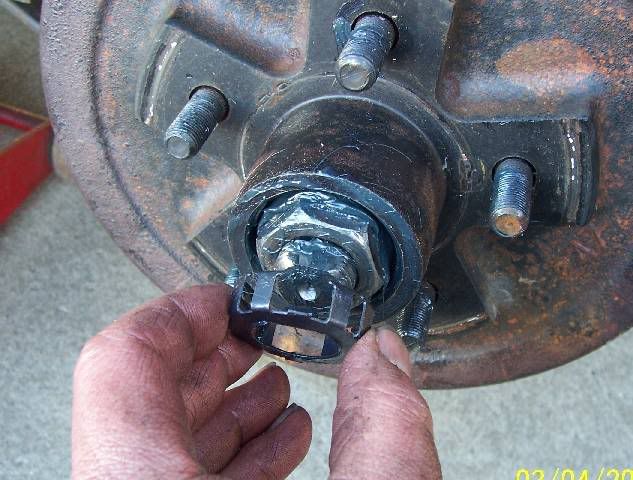
Then I start to pull the brake drums. I use a thin blade screw driver and lightly tap under the dust cap and pop it off. Take off the axle nut keeper and unscrew the axle nut. Most times it comes off by hand, but sometimes it needs a little help. These are right hand threads on mine.
Next the drums pull off and the outboard bearing cone and washer comes out. If your brake drums are not grove worn they will come off fairly easy. If it seems hung on the brake shoes and won't come off, you may have to unadjust the brakes first to get the shoes out of the worn groove in the drum.
You will find lots of brake dust. Do not breath it.
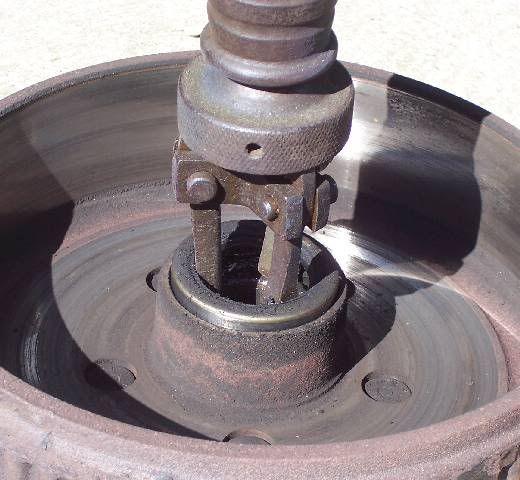
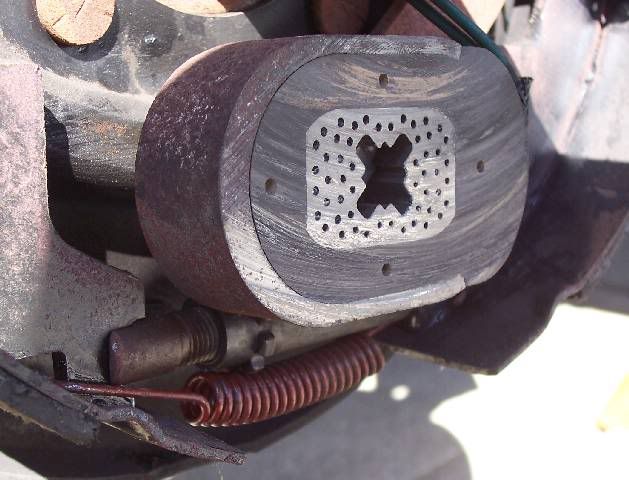
Next area is to get the grease seals out of the brake drum. I use a slide hammer puller. See the following reply's by other forum members on alternate seal pulling methods.
Close up of puller.
Once all the parts are off, need to clean them all up. The bearings get soaked and cleaned in degreaser. When cleaning I always keep the bearing as a matched set with the race they came from. I also clean out all the old grease from the hubs and clean up the brake shoe area ready for inspection. This is the first cleaning on this new TT after a year of use. WOW I was amazed on how little grease Dexter put in at the factory. Yes the bearings where covered, but I'm sure glad I did not go more than a year. A good point to clarify brought up by fellow forum members, make absolutely sure you dry out the solvent from the bearings. Using compressed air works well for this. Left over solvent will breakdown the new grease.
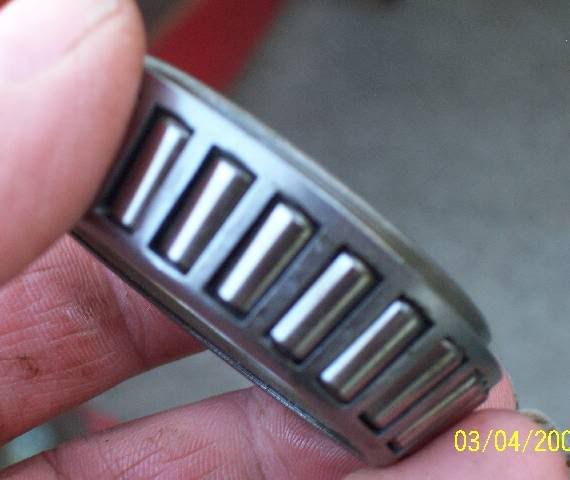
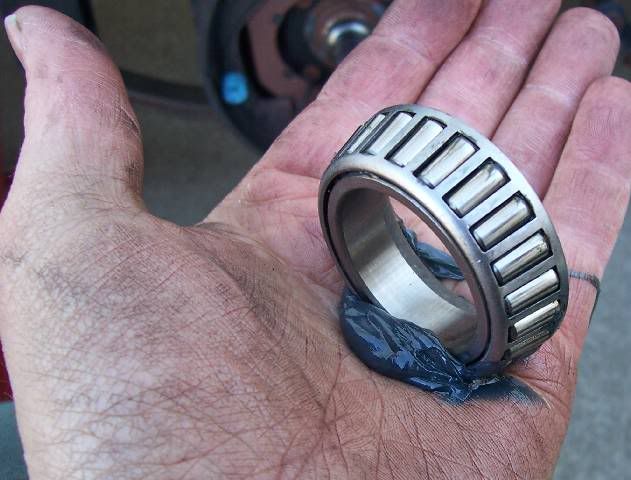
The bearing cones need to be closely inspected for corrosion or any type of wear on the rollers. You are looking for uneven wear, wear that looks burnished in one area and bright and shinny in others. This is uneven. Also look for corrosion pits, (small little holes)
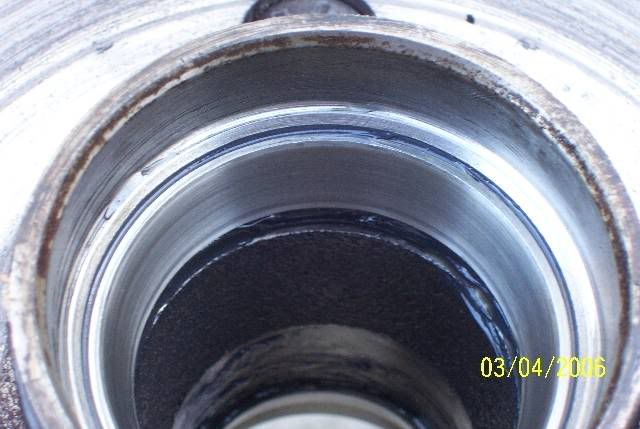
All bearing races also need to be inspected as well. Again you are looking for uneven wear and pitting, small little holes in the metal or signs of galled metal.
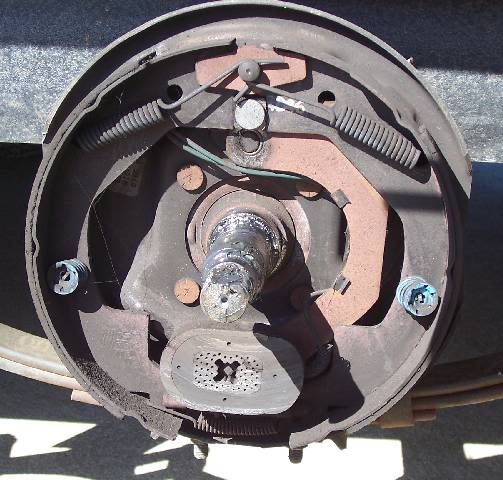
Then I inspect the brake shoes, linkage, springs, keepers etc. to make sure everything is OK.
Then comes the magnets, to make sure they are wearing correctly and do a close look at the brake adjuster to make sure it is not froze up. I very cautiously and with a rag in place, spray a little WD 40 on the brake adjuster. If you get any on the shoes, use brake cleaner to get it off. Taking the adjuster out and using Never Seize or grease on the threads also helps the adjuster from rusting. Just make sure you do not get any grease on the shoes.
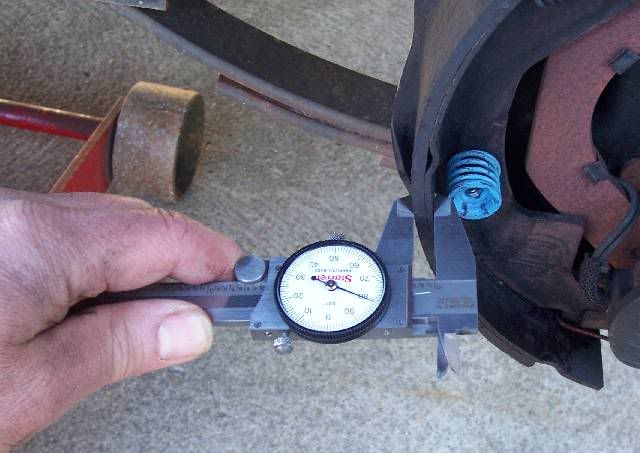
I measure and record the brake shoe thickness. I use the area by the shoe keeper pins so I always measure the same spot. Since I track my towing mileage, each year I can compare to last year and get a rate of wear per how many miles. This is just a heads up on when to buy new shoes for the next season.
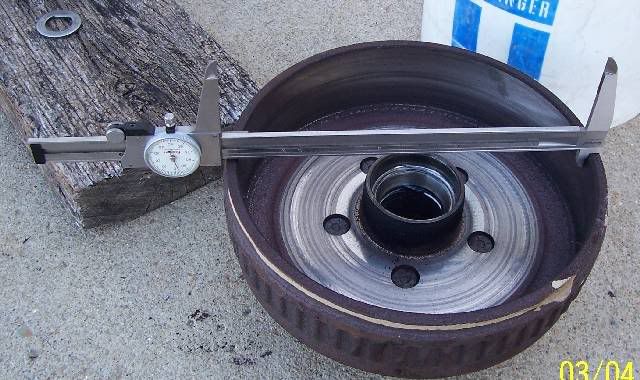
I then insect the brake drum for wear on the ID and the magnet surface. I'm also tracking the drum wear with measurements.
Now it's time to put things back together. Grease job at it's best. One of these days I'm going to buy bearing packer but for now I do it the hand way. Put a glob of good quality high temp wheel bearing grease in your hand and press and rock the grease into all the rollers.
Once all bearings are greased, I grease up the inner races and install the new seal.
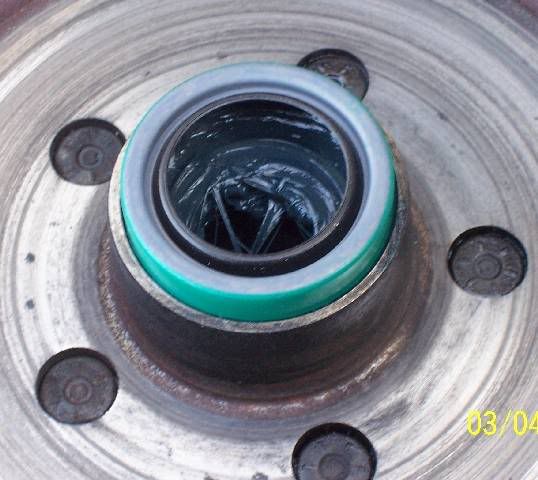
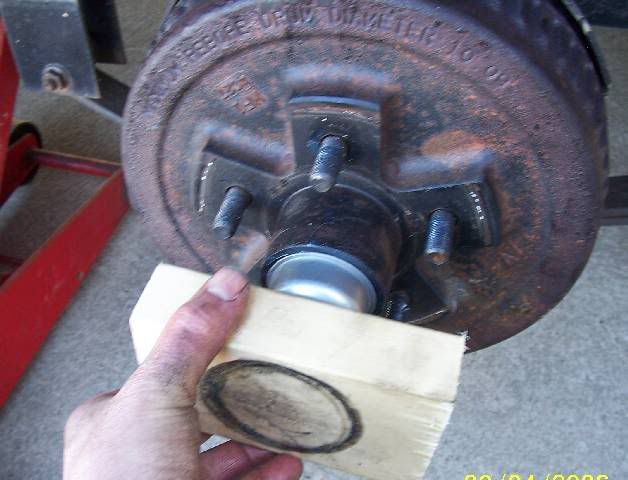
I use a wood block and gently and evenly tap the seal in flush.

Then I put a light coat of grease on the axle and lube up the outer race and gently push the wheel drum on. I slightly rotate the drum and push so I can feel the seal going on the axle. Install the bearing washer and nut and I set the preload. At this step you are taking all the excess play out of the bearings and then creating some running clearance.
I tighten the axle nut and rotate the drum. Tighten to like 50 ft lb of pull.
I rotate the drum a few times to make sure the bearings are seated. Then I hold the drum and back off the nut. Then by finger tight I take out all excess thread to the bearing inner race and stop. Do not move the drum, if you do, retorque and start over.
Then I put the axle nut keeper on. Personally I like the older style castle nut and cotter pin, but this keeper is the new thing Dexter does.
Then I use a block of wood and gently tap the grease cap back on.
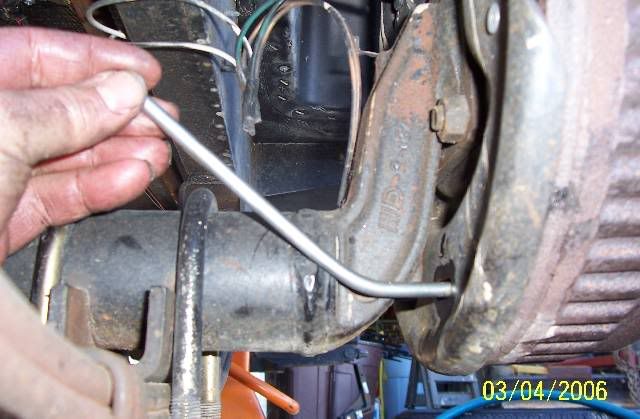
Since I have under slung axles, a treat to crawl under and get to the adjusters, this time I will adjust them with the wheels off. I had to make a tool to get in there with. All my regular brake tools do not work as you have to go in at an angle. This is what the tool looks like.

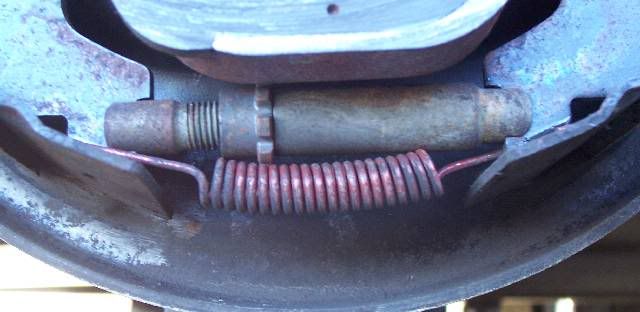
Now before you start adjusting, get a real good mental image of what the brake adjuster looks like. You are fishing in the dark. When I did the first 200 mile adjustment, I had to pull a drum to figure this thing out. They do not have the self adjuster lock tab like on automotive brakes to deal with in manual adjustment. Thank goodness.... The spring keeps the adjuster from moving, it drops in the sloted tabs on the adjuster stud. However I would reallllllly like self adjusting brakes. Having to adjust brakes manually is taking a step backswords like 50 years.... here is what mine looks like. The curved end of the tool especially helps.
Here is how the brake tool sneaks in from the back.
Once I get the drag set right and even, the wheels go on. I torque each lug set in a torque pattern. On my first camping trip out after putting the wheels on, the torque wrench comes with me and I recheck them at the camp site. And then I check the torque about 2 - 3 more times at the start of camping trips until I know they stop moving.
(EDIT 4-24-06) This is a new section is about hub/drum temperatures and checking that your brakes are adjusted equal. Here is some data from my setup. Yours may vary pending brand and setup.
Once you have gone through the procedure above on setting the brake shoe tension, I do a drag test to make sure all brakes are working even with each other. Meaning all 4 brakes are applying at the same time.
One way I do this is what I call a drag test. There are other methods, this is only one of them. It helps to have pulled a few miles to seat everything, but the test can be done directly after rebuilding and then later after 50 to 100 miles or when ever needed.
I use my gravel drive way and my son as a spotter. I have him watch one side and both wheels. I start driving about 15 - 20 feet, about 5MPH, let off the gas and then lock the brakes up. A slight drag will occur. The spotter looks to see if both wheels came on at once. The little dirt pile in front of the tire helps show this in case he missed it. The dirt pile should be similar.
Do this on both sides. Tweak the brake adjusters as needed to get all 4 to lock at once and come on at the same time. Again the little pile of dirt just ahead of the tires help tell you if they are all locking at about the same point.
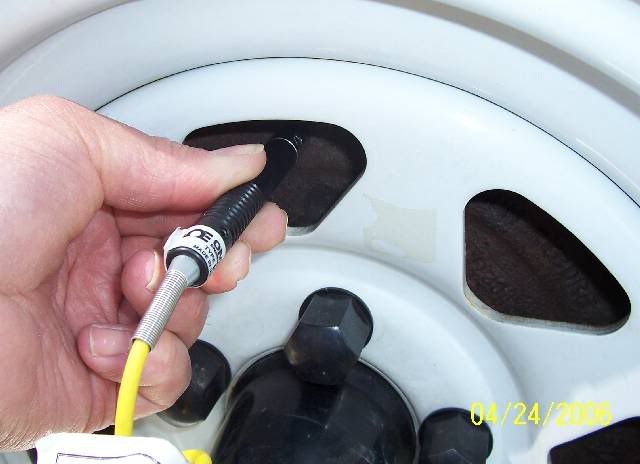
The next topic is hub and drum temperatures. These can help tell you if you have one brake working a lot harder than the rest or a bad bearing or to tight a bearing. When checking temperature, use the same spot when you move to all wheels. This will give you better comparison if one wheel is too hot. The drums are hotter the further to the edge you go.
Here is the hub temp. I have plastic hub caps so next to it is as close as I can get to the bearings. I use the same spot on all wheels. Ideally right on the bearing housing is best.
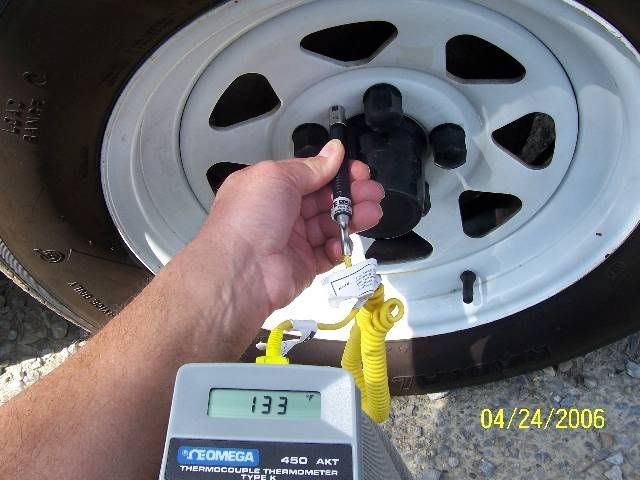
Next area is the drum temp. I sneak through the spoke holes.

I put the probe right on the OD of the drum. I do this so I can measure the same spot on all 4 wheels.
Here are some of my TT temps. These work on my rig. Yours may be different and how many times you brake affect these. Again key is are they all in the same range? Range meaning within 5 - 15 degrees not 30 to 40 plus degrees apart.
My 6400# loaded TT doing 60 MPH highway driving for 30 miles. Little braking, pulled into rest stop and took these.
Front Left Hub: 104F Drum: 156F
Rear Left Hub: 107F Drum: 156F
Front Right Hub: 112F Drum: 144F
Rear Right Hub: 106F Drum: 147F
I then traveled the rest of the way home, another 80 miles. Pulled in my drive way and took these. Here I had more stop and go traffic in town.
Front Left Hub: 132F Drum: 168F
Rear Left Hub: 129F Drum: 169F
Front Right Hub: 130F Drum: 165F
Rear Right Hub: 122F Drum: 155F
In the past I have had one wheel show a drum temp at ~ 200 - 205F. I found that a drum temp. this hot while the others where in the 150 to 170 range showed that that wheel was adjusted to tight in relation to the others. It was doing more stopping then the rest. The drag test showed it locked first. After adjusting, it was even with the rest.
Well this is what I do. Any tips on what you do?
Thanks
John
(EDIT 4-24-06) I have added a few new things dealing with drum temperatures at the end of this post and updated some other tips from forum members. Edits will show in blue text.
Had severe spring camping fever today and started getting the TT ready for the season. Shown below is how I do my annual brake check and axle relube.
Be glad to hear from others on the methods they use. Always open to learning from others here. Also this may help someone who wants to do their own.
My axles are Dexter 3,500# axles, 10" diameter x 2 1/4" wide brakes on an underslung axle setup.
If you want to read up more on this, see the Dexter manual. They have good manuals.
Dexter Resource Library
(Edit 5-19-07) Note: If the link does not reach a working web site,go to under service manuals. They change the links from time to time.
Since pictures are worth a million words here is the process I use.
First I level the TT with the tongue jack, block the opposite side wheels and jack up one side of the TT. I install jack stands both front and rear. Never trust a jack. (The coffee mug next to the jack is optional:))
Then I take both tires off and you can see the axles real easy now. Looks like this.
Then I start to pull the brake drums. I use a thin blade screw driver and lightly tap under the dust cap and pop it off. Take off the axle nut keeper and unscrew the axle nut. Most times it comes off by hand, but sometimes it needs a little help. These are right hand threads on mine.
Next the drums pull off and the outboard bearing cone and washer comes out. If your brake drums are not grove worn they will come off fairly easy. If it seems hung on the brake shoes and won't come off, you may have to unadjust the brakes first to get the shoes out of the worn groove in the drum.
You will find lots of brake dust. Do not breath it.
Next area is to get the grease seals out of the brake drum. I use a slide hammer puller. See the following reply's by other forum members on alternate seal pulling methods.
Close up of puller.
Once all the parts are off, need to clean them all up. The bearings get soaked and cleaned in degreaser. When cleaning I always keep the bearing as a matched set with the race they came from. I also clean out all the old grease from the hubs and clean up the brake shoe area ready for inspection. This is the first cleaning on this new TT after a year of use. WOW I was amazed on how little grease Dexter put in at the factory. Yes the bearings where covered, but I'm sure glad I did not go more than a year. A good point to clarify brought up by fellow forum members, make absolutely sure you dry out the solvent from the bearings. Using compressed air works well for this. Left over solvent will breakdown the new grease.
The bearing cones need to be closely inspected for corrosion or any type of wear on the rollers. You are looking for uneven wear, wear that looks burnished in one area and bright and shinny in others. This is uneven. Also look for corrosion pits, (small little holes)
All bearing races also need to be inspected as well. Again you are looking for uneven wear and pitting, small little holes in the metal or signs of galled metal.
Then I inspect the brake shoes, linkage, springs, keepers etc. to make sure everything is OK.
Then comes the magnets, to make sure they are wearing correctly and do a close look at the brake adjuster to make sure it is not froze up. I very cautiously and with a rag in place, spray a little WD 40 on the brake adjuster. If you get any on the shoes, use brake cleaner to get it off. Taking the adjuster out and using Never Seize or grease on the threads also helps the adjuster from rusting. Just make sure you do not get any grease on the shoes.
I measure and record the brake shoe thickness. I use the area by the shoe keeper pins so I always measure the same spot. Since I track my towing mileage, each year I can compare to last year and get a rate of wear per how many miles. This is just a heads up on when to buy new shoes for the next season.
I then insect the brake drum for wear on the ID and the magnet surface. I'm also tracking the drum wear with measurements.
Now it's time to put things back together. Grease job at it's best. One of these days I'm going to buy bearing packer but for now I do it the hand way. Put a glob of good quality high temp wheel bearing grease in your hand and press and rock the grease into all the rollers.
Once all bearings are greased, I grease up the inner races and install the new seal.
I use a wood block and gently and evenly tap the seal in flush.
Then I put a light coat of grease on the axle and lube up the outer race and gently push the wheel drum on. I slightly rotate the drum and push so I can feel the seal going on the axle. Install the bearing washer and nut and I set the preload. At this step you are taking all the excess play out of the bearings and then creating some running clearance.
I tighten the axle nut and rotate the drum. Tighten to like 50 ft lb of pull.
I rotate the drum a few times to make sure the bearings are seated. Then I hold the drum and back off the nut. Then by finger tight I take out all excess thread to the bearing inner race and stop. Do not move the drum, if you do, retorque and start over.
Then I put the axle nut keeper on. Personally I like the older style castle nut and cotter pin, but this keeper is the new thing Dexter does.
Then I use a block of wood and gently tap the grease cap back on.
Since I have under slung axles, a treat to crawl under and get to the adjusters, this time I will adjust them with the wheels off. I had to make a tool to get in there with. All my regular brake tools do not work as you have to go in at an angle. This is what the tool looks like.
Now before you start adjusting, get a real good mental image of what the brake adjuster looks like. You are fishing in the dark. When I did the first 200 mile adjustment, I had to pull a drum to figure this thing out. They do not have the self adjuster lock tab like on automotive brakes to deal with in manual adjustment. Thank goodness.... The spring keeps the adjuster from moving, it drops in the sloted tabs on the adjuster stud. However I would reallllllly like self adjusting brakes. Having to adjust brakes manually is taking a step backswords like 50 years.... here is what mine looks like. The curved end of the tool especially helps.
Here is how the brake tool sneaks in from the back.
Once I get the drag set right and even, the wheels go on. I torque each lug set in a torque pattern. On my first camping trip out after putting the wheels on, the torque wrench comes with me and I recheck them at the camp site. And then I check the torque about 2 - 3 more times at the start of camping trips until I know they stop moving.
(EDIT 4-24-06) This is a new section is about hub/drum temperatures and checking that your brakes are adjusted equal. Here is some data from my setup. Yours may vary pending brand and setup.
Once you have gone through the procedure above on setting the brake shoe tension, I do a drag test to make sure all brakes are working even with each other. Meaning all 4 brakes are applying at the same time.
One way I do this is what I call a drag test. There are other methods, this is only one of them. It helps to have pulled a few miles to seat everything, but the test can be done directly after rebuilding and then later after 50 to 100 miles or when ever needed.
I use my gravel drive way and my son as a spotter. I have him watch one side and both wheels. I start driving about 15 - 20 feet, about 5MPH, let off the gas and then lock the brakes up. A slight drag will occur. The spotter looks to see if both wheels came on at once. The little dirt pile in front of the tire helps show this in case he missed it. The dirt pile should be similar.
Do this on both sides. Tweak the brake adjusters as needed to get all 4 to lock at once and come on at the same time. Again the little pile of dirt just ahead of the tires help tell you if they are all locking at about the same point.
The next topic is hub and drum temperatures. These can help tell you if you have one brake working a lot harder than the rest or a bad bearing or to tight a bearing. When checking temperature, use the same spot when you move to all wheels. This will give you better comparison if one wheel is too hot. The drums are hotter the further to the edge you go.
Here is the hub temp. I have plastic hub caps so next to it is as close as I can get to the bearings. I use the same spot on all wheels. Ideally right on the bearing housing is best.
Next area is the drum temp. I sneak through the spoke holes.
I put the probe right on the OD of the drum. I do this so I can measure the same spot on all 4 wheels.
Here are some of my TT temps. These work on my rig. Yours may be different and how many times you brake affect these. Again key is are they all in the same range? Range meaning within 5 - 15 degrees not 30 to 40 plus degrees apart.
My 6400# loaded TT doing 60 MPH highway driving for 30 miles. Little braking, pulled into rest stop and took these.
Front Left Hub: 104F Drum: 156F
Rear Left Hub: 107F Drum: 156F
Front Right Hub: 112F Drum: 144F
Rear Right Hub: 106F Drum: 147F
I then traveled the rest of the way home, another 80 miles. Pulled in my drive way and took these. Here I had more stop and go traffic in town.
Front Left Hub: 132F Drum: 168F
Rear Left Hub: 129F Drum: 169F
Front Right Hub: 130F Drum: 165F
Rear Right Hub: 122F Drum: 155F
In the past I have had one wheel show a drum temp at ~ 200 - 205F. I found that a drum temp. this hot while the others where in the 150 to 170 range showed that that wheel was adjusted to tight in relation to the others. It was doing more stopping then the rest. The drag test showed it locked first. After adjusting, it was even with the rest.
Well this is what I do. Any tips on what you do?
Thanks
John
2005 Ford F350 Super Duty, 4x4; 6.8L V10 with 4.10 RA, 21,000 GCWR, 11,000 GVWR, upgraded 2 1/2" Towbeast Receiver. Hitched with a 1,700# Reese HP WD, HP Dual Cam to a 2004 Sunline Solaris T310R travel trailer.
45 REPLIES 45
Options
- Mark as New
- Bookmark
- Subscribe
- Mute
- Subscribe to RSS Feed
- Permalink
- Report Inappropriate Content
Apr-19-2006 06:40 PM
Just repacked today, one question did not soak bearings in cleaner, sprayed off with cleaner then dried with towels. Used a bearing packer seen some old grease oozing out and hopefully cleaner too. Have not pulled trailer yet just wondering if I should redo to make sure no cleaner was left in and has contaminated new grease.
2004 Ram 3500 Quad Cab /Auto/LB/SRW/CTD/4x4/4.10
2003 Four Winds 31BH4-DSL
Hensley Arrow
Prodigy
Great wife & 3 lovely girls
2003 Four Winds 31BH4-DSL
Hensley Arrow
Prodigy
Great wife & 3 lovely girls
Options
- Mark as New
- Bookmark
- Subscribe
- Mute
- Subscribe to RSS Feed
- Permalink
- Report Inappropriate Content
Apr-07-2006 05:21 AM
JBarca wrote:
dcdtn
Good for you! 🙂 Now you know what is inside and what to expect. And since you found a few dry bearings, how long to not go again. Or you had it done at the right interval and they did not put enough grease in. Dexter recommends every 12,000 miles or every year on grease repacking.
A few things I do to stay clean.
A. Stay ahead of the grease mess. Meaning when something get's all mucked up, wipe it up B4 going on. Clean as you go.
B. Old or new grease globs. I use old news paper as a receptacle. Meaning wipe out old gunk, either screw driver or finger and wipe it down inside the newspaper. Paper towels work too, just old news/junk mail adds are cheaper and work.
C. I do the dirty work, then clean up before installing anything. This way when you pick up brake drum or bearing it is clean to start with and you are not contaminating the new stuff.
I have been working on machines for the last 35 years and I do remember being a whole lot dirtier in the first few years. I still remember my mother telling me during the teen years, John what did you do jump in the grease?:R Oh well guess I made it to being cleaner as time when on.
On the bearing inspection, this is what I look for:
D. Corrosion pitting, galling or any metal bumps. Look at the rollers and the races. You are looking for actual metal lose or high spots. Small pits, holes, bumpy surfaces. When new, the rollers and races are ground to a very smooth finish surface on 100% of the rolling surfaces. If you have a pit, soon it will get bigger in time and eventually lead to bearing failure. I'll see if I can find a few shot bearings to post pics of.
E. Discoloration or blueish color. This comes from lack of lube and high heat. When you start seeing the blue tint, heavy blueish or other distorted colors the heat has became high enough that it may affect the temper of the metal and the bearing life will most generally be reduced.
F. Uneven wear. You may not see any pits or rough metal but things should be wearing evenly. Look for burnished surfaces then high polished ones. This generally points to something not running true. If you see this you have to figure out what is not true or loose.
Good luck and glad the post helped.
Happy camping
John
Thanks for the advice. I don't know when the last time the bearings were packed. I have only had the TT a little over a year, and put about 4000 miles on it. The previous owner had put very few miles on the trailer.
07 Dodge 2500 4x4 5.9L CTD Auto
99 Sunline T-2553
99 Sunline T-2553
Options
- Mark as New
- Bookmark
- Subscribe
- Mute
- Subscribe to RSS Feed
- Permalink
- Report Inappropriate Content
Apr-02-2006 04:31 PM
dcdtn wrote:
JBarca,
Thanks for your post. You inspired me to try packing the bearings myself on my '99 Sunline, rather than pay someone $100. It was a good learning experience for me, but next time I think I will pay someone. The hardest part for me was dealing with the mess. I don't see how you were able to take pictures without getting grease all over your camera. I found it very difficult to keep grease from getting all over everything (tools, brakes, etc.) and to keep dirt and sand from contaminating the "clean" grease. Also didn't know exactly what to look for when inspecting bearings/races. One or two bearings had almost no grease in them and their races had brown streaks (scorching?). But the bearings were intact so I packed them with grease and put them back in.
dcdtn
Good for you! 🙂 Now you know what is inside and what to expect. And since you found a few dry bearings, how long to not go again. Or you had it done at the right interval and they did not put enough grease in. Dexter recommends every 12,000 miles or every year on grease repacking.
A few things I do to stay clean.
A. Stay ahead of the grease mess. Meaning when something get's all mucked up, wipe it up B4 going on. Clean as you go.
B. Old or new grease globs. I use old news paper as a receptacle. Meaning wipe out old gunk, either screw driver or finger and wipe it down inside the newspaper. Paper towels work too, just old news/junk mail adds are cheaper and work.
C. I do the dirty work, then clean up before installing anything. This way when you pick up brake drum or bearing it is clean to start with and you are not contaminating the new stuff.
I have been working on machines for the last 35 years and I do remember being a whole lot dirtier in the first few years. I still remember my mother telling me during the teen years, John what did you do jump in the grease?:R Oh well guess I made it to being cleaner as time when on.
On the bearing inspection, this is what I look for:
D. Corrosion pitting, galling or any metal bumps. Look at the rollers and the races. You are looking for actual metal lose or high spots. Small pits, holes, bumpy surfaces. When new, the rollers and races are ground to a very smooth finish surface on 100% of the rolling surfaces. If you have a pit, soon it will get bigger in time and eventually lead to bearing failure. I'll see if I can find a few shot bearings to post pics of.
E. Discoloration or blueish color. This comes from lack of lube and high heat. When you start seeing the blue tint, heavy blueish or other distorted colors the heat has became high enough that it may affect the temper of the metal and the bearing life will most generally be reduced.
F. Uneven wear. You may not see any pits or rough metal but things should be wearing evenly. Look for burnished surfaces then high polished ones. This generally points to something not running true. If you see this you have to figure out what is not true or loose.
Good luck and glad the post helped.
Happy camping
John
2005 Ford F350 Super Duty, 4x4; 6.8L V10 with 4.10 RA, 21,000 GCWR, 11,000 GVWR, upgraded 2 1/2" Towbeast Receiver. Hitched with a 1,700# Reese HP WD, HP Dual Cam to a 2004 Sunline Solaris T310R travel trailer.
Options
- Mark as New
- Bookmark
- Subscribe
- Mute
- Subscribe to RSS Feed
- Permalink
- Report Inappropriate Content
Apr-01-2006 05:38 PM
Bravo, well done, enjoyed and am ready to give it a try. Thanks GabJam
11' Monaco Monarch 34SBD
Dan:B, Donna:), Gabrielle (13):R, & Jameson (11):p
Listen to Country Music on-line or on your Smart Phone @ US66Radio.com
Dan:B, Donna:), Gabrielle (13):R, & Jameson (11):p
Listen to Country Music on-line or on your Smart Phone @ US66Radio.com
Options
- Mark as New
- Bookmark
- Subscribe
- Mute
- Subscribe to RSS Feed
- Permalink
- Report Inappropriate Content
Apr-01-2006 05:21 PM
JBarca,
Thanks for your post. You inspired me to try packing the bearings myself on my '99 Sunline, rather than pay someone $100. It was a good learning experience for me, but next time I think I will pay someone. The hardest part for me was dealing with the mess. I don't see how you were able to take pictures without getting grease all over your camera. I found it very difficult to keep grease from getting all over everything (tools, brakes, etc.) and to keep dirt and sand from contaminating the "clean" grease. Also didn't know exactly what to look for when inspecting bearings/races. One or two bearings had almost no grease in them and their races had brown streaks (scorching?). But the bearings were intact so I packed them with grease and put them back in.
Thanks for your post. You inspired me to try packing the bearings myself on my '99 Sunline, rather than pay someone $100. It was a good learning experience for me, but next time I think I will pay someone. The hardest part for me was dealing with the mess. I don't see how you were able to take pictures without getting grease all over your camera. I found it very difficult to keep grease from getting all over everything (tools, brakes, etc.) and to keep dirt and sand from contaminating the "clean" grease. Also didn't know exactly what to look for when inspecting bearings/races. One or two bearings had almost no grease in them and their races had brown streaks (scorching?). But the bearings were intact so I packed them with grease and put them back in.
07 Dodge 2500 4x4 5.9L CTD Auto
99 Sunline T-2553
99 Sunline T-2553
Options
- Mark as New
- Bookmark
- Subscribe
- Mute
- Subscribe to RSS Feed
- Permalink
- Report Inappropriate Content
Apr-01-2006 06:22 AM
You might try your local auto parts place, like NAPA, or the like. I stopped in to my local auto parts store, Hometown, not big name, and they had the Wheel Bearing Seal --( Electric Brakes ) BRAND NAME set, 2 in package, for $4.50 NOT $18.00 for 2 that Auto-Zone, ETC.. Wanted. Just a heads up !!:W
2000 Ford SuperDuty F-350 Powerstroke,Dually.C.C.,.The Tow Monster
2005 Open Road 357RLDS
Prodigy Brake Controller:B
Honda EU3000is Generator
Raytek ,,Garmin 7735/GPS
Doran Mfg-RV360-TPMS
B&W/Companion
My Blog
Good Sam Member
2005 Open Road 357RLDS
Prodigy Brake Controller:B
Honda EU3000is Generator
Raytek ,,Garmin 7735/GPS
Doran Mfg-RV360-TPMS
B&W/Companion
Rally's attended so far-21
My Blog
Good Sam Member
Options
- Mark as New
- Bookmark
- Subscribe
- Mute
- Subscribe to RSS Feed
- Permalink
- Report Inappropriate Content
Mar-31-2006 04:37 PM
To remove most wheel seals, you do not need a seal puller at all. Drive out the inner bearing with a brass punch by going in through the outer bearing hole. There should be small recesses that you can place the punch tip into so the punch only rests on the outer race of the inner bearing. This does not damage the rollers or the cage. Just drive the inner bearing out and the seal will come with it. This usually doesn't damage the seal at all.
Keith
Keith
Options
- Mark as New
- Bookmark
- Subscribe
- Mute
- Subscribe to RSS Feed
- Permalink
- Report Inappropriate Content
Mar-31-2006 02:36 PM
Thanks for taking the time to make this in-depth post John.
2003 GMC Sierra 2500 CCLB w/ Duramax
2005 Open Road 318(36 ft.) RLDS TT
Reese DC sway control
Prodigy brake control
Wife Laura, son Preston(10),daughter Lucy(7), Ellie the Golden Retriever, Bella the Norwich Terrier.
2005 Open Road 318(36 ft.) RLDS TT
Reese DC sway control
Prodigy brake control
Wife Laura, son Preston(10),daughter Lucy(7), Ellie the Golden Retriever, Bella the Norwich Terrier.
Options
- Mark as New
- Bookmark
- Subscribe
- Mute
- Subscribe to RSS Feed
- Permalink
- Report Inappropriate Content
Mar-20-2006 04:26 PM
boy with toys wrote:
great post, I do my bearing packing myself. hey jbarka, next time you do that, try some surgical, or rubber gloves. those come in handy. also do yourself a favor and buy a bearing packer, it's sooo much easier and much faster.
where do you buy the seals from? i usually go to my dealer (thats the only time i go there) but they charge like $16 per seal. that seems like a ripoff. i need to do mine soon, but it's been too cold lately.
Boy with Toys
If you have a Dexter axle they have a great on line web site. You have to search out which axle and brake diameter you have but then it get's easier.
Dexter cross reference on seals they tell you several brands to use. I go with the name brand/premium parts. Even then a lot are made outside the states now.
Here is the main site. Dexteraxle.com
Personally I get mine at NAPA. Once you have the right part numbers the shopping is easier.
The gloves, h'mm may try that. To use to doing it the old way but open to new tricks...
Thanks
John
2005 Ford F350 Super Duty, 4x4; 6.8L V10 with 4.10 RA, 21,000 GCWR, 11,000 GVWR, upgraded 2 1/2" Towbeast Receiver. Hitched with a 1,700# Reese HP WD, HP Dual Cam to a 2004 Sunline Solaris T310R travel trailer.
Options
- Mark as New
- Bookmark
- Subscribe
- Mute
- Subscribe to RSS Feed
- Permalink
- Report Inappropriate Content
Mar-19-2006 09:43 PM
great post, i do my bearing packing myself. hey jbarka, next time you do that, try some surgical, or rubber gloves. those come in handy. also do yourself a favor and buy a bearing packer, it's sooo much easier and much faster.
where do you buy the seals from? i usually go to my dealer (thats the only time i go there) but they charge like $16 per seal. that seems like a ripoff. i need to do mine soon, but it's been too cold lately.
where do you buy the seals from? i usually go to my dealer (thats the only time i go there) but they charge like $16 per seal. that seems like a ripoff. i need to do mine soon, but it's been too cold lately.
jim
'06 f250 lariat crewcab diesel 4x4
'03 jayco eagle 314bhs
'06 f250 lariat crewcab diesel 4x4
'03 jayco eagle 314bhs
Options
- Mark as New
- Bookmark
- Subscribe
- Mute
- Subscribe to RSS Feed
- Permalink
- Report Inappropriate Content
Mar-19-2006 05:57 PM
+-Great stuff - Thanks.
My only trick to offer is dust control. As you said, you do not want to breath this stuff. I grap a spray bottle of windex, or ammonia/water mix (surfactant)and hose it all down. Keeps the dust in a liquid, so you can't breathe it, then hose it with brake cleaner, if wanted. Clean up with paper towels.
My only trick to offer is dust control. As you said, you do not want to breath this stuff. I grap a spray bottle of windex, or ammonia/water mix (surfactant)and hose it all down. Keeps the dust in a liquid, so you can't breathe it, then hose it with brake cleaner, if wanted. Clean up with paper towels.
Options
- Mark as New
- Bookmark
- Subscribe
- Mute
- Subscribe to RSS Feed
- Permalink
- Report Inappropriate Content
Mar-07-2006 08:08 AM
With my Dexter hubs, the nut is too big to pass through the center of the drum and pull off the seal. I use a $5 seal puller from a local tool store. It destroys the seal, but I always replace the seal anyway. Seals are cheap...a wreck caused by grease on the brakes is expensive.
In case there is much wear, check the prices for replacing the complete assembly vs. just buying parts or remachining the drum. My local auto parts store sells new drums for less than the cost of refacing the inner face (magnet contact face) of the brake drum. They can resurface the inner rim cheaply enough. A complete "loaded backing plate" with shoes, new magnet, new springs, and everything is cheaper than buying the parts. Four bolts and two wires are the total replacement job.
I don't use WD-40 for much. It is great for what the name says, WD for water-displacing. I've found it to be a poor lubricant and poor penetrant. I'd use a very small dab of grease on the adjuster threads.
It is OK to mix greases if they are the same base material or compatible base materials. If you aren't sure, don't mix. Grease is a mixture of the base (thickener), oil (conventional or synthetic), additives like graphite, molybdenum disulfide (MoS2), or teflon particles (OK in grease, no-no in engine oil), and maybe dye. If you have one lithium complex base grease, you can mix with another brand of lithium complex grease. Mixing a calcium base grease with a lithium base grease may result in a watery, runny mess and bearing failure.
http://www.boucherandjones.com/grease.htm
I prefer to adjust the brakes with the wheels removed. Without the momentum of the tires, I get better feel for just when the shoes are beginining to contact the drums. I like no shoe contact, one click away from making contact.
Ken
I'm free of prostate cancer for 5 years now.
All men over age 50 should get an annual PSA blood test. Mine had a low reading, but the yearly jump was significant. The biopsy showed cancer just entering the aggressive stage. Dr. Hackenslash removed it.
All men over age 50 should get an annual PSA blood test. Mine had a low reading, but the yearly jump was significant. The biopsy showed cancer just entering the aggressive stage. Dr. Hackenslash removed it.
Options
- Mark as New
- Bookmark
- Subscribe
- Mute
- Subscribe to RSS Feed
- Permalink
- Report Inappropriate Content
Mar-07-2006 05:20 AM
JBarca wrote:
H'mm Jimmy OK what you are saying is the inner bearing cone stops up against the nut and then the bearing acts against the seal and the brake drum is the slide hammer. Gently ratchet the drum back and forth and tap out the seal. Like the slide hammer puller. I could see this working and obviously it does.
Yes, that is the general idea. Only thing wrong with your interpretation is the part about "gently ratchet the drum back and forth and tap out the seal". What you are really doing is giving the drum a sharp pull off the spindle. One hit with the "slide hammer" so to say. Done properly, this single pull gets the job done in one swift motion.
When I was a mechanic (for a Chrysleer dealer) FWD cars with rear drums were the norm. This was always the way we removed the bearings and seals on customer's cars. I don't think I EVER saw a puller used to remove grease seals. OF course, when the car belonged to a customer, it always got new seals. When it belonged to me, I reuse them until they got funky, then replace. I've done thousands this way over the years.
Oh, and on the bearing packer topic, most old mechanics will NOT use a bearing packer even if one is present. It's thought hand packing is the only way to really get the grease in were it belongs. I've tried both ways, and they both seem to work for me. But when I worked at the dealership all the techs hand packed the bearings, even though we had a really nice pnuematic packing machine available. I do notice that when I use my bearing packer, a lot of grease is wasted. This is because the packing cone has to fill the ID of the bearing before it begins to push grease into the rollers.
One last tip: If you clean the bearings in solvent or spray cleaner (sometimes required, sometimes not), make sure you blow them out thoroughly with clean compressed air. Any tiny bit of solvent left in the bearings can break down the grease and fry a bearing. THIS I have seen on several occassions. ("What do you mean my bearing are fried, I just repacked them last weekend!") And NEVER mix different types of grease when packing bearings. If you are upgrading to synthetic, or even just changing brands, best to completely clean the bearing in solvent and start from scratch. Different types of greases can react negatively to one another and break down.
I myself always use a high quality synthetic grease, although my reasons are more laziness than anything. The synthetic grease is superior for just about any use, allowing me to keep only that type of grease "in stock" in my garage. I use it for suspension zerk fittings, wheel bearings in drums AND disk brake axles, U-joints...etc. you name it.
-Jimmy
- '11 Ford Expedition XL 5.4L (Primary tow vehicle)
- '04 Mercury Grand Marquis 4.6L (Backup tow vehicle
- '04 Ford Freestar SES 3.9L (another Backup tow vehicle)
- '97 Lincoln Mark VIII 32v 4.6L (another Backup tow vehicle)
- '95 Ford Ranger XLT 4.0L (final Backup)
Options
- Mark as New
- Bookmark
- Subscribe
- Mute
- Subscribe to RSS Feed
- Permalink
- Report Inappropriate Content
Mar-07-2006 03:37 AM
Yesterday, I talked to a mechanic and he told me the same thing as Caddywhompus said, think I will try it before I make that tool.
Options
- Mark as New
- Bookmark
- Subscribe
- Mute
- Subscribe to RSS Feed
- Permalink
- Report Inappropriate Content
Mar-06-2006 08:02 PM
Caddywhompus wrote:
After you pull the outer nut, washer and bearing, but before you remove the drum. Simply thread ONLY the nut back on to the spindle a few turns. As you slide the drum off, hook the inside edge of the seal against the back of the nut and give the drum a sharp pull. The grease seal (and usually the inner bearing) will be left dangling on the spindle behind the nut.
I know it sounds like it shouldn't work, and that it might even damage a bearing or race in the process, but it doesn't. Like I said, most of the time the grease seal comes out so gently it can be cleaned and reused. I've been doing my bearings this way for about 15 years. Never replaced a wheelbearing yet. And the only grease seals I've ever replaced were due to age, not damage from removal. That includes not only the trailers, but also the FWD vehicles I had with rear drum brakes.
-Jimmy
H'mm Jimmy OK what you are saying is the inner bearing cone stops up against the nut and then the bearing acts against the seal and the brake drum is the slide hammer. Gently ratchet the drum back and forth and tap out the seal. Like the slide hammer puller. I could see this working and obviously it does.
The bearing should be able to take it. The seal, well if the rubber is hard, it needs to go anyway. Whether or not to reuse the seal over, well that is a personal call. There is 2 camps on this. Those that clean and inspect and reuse, and those that pitch it regardless. Both work.
I must admit this is cheaper than the $487 Proto puller set.... But then again I have had mine for the last 30 years and it was used when I got it. Only cost me like $20 in a barter trade agreement. Good tools taken care of, last.
Thanks
John
2005 Ford F350 Super Duty, 4x4; 6.8L V10 with 4.10 RA, 21,000 GCWR, 11,000 GVWR, upgraded 2 1/2" Towbeast Receiver. Hitched with a 1,700# Reese HP WD, HP Dual Cam to a 2004 Sunline Solaris T310R travel trailer.


